Macaw Overview
Macaw is an enterprise grade prescriptive Microservices platform. Macaw provides a comprehensive toolset, many built-in core services, CI/CD integrations, management & operational capabilities, and cloud agnostic deployment to accelerate the enterprise cloud native journey.
- API modeling in JSON or YANG and Swagger documentation for Microservices, or a collection of Microservices called blueprints.
- Codegen, build and publish toolset for Microservice development. Java, Javascript language for service implementation, with further language support coming in the future.
- Several built-in core, essential services like database (Cassandra, MySQL), logging (Elasticsearch), identity with multi-tenancy, etc. for rapid application development and a focus on business logic.
- Microservice metadata allows for standardization, auditing, policy enforcement, and service discovery & provisioning. Microservice tag identifies a specific code commit and can be used for release/sprint progression, staging or production usage.
- Macaw microservices are packaged as Docker containers. MDR (Meta Data Repository) holds the service blueprints, Metadata information, available Docker tags for a specific service. Docker registry holds service container images.
- Macaw service catalog serves as a marketplace and presents Microservices that are available in selected MDR/Docker repositories, which can be private, shared or public.
- Macaw provides Macaw CLI and a graphical web-based console to deploy, scale, and administer (monitor, troubleshoot) the platform and microservices. Message co-relation and event visualization serve as essential troubleshooting and analytics tools.
- From a runtime standpoint, Macaw is a distributed application running on top of one or more standalone Docker nodes that host Macaw microservices. Messaging, routing, and load balancing among the nodes and services are achieved using Kafka & Zookeeper over SSL. Front-end UI messages are load balanced through HAProxy. For service-level resiliency, Macaw creates multiple instances of a Microservice and operates it as a cluster using its native placement, load balancing algorithm.
- Macaw can be configured to send container placement requests to a resource scheduler like Kubernetes or Docker Swarm, which will assume responsibility of container placement and high availability.
- Macaw offers several installation choices. For on-premise, Macaw can be installed on the developer’s machine (Mac/PC/Linux) using Vagrant and VirtualBox, or on VMware vSphere. For cloud, Macaw AMIs are available on AWS Cloud. For other clouds, Macaw can be installed on top of CentOS-based Linux nodes using installer scripts.
Key Features
- Multi-Cloud Support: Runs on any cloud, public or private, and support on most on-premises infrastructure platforms.
- Container ready: Built-in support for standard container formats like Docker, making it easy to build, compose, deploy and move your workloads easily.
- Built-in security and scalability: Enterprises can define fine-grained policies for access management, scaling, and other life cycle management operations that encourages the platform natively support them. Its built-in workflow manager can be used to embed approval steps where required to provide an additional layer of controls.
- Multi-Tenancy: Service providers and the Enterprise can achieve clear isolation and assure autonomy by enforcing policies at the tenant, project, user, or service levels.
- Self-governance: Built on the core principle of providing pervasive governance to ensure consistent operational behavior from availability, performance, compliance, and a security point of view is provided.
- Blueprint support: Developers and architects can group services into a logical entity called Blueprint with common scaling policies and access controls. Once modeled these blueprints can be used to deploy the group of services with a single click and manage the life cycle as per the policies specified.
- DevOps Console: Microservices-based applications are dynamic in nature and Macaw DevOps console can help developers and operations team deploy and monitor their runtime behavior for easy troubleshooting.
- Application Modernization: Traditional applications can be transformed without any major disruption to embrace the principle of cloud-native applications. Macaw allows gradual migration to Microservices by leveraging the middleware support or shadow services to maintain integration with the legacy systems.
- Curated stack of open source technologies: The platform is built using the best of breed open source technologies including Kafka, Zookeeper, Spark, Cassandra, Docker, Swarm, Elastic Search among others. These technologies provide the scalability, multi-tenancy, and robustness enterprises demand. Further enhancement with automation and governance features simplify usage for DevOps functions.
Architecture

Key Components
Service Infrastructure: Macaw’s set of core capabilities that provide a solid foundation of both services and platform.
- Message Bus: Distributed Kafka & Zookeeper over SSL running on multiple container nodes, used dually for internal and external messaging between microservices.
- Logging & Search: Logging as a service provides centralized logging capabilities leveraging Elasticsearch.
- DBaaS: Utilize Cassandra and MySQL database as services. Macaw covers the DB lifecycle, including init data, schema loading, loading DB drivers, and automatically mapping and building dependencies for service/container images.
- Message Correlator: All user-generated API request chains are fully traceable and correlated through message ID and can be viewed in the DevOps console events widget. Serves effectively for troubleshooting plus acts as an analytics tool to build social service graphs.
- Analytics: Yields essential intelligence about service operational behavior like service performance, life cycle events, usage stats, etc. through native analytics as well as pluggable external analytics providers like Apache Spark and more.
Macaw Runtime: Macaw platform core runtime is polyglot with support for multiple languages including Java, Javascript, Python etc.
Core Services: Macaw platform capabilities (i.e. service discovery, registry, provisioner, etc.) that are integral in a Microservices-based architecture.
- Service Registry: All Macaw microservices register with a centralized Service Registry regarding service listing, service lookups, and interactions among services or with external clients.
- Service Provisioner: Provisions any service on a Macaw node based on native placement and a load balancing algorithm. Configurable also to provision service on external container clusters through resource schedulers like Kubernetes or Docker Swarm
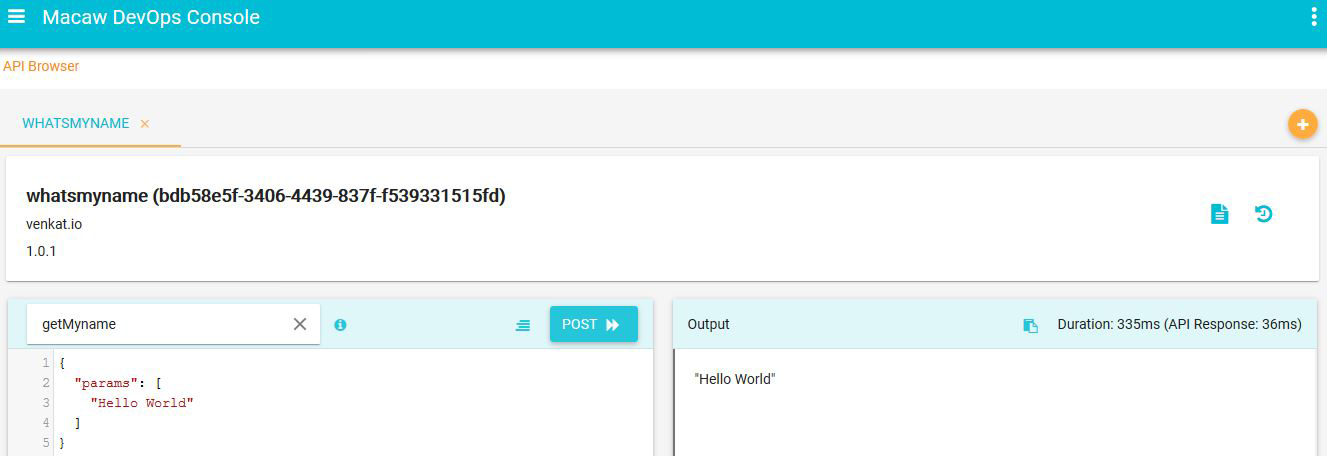
- API Gateway: Aggregates all Macaw microservices APIs as RESTful API endpoints and provides API browser, invocation capabilities through the DevOps console.
- Blueprints: Collection of related Macaw microservices along with their operational, placement, and deployment policies together constitute Macaw blueprint.
Advanced Services: Premium services consisting of additional applications that run on Macaw platform.
- Locker: A secure way to store and access credentials using multi-level encryptions and advanced security principles similar to that of popular cloud providers.
- Identity: Identity services to other Macaw microservices equipped with knowledge of all users, orgs, tenants.
- Service Governance: Service migration-based on load or behavior, service access governance-based on policies, approval injections at platform level are some of the capabilities provided by Service Governance
- Notification Manager: Responsible for sending notifications to interested clients about service lifecycle events.
Multi-Tenancy: Supports multiple tenants to operate on a single instance of Macaw platform through support for tenants, projects, users and roles.
Service Operations: Macaw catalog services that integrate with external applications to enhance the operational behavior of macaw applicationss.
- APM: Allows Macaw microservices to be monitored through existing APM tools by serving Macaw service data to target APM tools.
- Ticketing: Allows Macaw microservices to create/update/delete tickets in a target ticketing system-based on certain service lifecycle events.
- Shadow Services: Integration with legacy systems and external applications to bring them into Macaw’s operational environment to streamline the application modernization process.
Images & Repositories: Macaw microservices are packaged as Docker containers. MDR (Meta Data Repository) holds the service blueprints, Metadata information with available Docker tags for a specific service. Docker registry holds service container images.
CI/CD Plugins: Integration with CI/CD tools for accelerated release and feature velocity.
IDE Plugins: Improves developer productivity by providing plug-ins and project configuration files for popular IDEs like Eclipse.
Developer Toolset: A set of essential tools to accelerate service development and increase developer productivity.
- Modeling: Capture API model in YANG or JSON and Swagger documentation.
- Codegen: Generates Java artifacts such as public interfaces and class stubs.
- Build: Build entire Microservices and automatically build service and container images.
- Publish: CLI utilities to easily publish a Microservice to repository using an image tag.
Access and Administrative Interfaces: Macaw can be accessed and administered in multiple ways.
- DevOps Console: A slick web-based HTML 5 interface for DevOps professionals to operate Macaw microservices and the platform.
- Macaw CLI: CLI-based interface for platform and service operations.
- API Gateway: API-based service interactions and administrations suitable for automation and integrations with external tools.
Infrastructure: Infrastructure integration, management and orchestration layers allow Macaw to operate on various IaaS/Cloud platforms including BareMetal, VM, Cloud, or a developer laptop.
Detailed Installation
Terminology and Definitions
Before proceeding with installation, refer to the details listed below to directly understand Macaw’s terminologies and supported installation configurations.
Terminologies
In the installation documentation, the following terminologies are used. Comprehension of the terminologies, what they mean, and what role they play in the overall Macaw platform is crucial to the installation process.
| Type/VM | Purpose | Processes/Services |
| Macaw Infrastructure Services
Platform VM |
Macaw’s infrastructure layer provides the DB access, indexing/search capabilities, and service communication infrastructure. These are mandatory core infra services. | Zookeeper Kafka MYSQL Cassandra Elasticsearch Redis Tomcat |
| Macaw Platform Services
Platform VM |
Macaw platform layer includes the core essential foundation services. These platform services are shared across all tenants and provides critical services like Identity Management, Encryption/Decryption services for critical data, Provisioner for deploying microservices, Services Registry etc. These are mandatory core platform services. | Service Registry Notification Manager Identity Service Service Provisioner |
| Macaw ADPM Services (Performance Monitoring)
Platform VM |
Macaw platform provides performance monitoring capabilities for the deployed microservices. To enable the performance monitoring capability, optional performance monitoring services need to be installed. These services are optional and needs to be installed only if performance monitoring features are needed. | macaw-apm-agent macaw-apm-collector |
| MACAW Services
Service VM |
Macaw Services include various microservices and can be deployed on the Service Host. Services Hosts are logically grouped under an environment. You can have multiple environments with different services hosts and during provisioning user can select a specific environment for deployment. | Developed Microservices |
| Macaw Tools
Platform VM |
Macaw Tools are light weight containers providing the MDR (Meta Data Repository) and Docker Registry functionality. These are needed to publish and deploy user developed microservices.
Note: Docker Registry is installed from Central Docker and the version used is 2.3.1. For production deployments it is highly recommended to deploy and configure tools on a separate host. |
macaw-mdr docker-registry |
Environment Preparation
VMWare OVF
Platform VM and Service VM can be deployed as OVFs. In preparation to deploy the OVFs, keep the IP Addresses, Gateway, Netmask, DNS, NTP, and Hostname details for each VM handy. It is extremely important to have DNS mapping for the hostnames and all nodes to be timed synced with NTP.
Note: Macaw delivered OVFs are compatible with VMware vSphere 5.1 and above.
Prerequisites to deploy OVF’s are as follows.
| Macaw Platform VM | Macaw Services VM | |
| Operating System | CentOS 7.3.1611 (Core) | CentOS 7.3.1611 (Core) |
| RAM(GB) | 24 | 16 |
| vCPU | 8 | 8 |
| NICs | 1 | 1 |
| IP Address | IP, Subnet, Gateway,DNS | IP, Subnet, Gateway,DNS |
| NTP | NTP Server | NTP Server |
| Hostname | DNS Resolvable Hostname |
DNS Resolvable Hostname |
| OS | Tools Needed |
| Windows/Linux | 7z Utility |
| VMware vSphere | 5.1 or above |
| VMWare vSphere Client | 5.1 or above |
Note: For the rest of the document, the nodes will be referred to as displayed here (using the following convention to qualify the context):
Macaw Platform VM – platform.domain.com
Macaw Service VM – service.domain.com
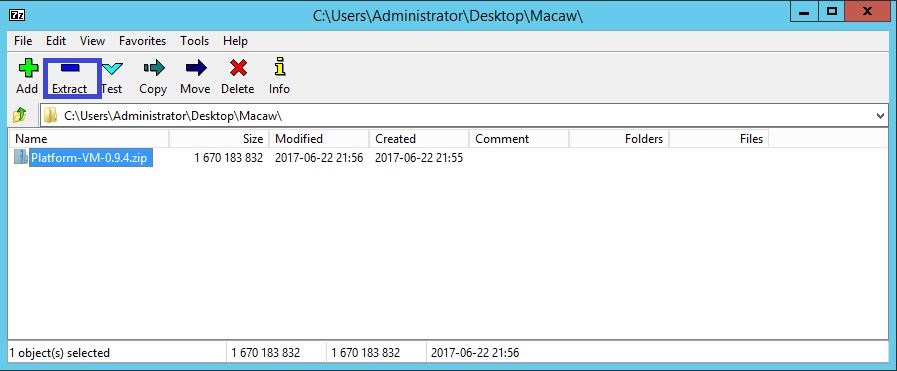
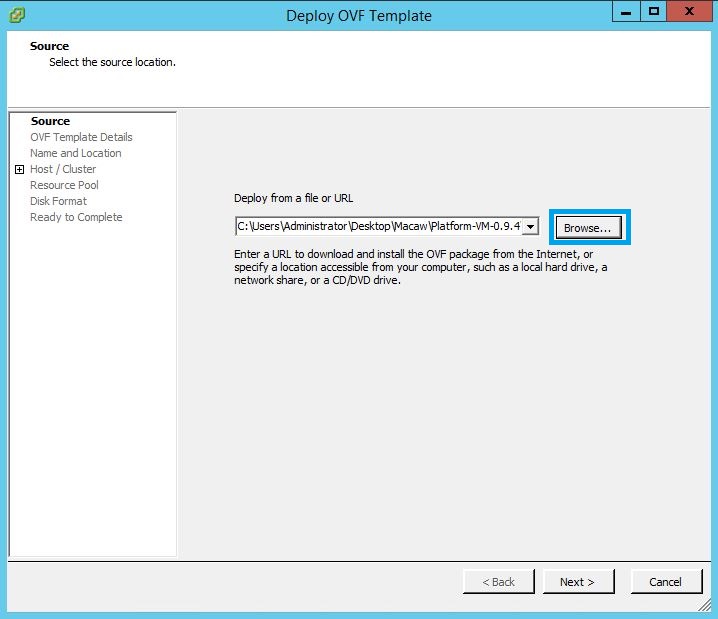
3.1 Two VMware OVFs are delivered as a part of deliverables:
- Platform-VM-0.9.4.zip (Macaw Platform VM in OVF Format)
- Services-VM-0.9.4.zip (Macaw Services VM in OVF Format)
3.2 Download of OVFs
Download the OVFs using the following URLs (contact POC or Support contact at support@www.macaw.io) onto a machine where the vSphere client is available (e.g Windows box where the VMWare vSphere client/environment will be accessible to deploy the above downloaded OVFs.).
Platform OVF: <URL>
Services OVF: <URL>
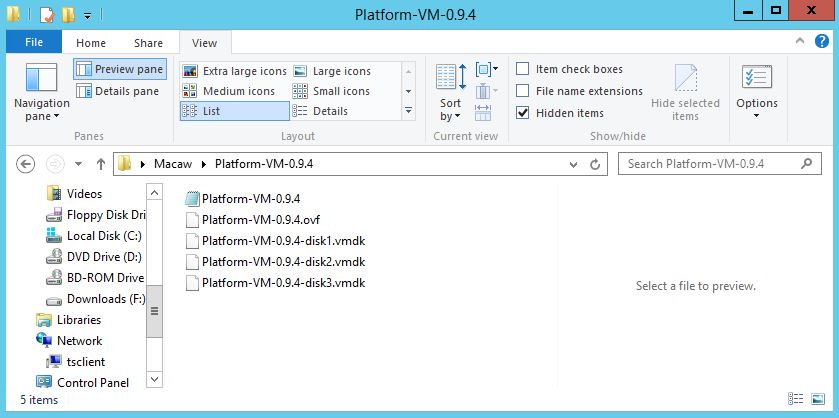
3.3 Extract or Unzip the above downloaded OVF’s using standard unzip utility ( 7z utility ) as depicted in following screen-shots.
3.4 Deploy OVFs using VMware vSphere Client (using wizard):
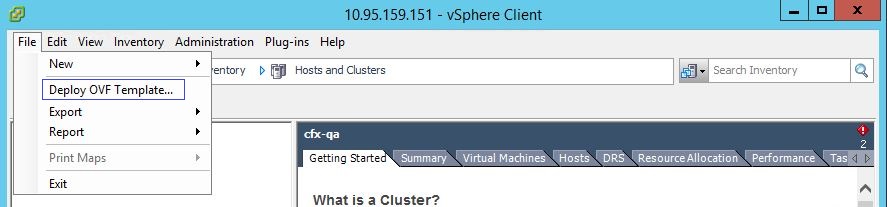
The above step will prompt wizard to deploy the OVF’s. Please make sure you have all the prerequisites before deployment starts
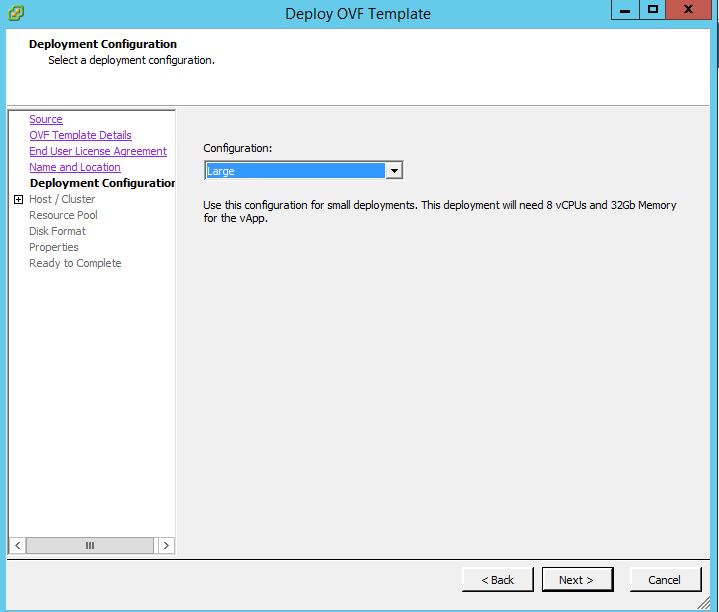
Accept license window and follow the steps,
We have three types of deployments in OVF Configurations Small, Medium and Large .We need to select based on requirements,configuration for production is Large.
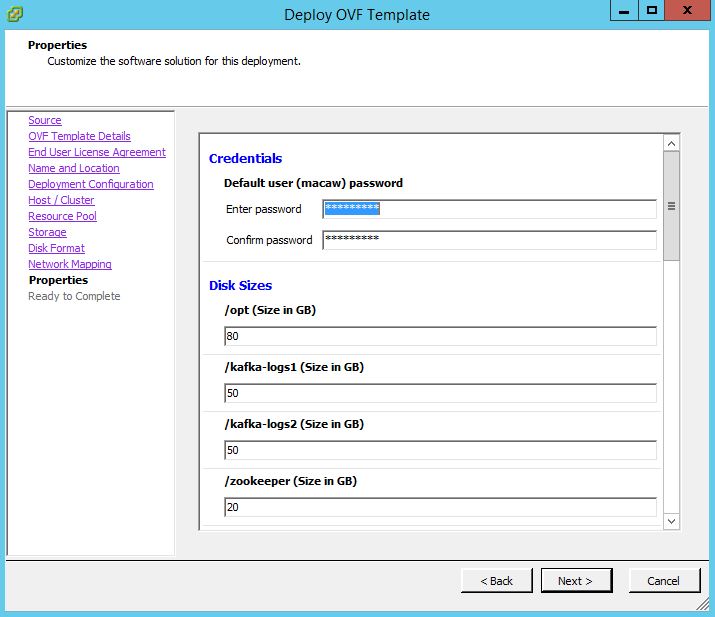
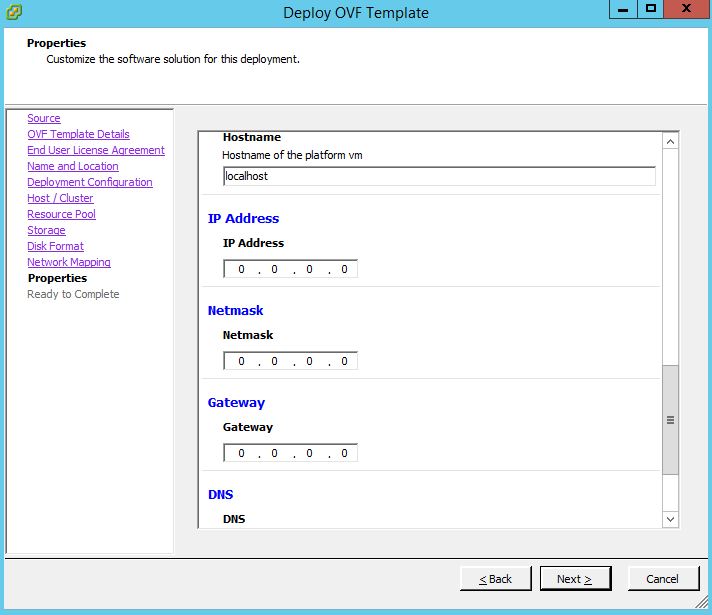
Select the “deploy OVF template” option and wizard will walk through the deployment process. Please make to have the following details ready before deploying the VMs as described in the prerequisite section of the document.
- Cluster: where to deploy these VMs
- Storage: to use for deploying VMs
- Network: to use for deploying VMs (Port Group details reachable to network)
- Hostname, IP Address, Gateway etc) as wizard will prompt to enter those values during the deployment process
3.5 Power On VMs
Once the above step is completed (deployment of OVF templates into vSphere environment is completed using wizard), power on the VMs as shown below.

Once the VM’s are powered on, make sure to access the above VM(s) using the DNS/IP entries (via ping or ssh to connect to the above deployed and configured VMs over the network) that were provided by the user to the VMs during deployment.
3.6 Login Verification of deployed VMs (OVFs):
Verify the login via SSH client of choice to Platform VM and Service VM Nodes with the below credentials.
E.g :-
————————————————————————————-
ssh macaw@platform.domain.com <Enter>
User: macaw<Enter>
Password: appd1234<Enter>
————————————————————————————-
The above will login into Macaw Platform / Service VM shell.
Note: Another user ‘macaw’ belonging to group ‘macaw’ is also defined under whom the infrastructure services would be running. This user doesn’t have any password.
Once the above steps are done, move to the platform installation section.
AWS
Prerequisites
The subsequent instructions assume that AWS is setup with basic or necessary configurations like VPC, Networks etc. Refer to the AWS link below on how to execute an AWS setup for a new account.
Security Group Creation
This section of the document explains how to create the AWS security group for platform and service VMs. Also refer to the AWS Security Group documentation for more details.
- Login to AWS EC2 and select the VPC under Networking.
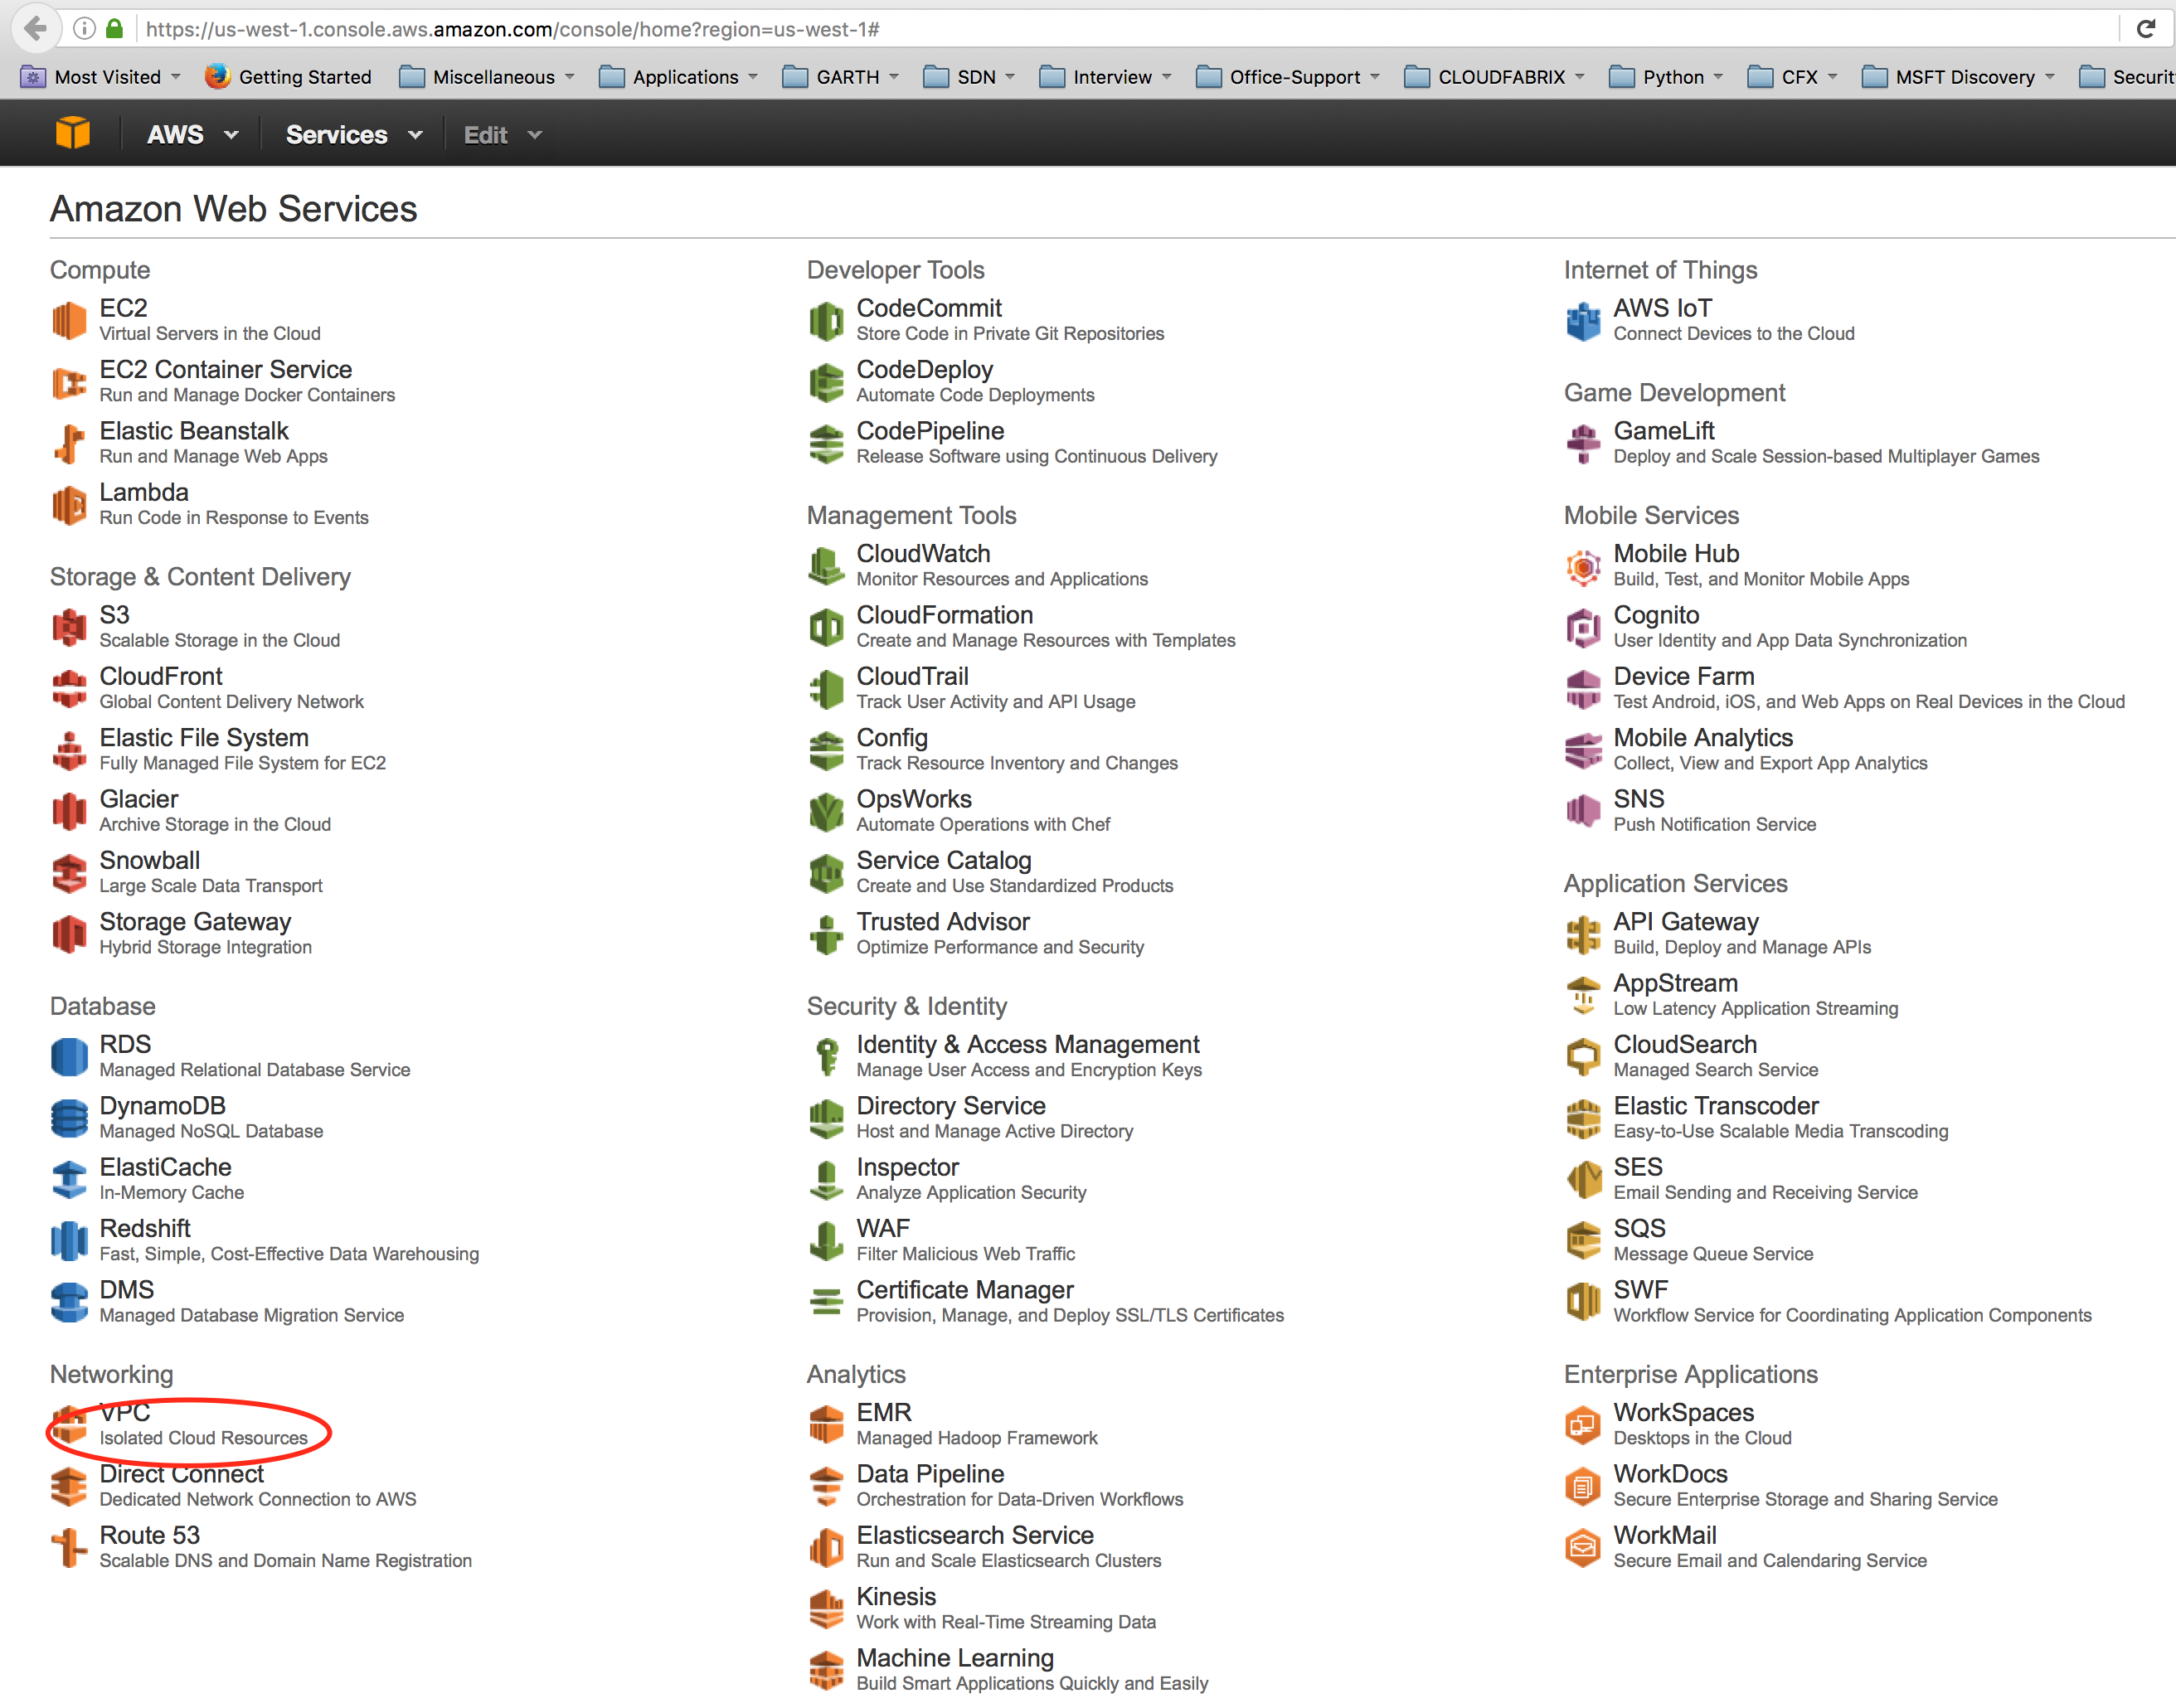
- Select the option Security Groups under the Security.
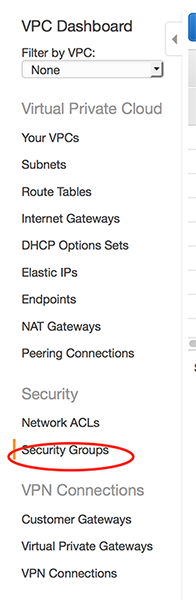
- Click on ‘Create Security Group’ and create the group.
![]()
![]()
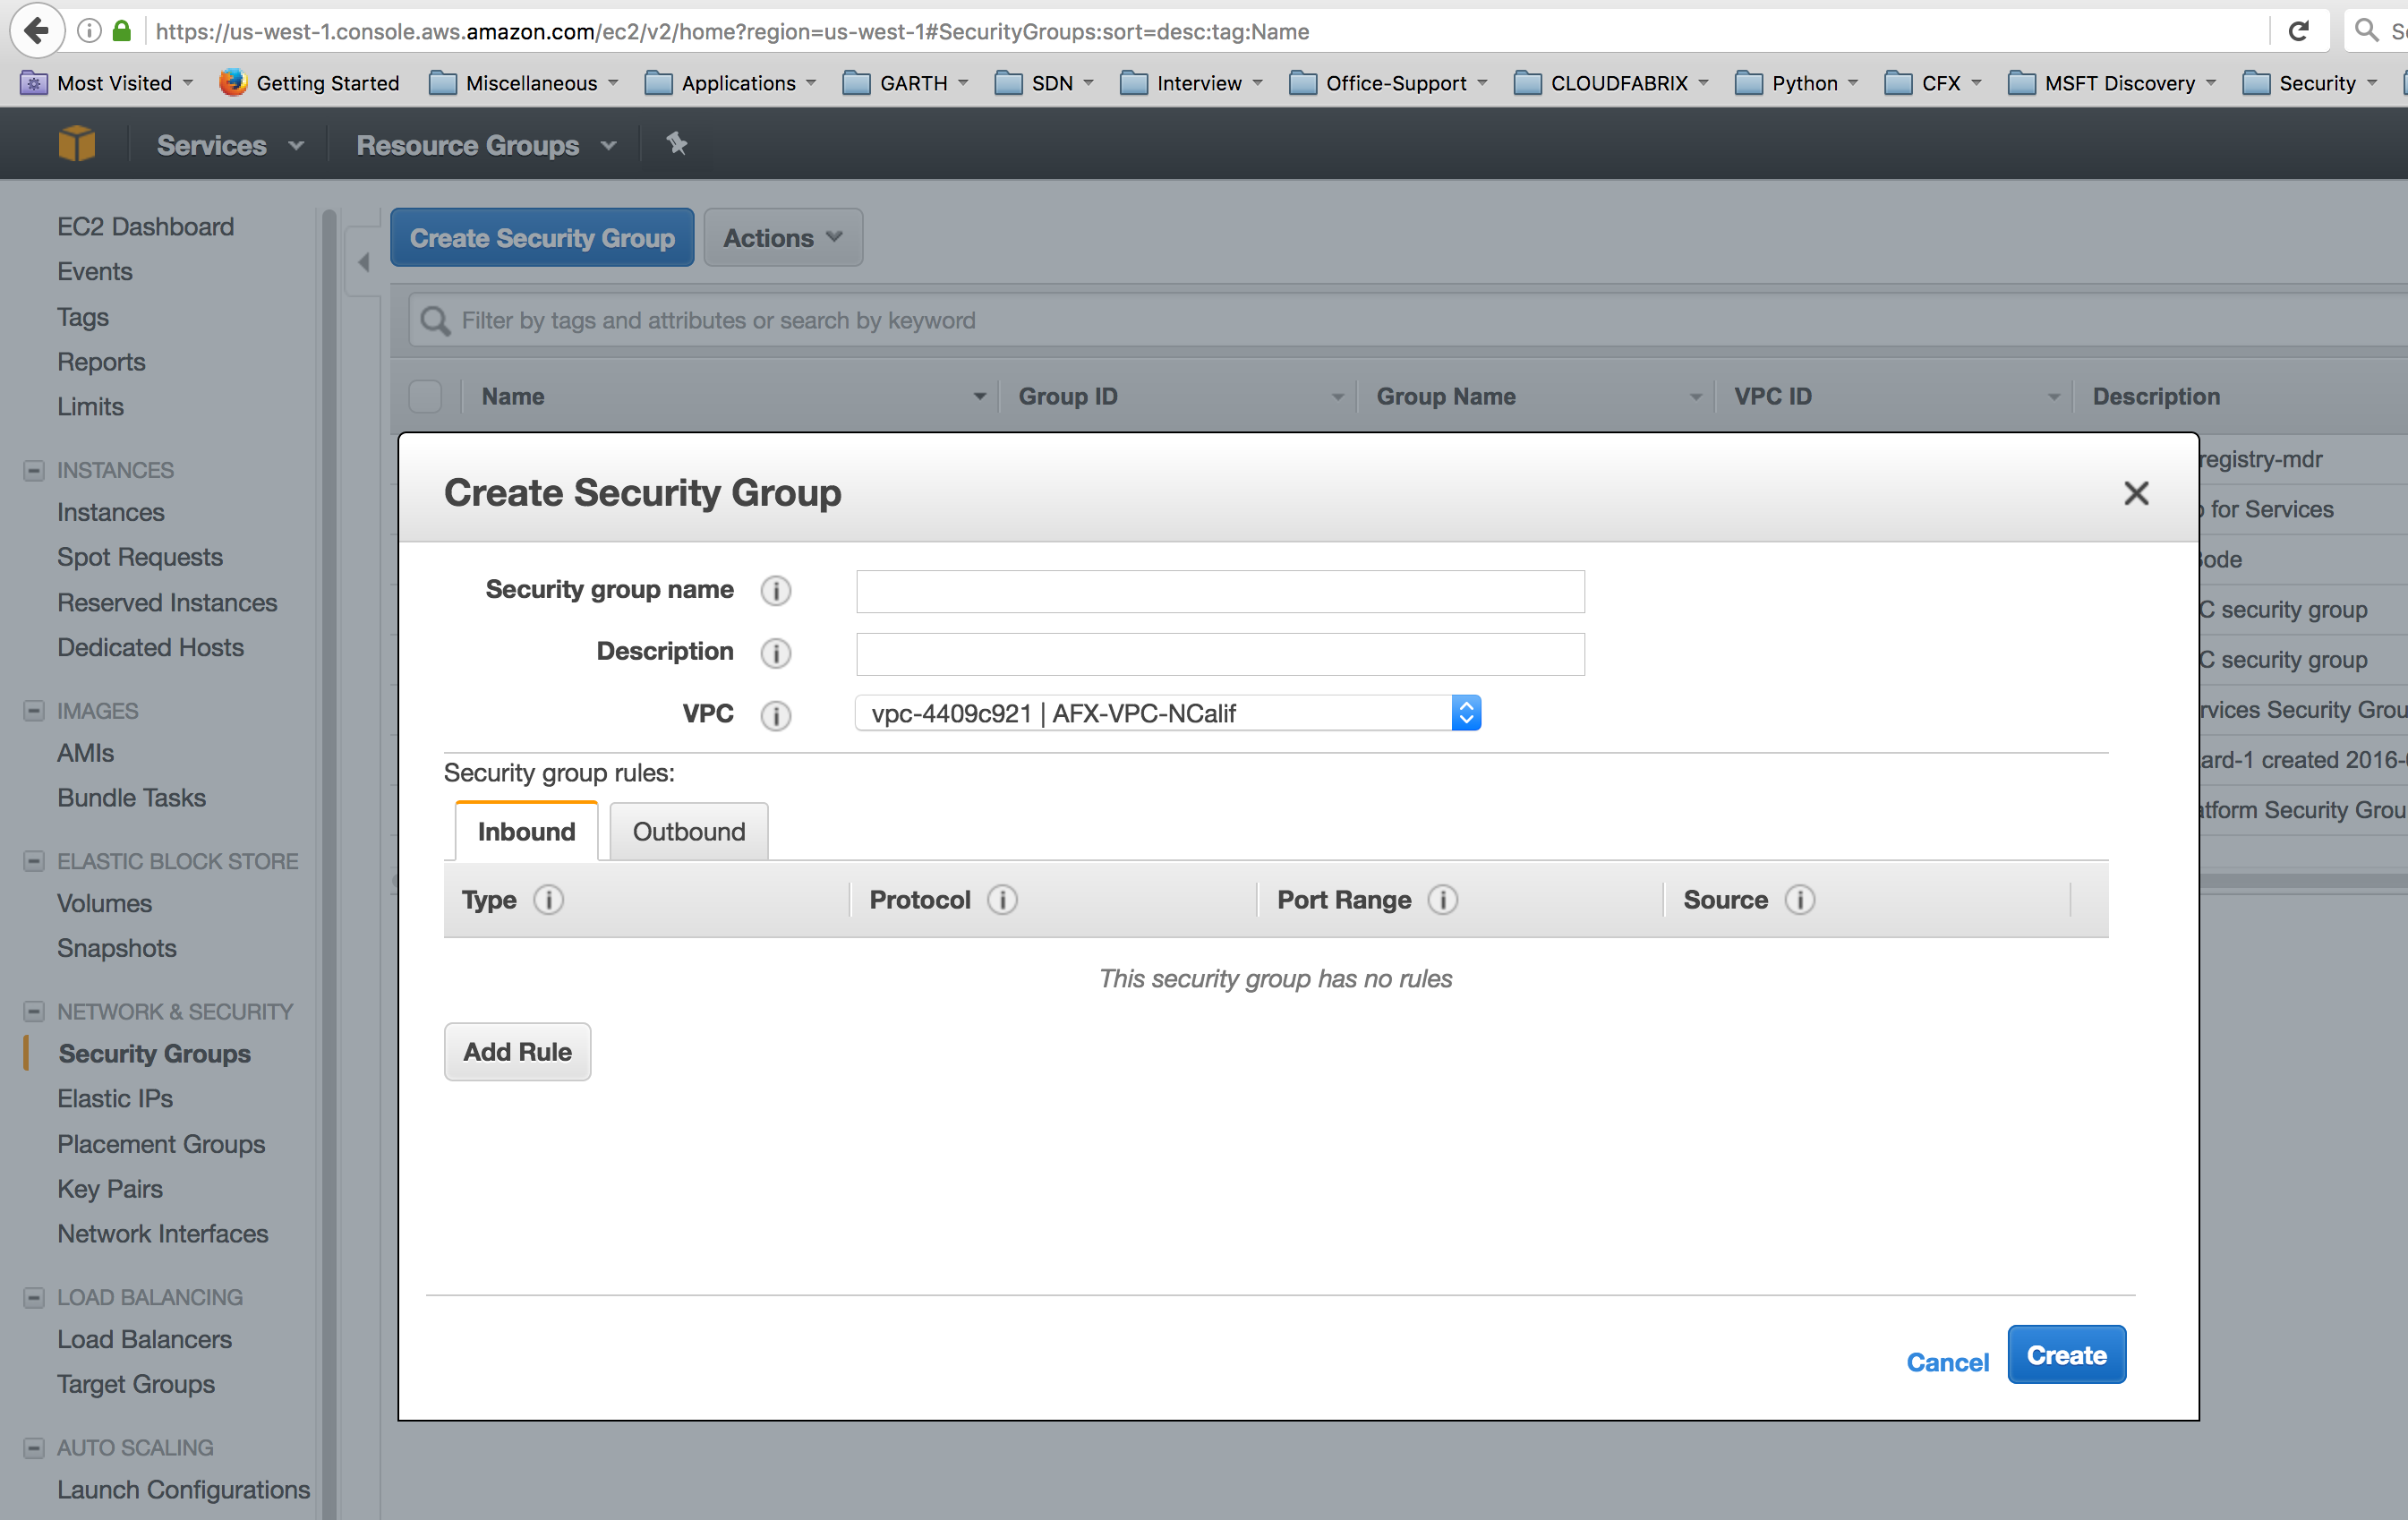
- Provide the Name Tag, Group Name and description. Select the VPC that you want this group to belong to. If you are not sure of the VPC, please check with the administrator of your AWS EC2 cloud account.
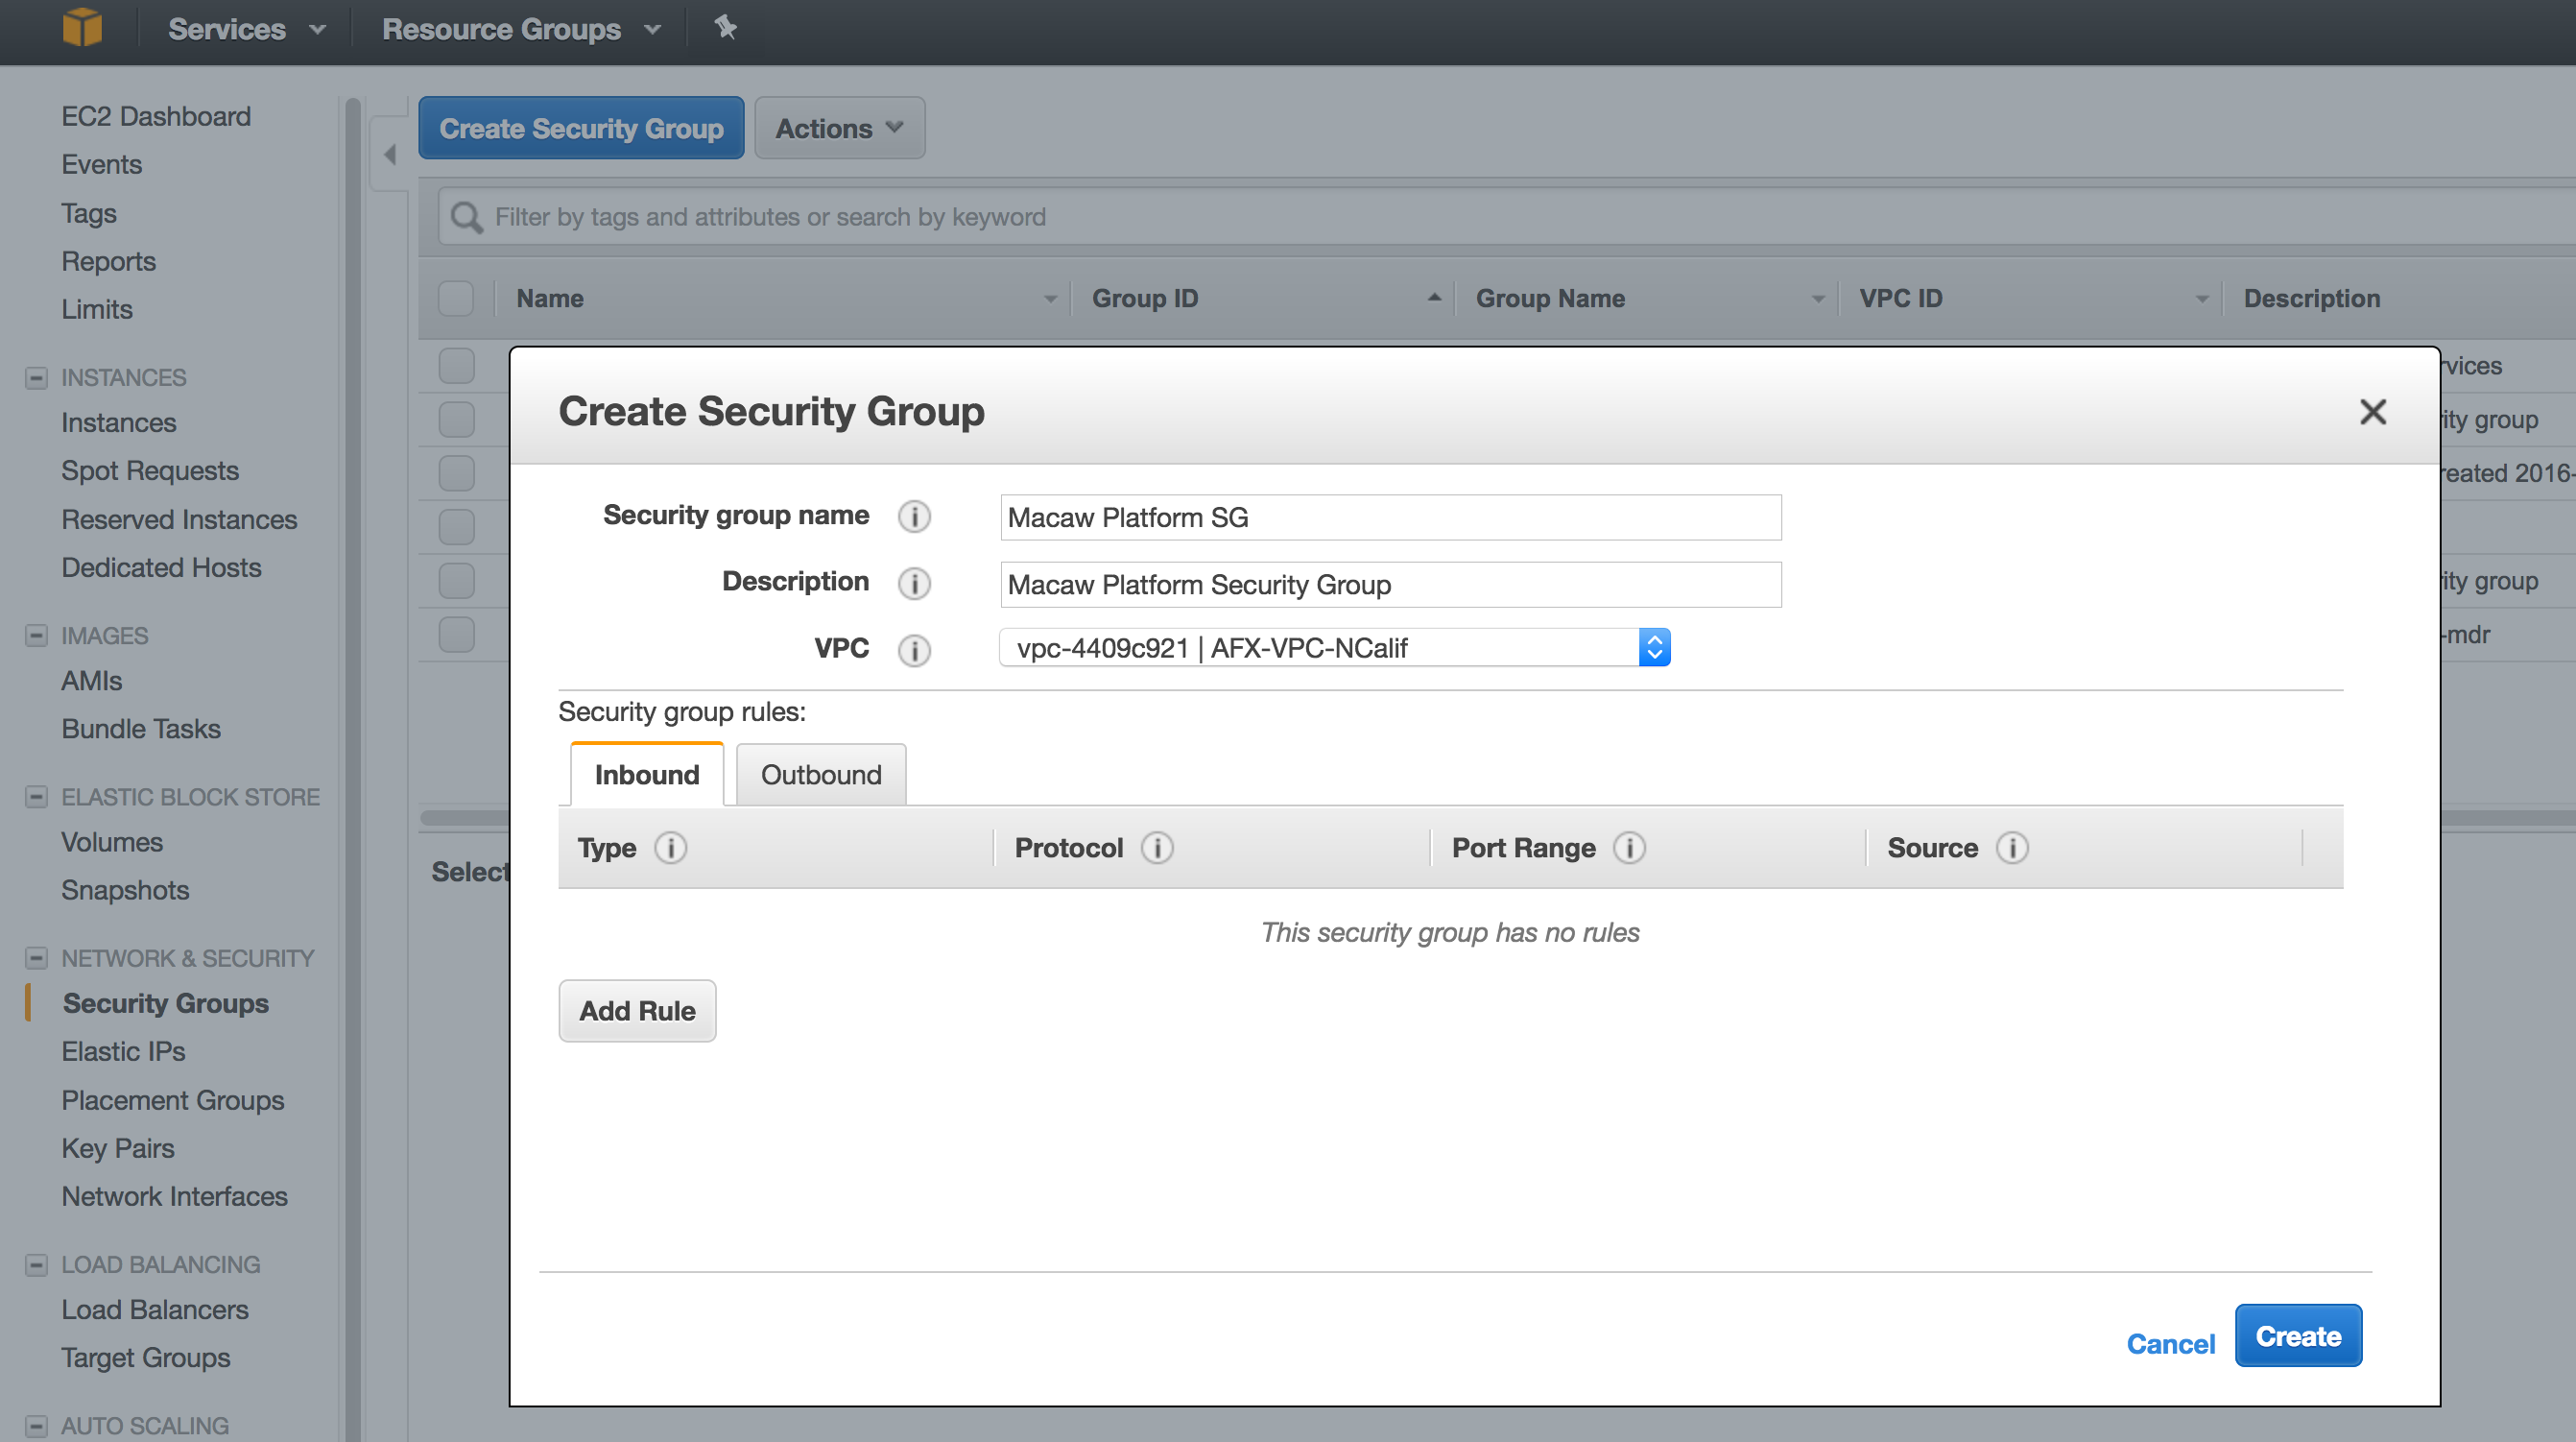
- Now click ‘Create Security Group’ again and create security group for Service Instances.
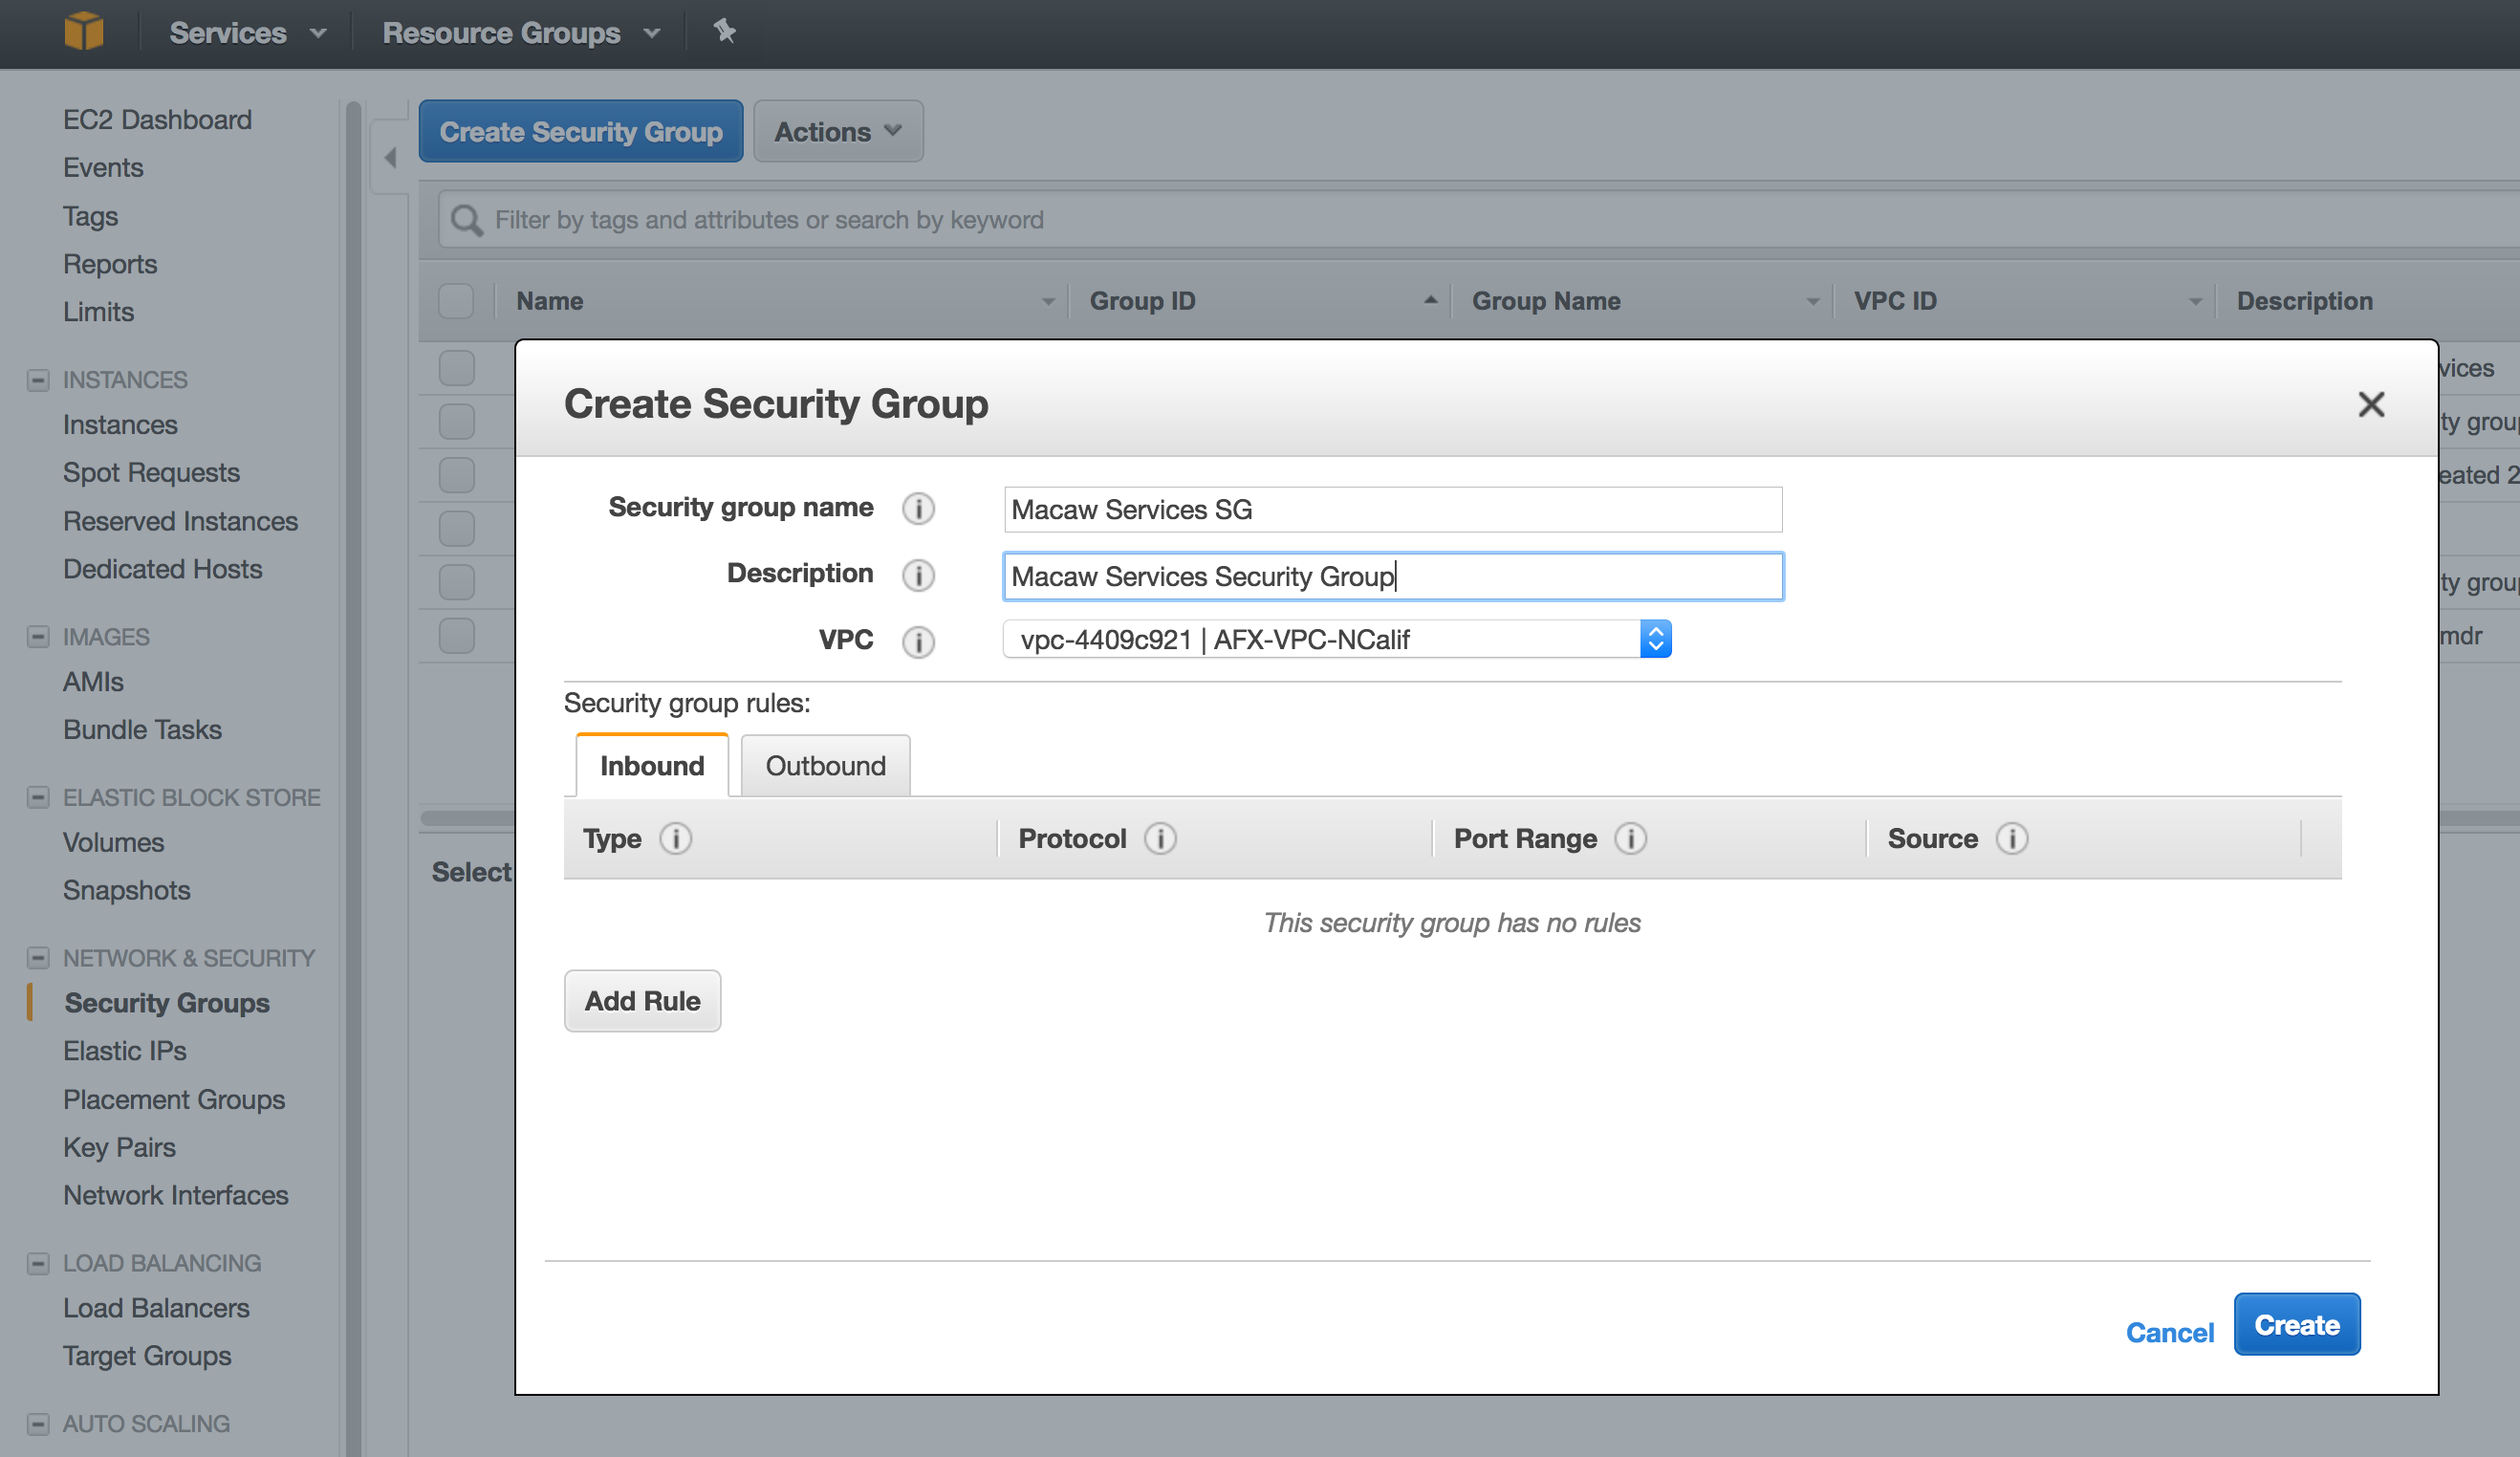
- You should now be seeing 2 security groups: one for platform, one for services like below.

Security Group Configuration
- Select the platform security group created in the previous section and navigate to the Inbound rules. Click on Edit and add the below inbound rules to the platform security group. Once done, click on save.
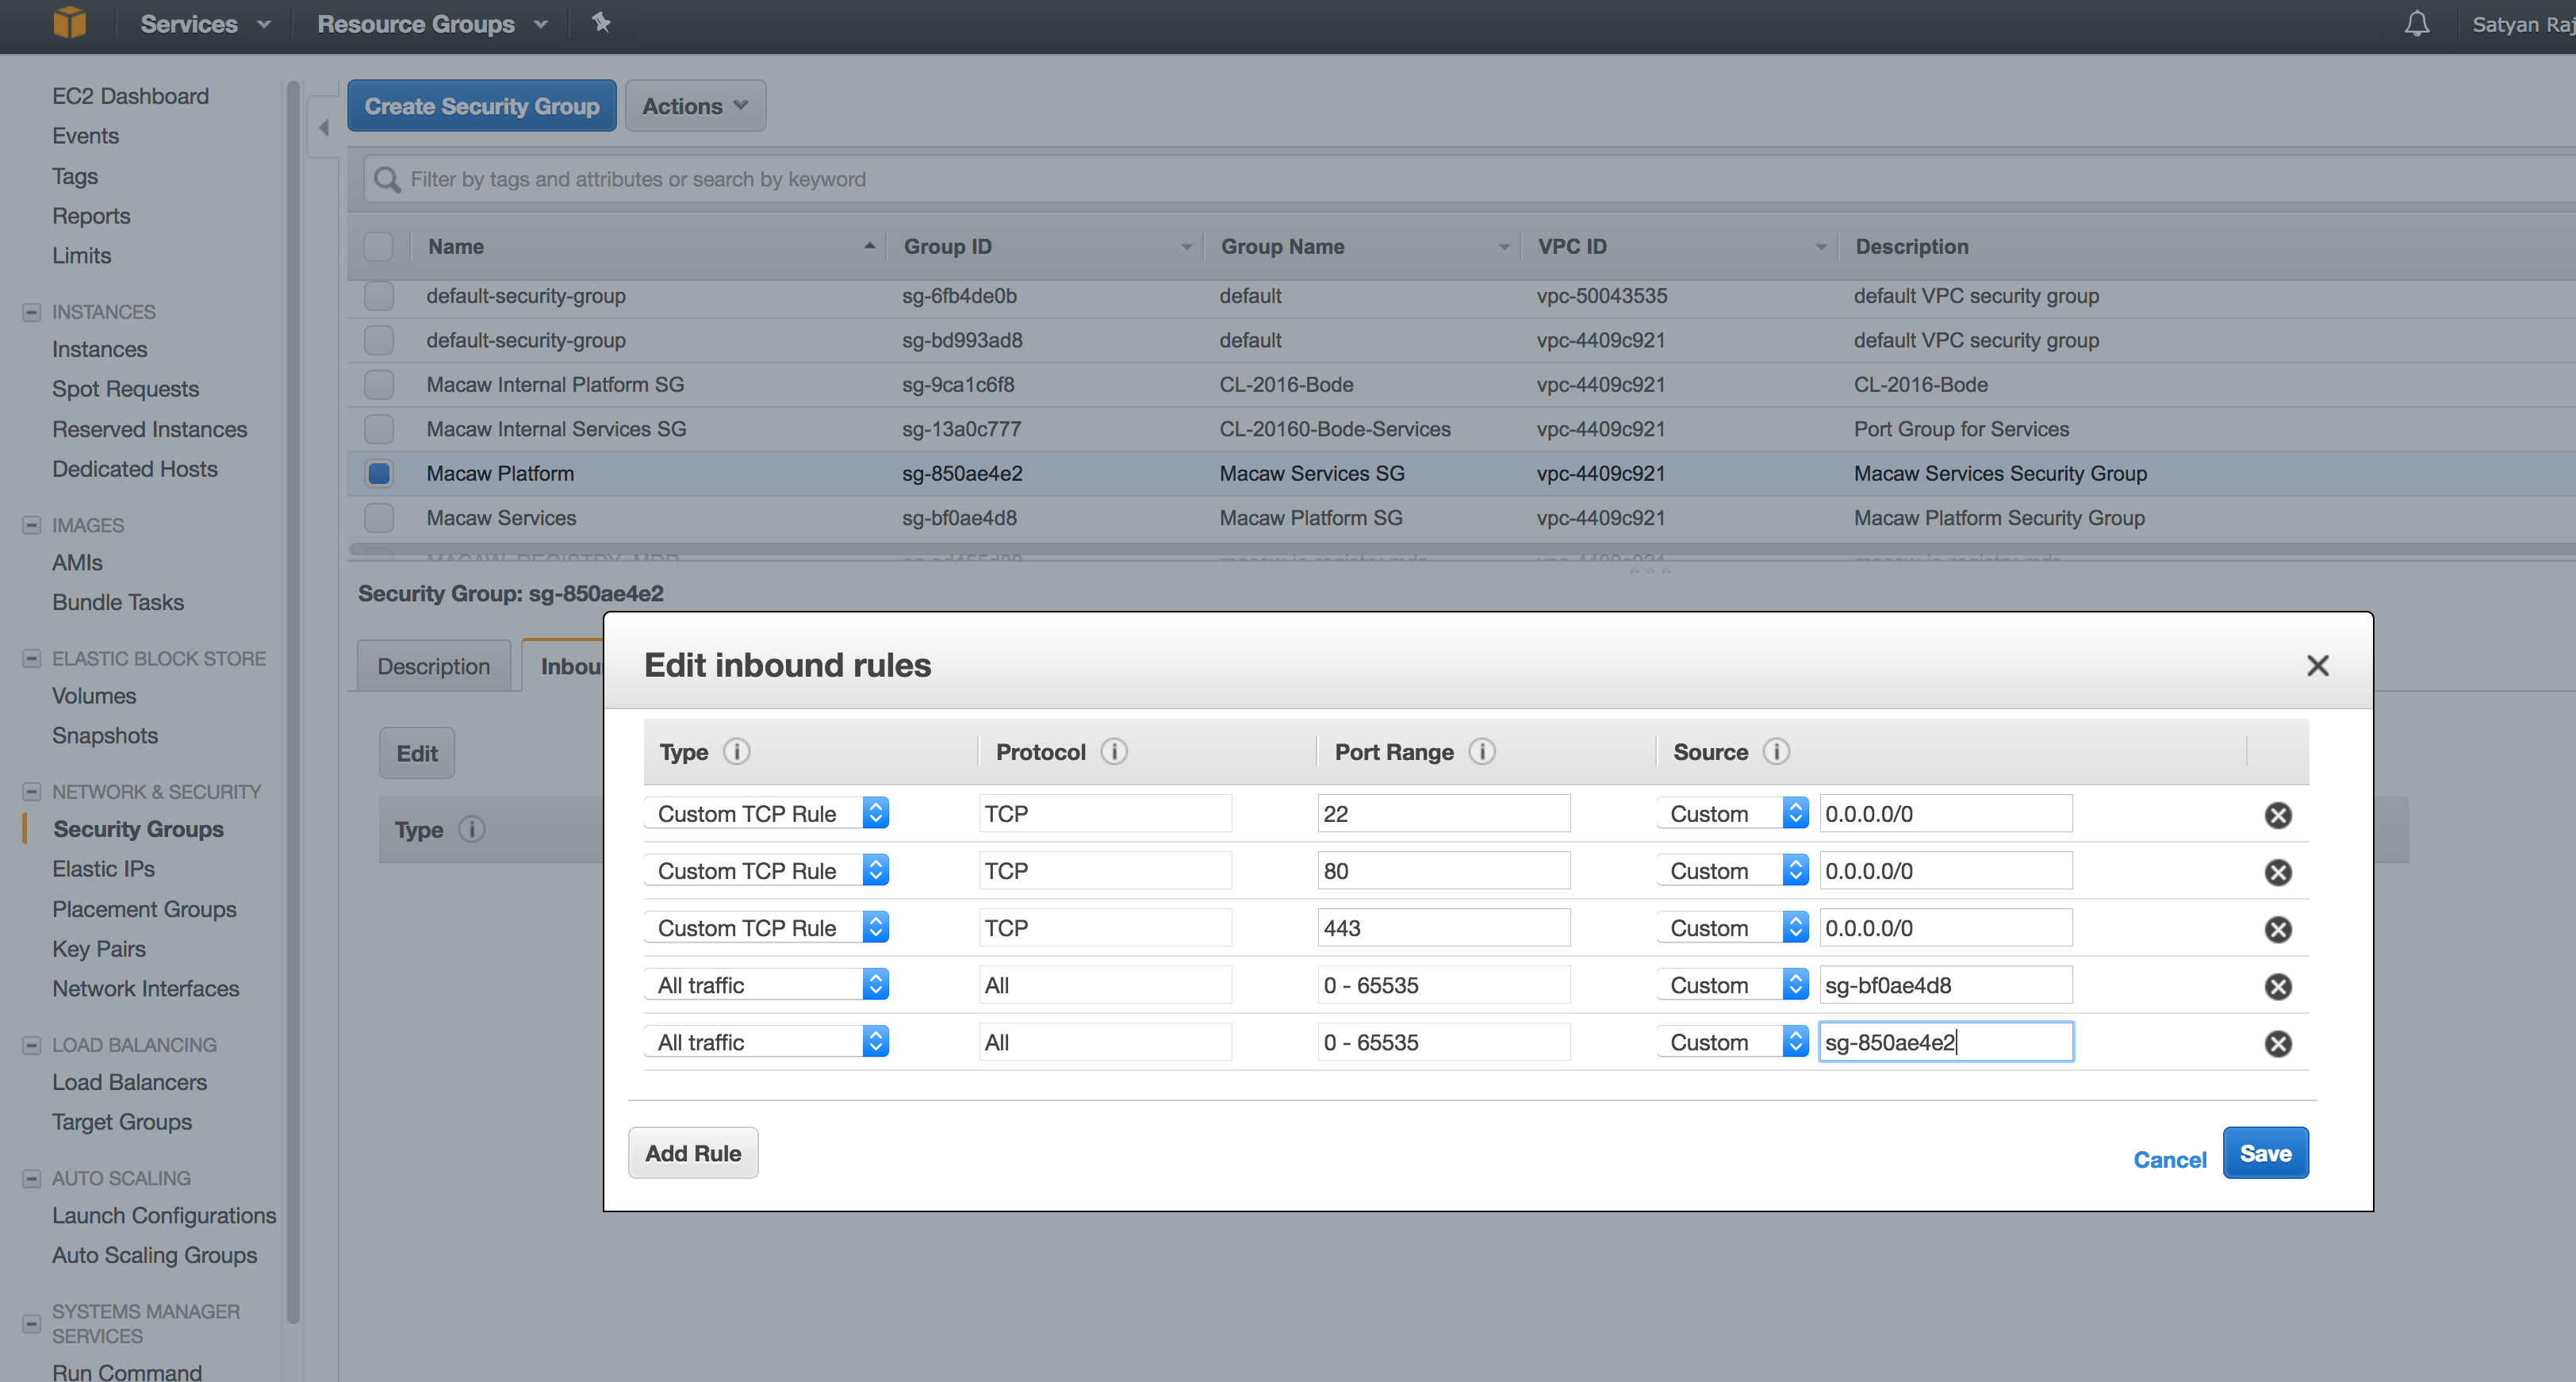
Note:
sg-bf0ae4d8 – In the above rule, this refers to the Platform Security Group ID. This is to allow any traffic between the instances in this group.
sg-850ae4e2 – This refers to the Services Security Group ID. This is to allow any traffic between platform security group and services security group.
HTTP and HTTPS rules – This is to allow HTTPS access to macaw console portal. HTTP is redirected to HTTPS.
Note: If you are installing macaw tools (MDR and Docker Registry), allow the additional TCP ports 8637 and 5000 as well similar to 80/443/22.
- Now select the services security group and add the below rules.
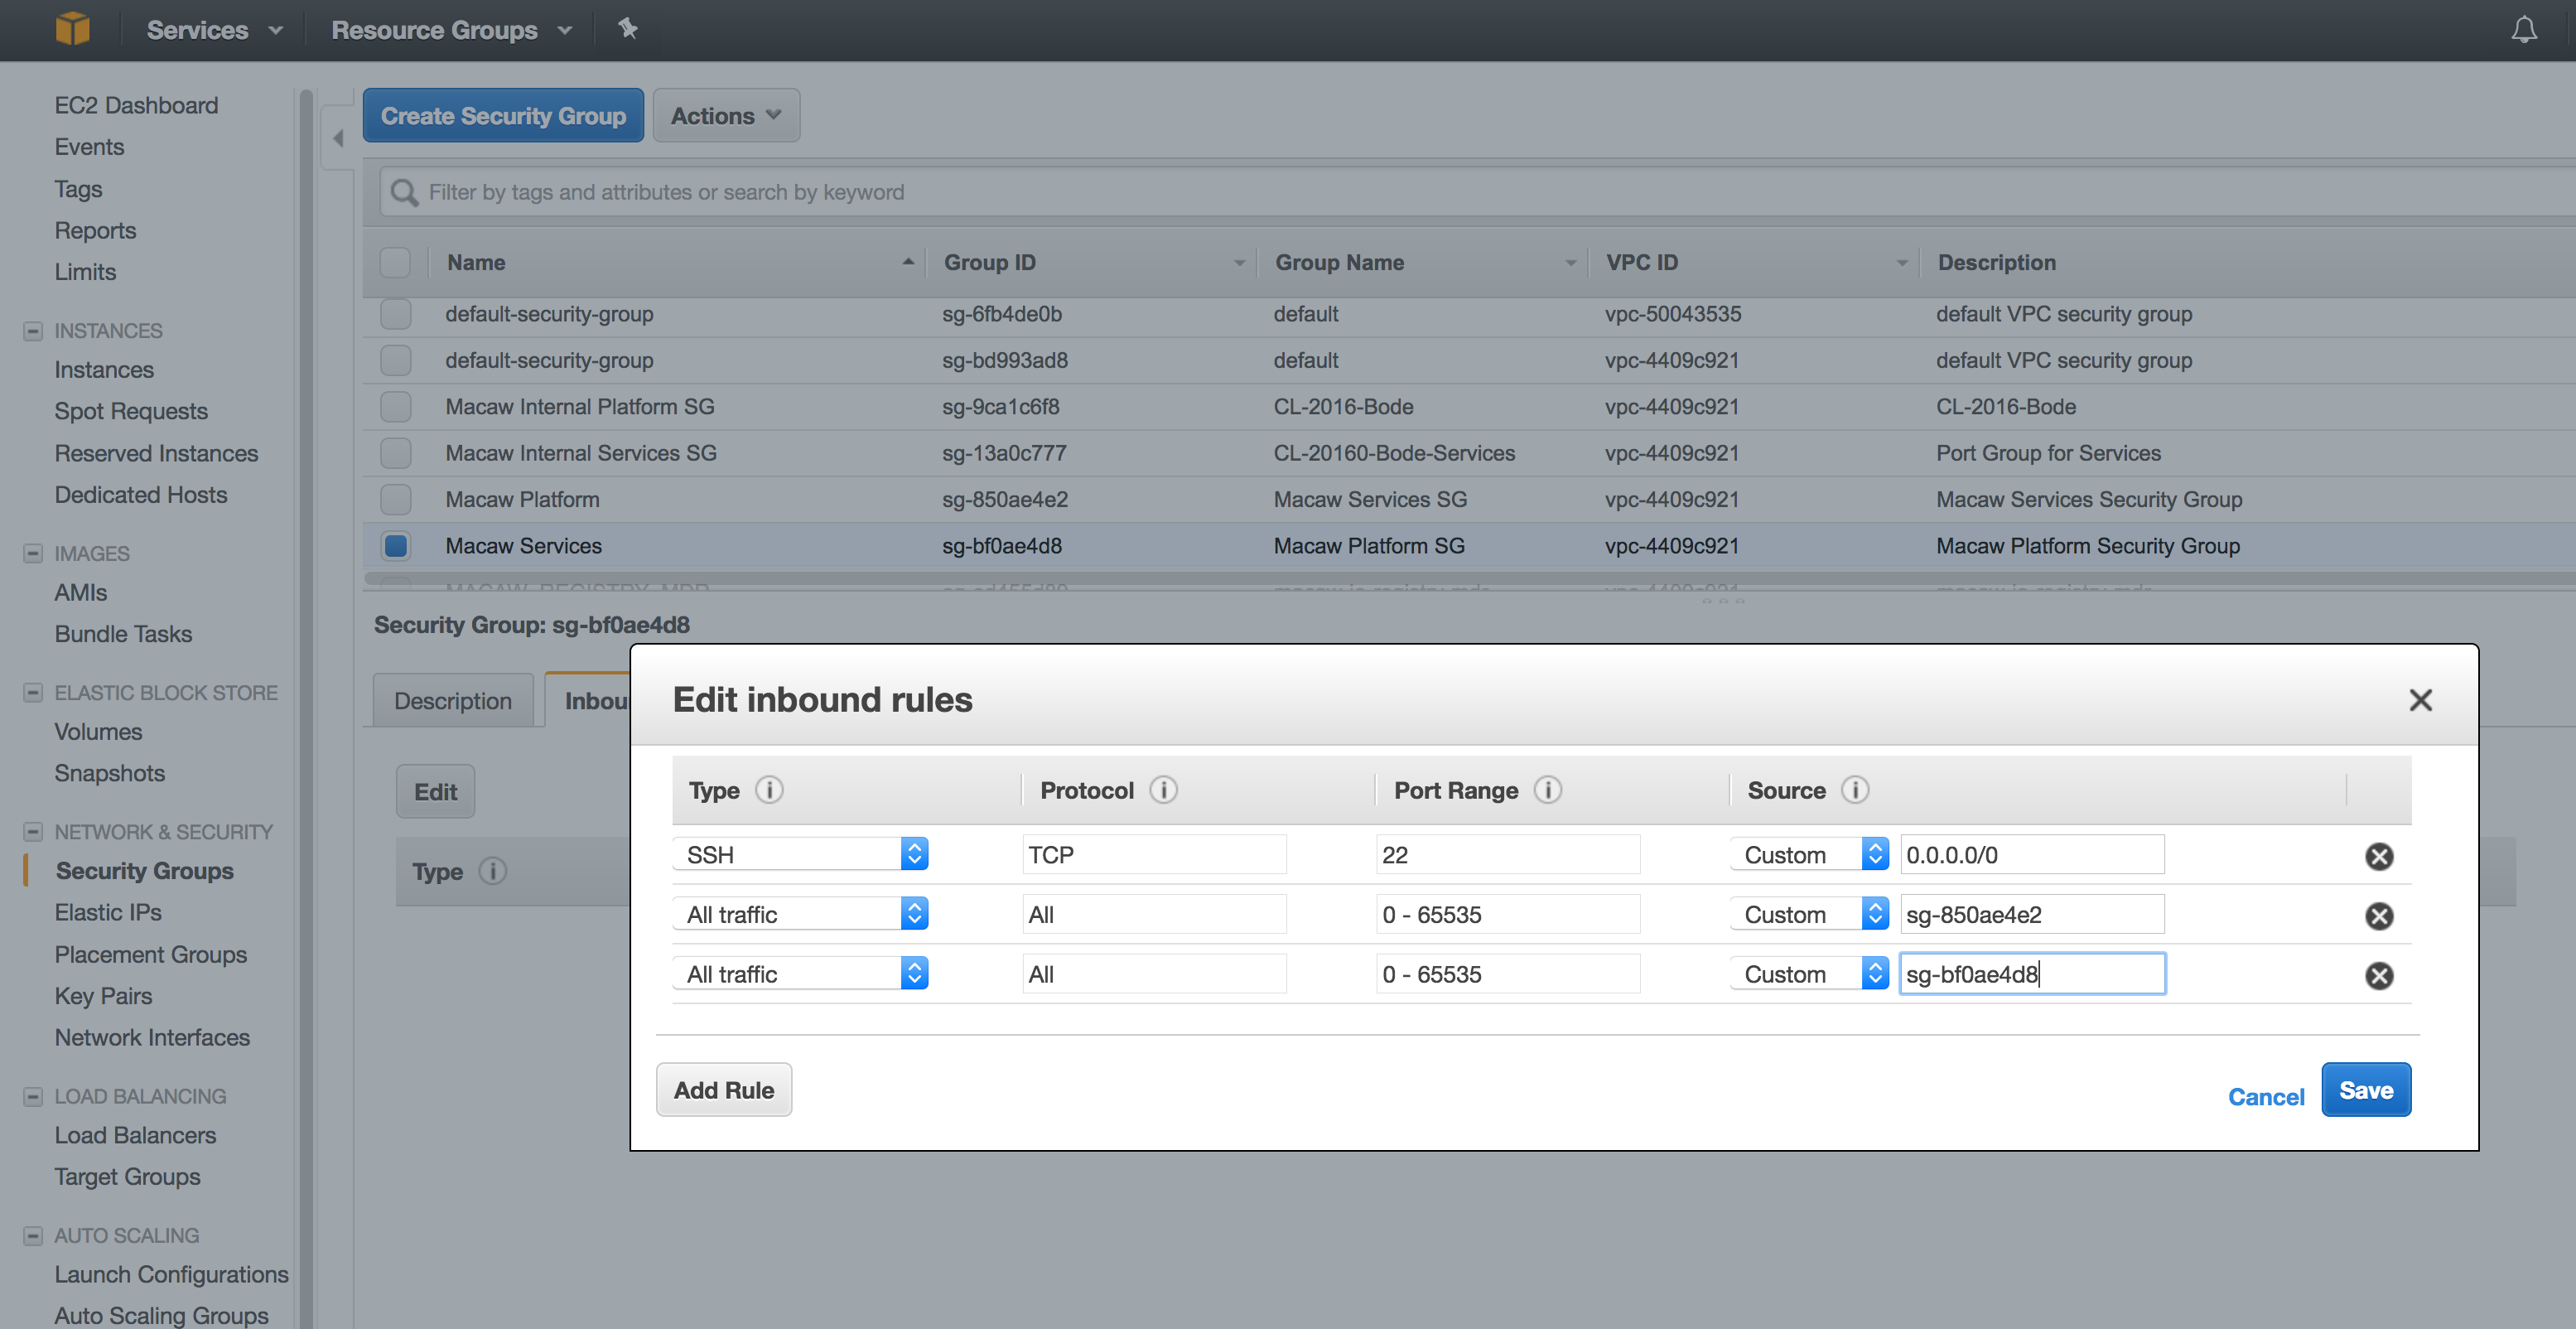
Note:
sg-bf0ae4d8 – In the above rule, this refers to the Platform Security Group ID. This is to allow any traffic between the instances in this group.
sg-850ae4e2 – This refers to the Services Security Group ID. This is to allow any traffic between platform security group and services security group.
Launching Platform Instance
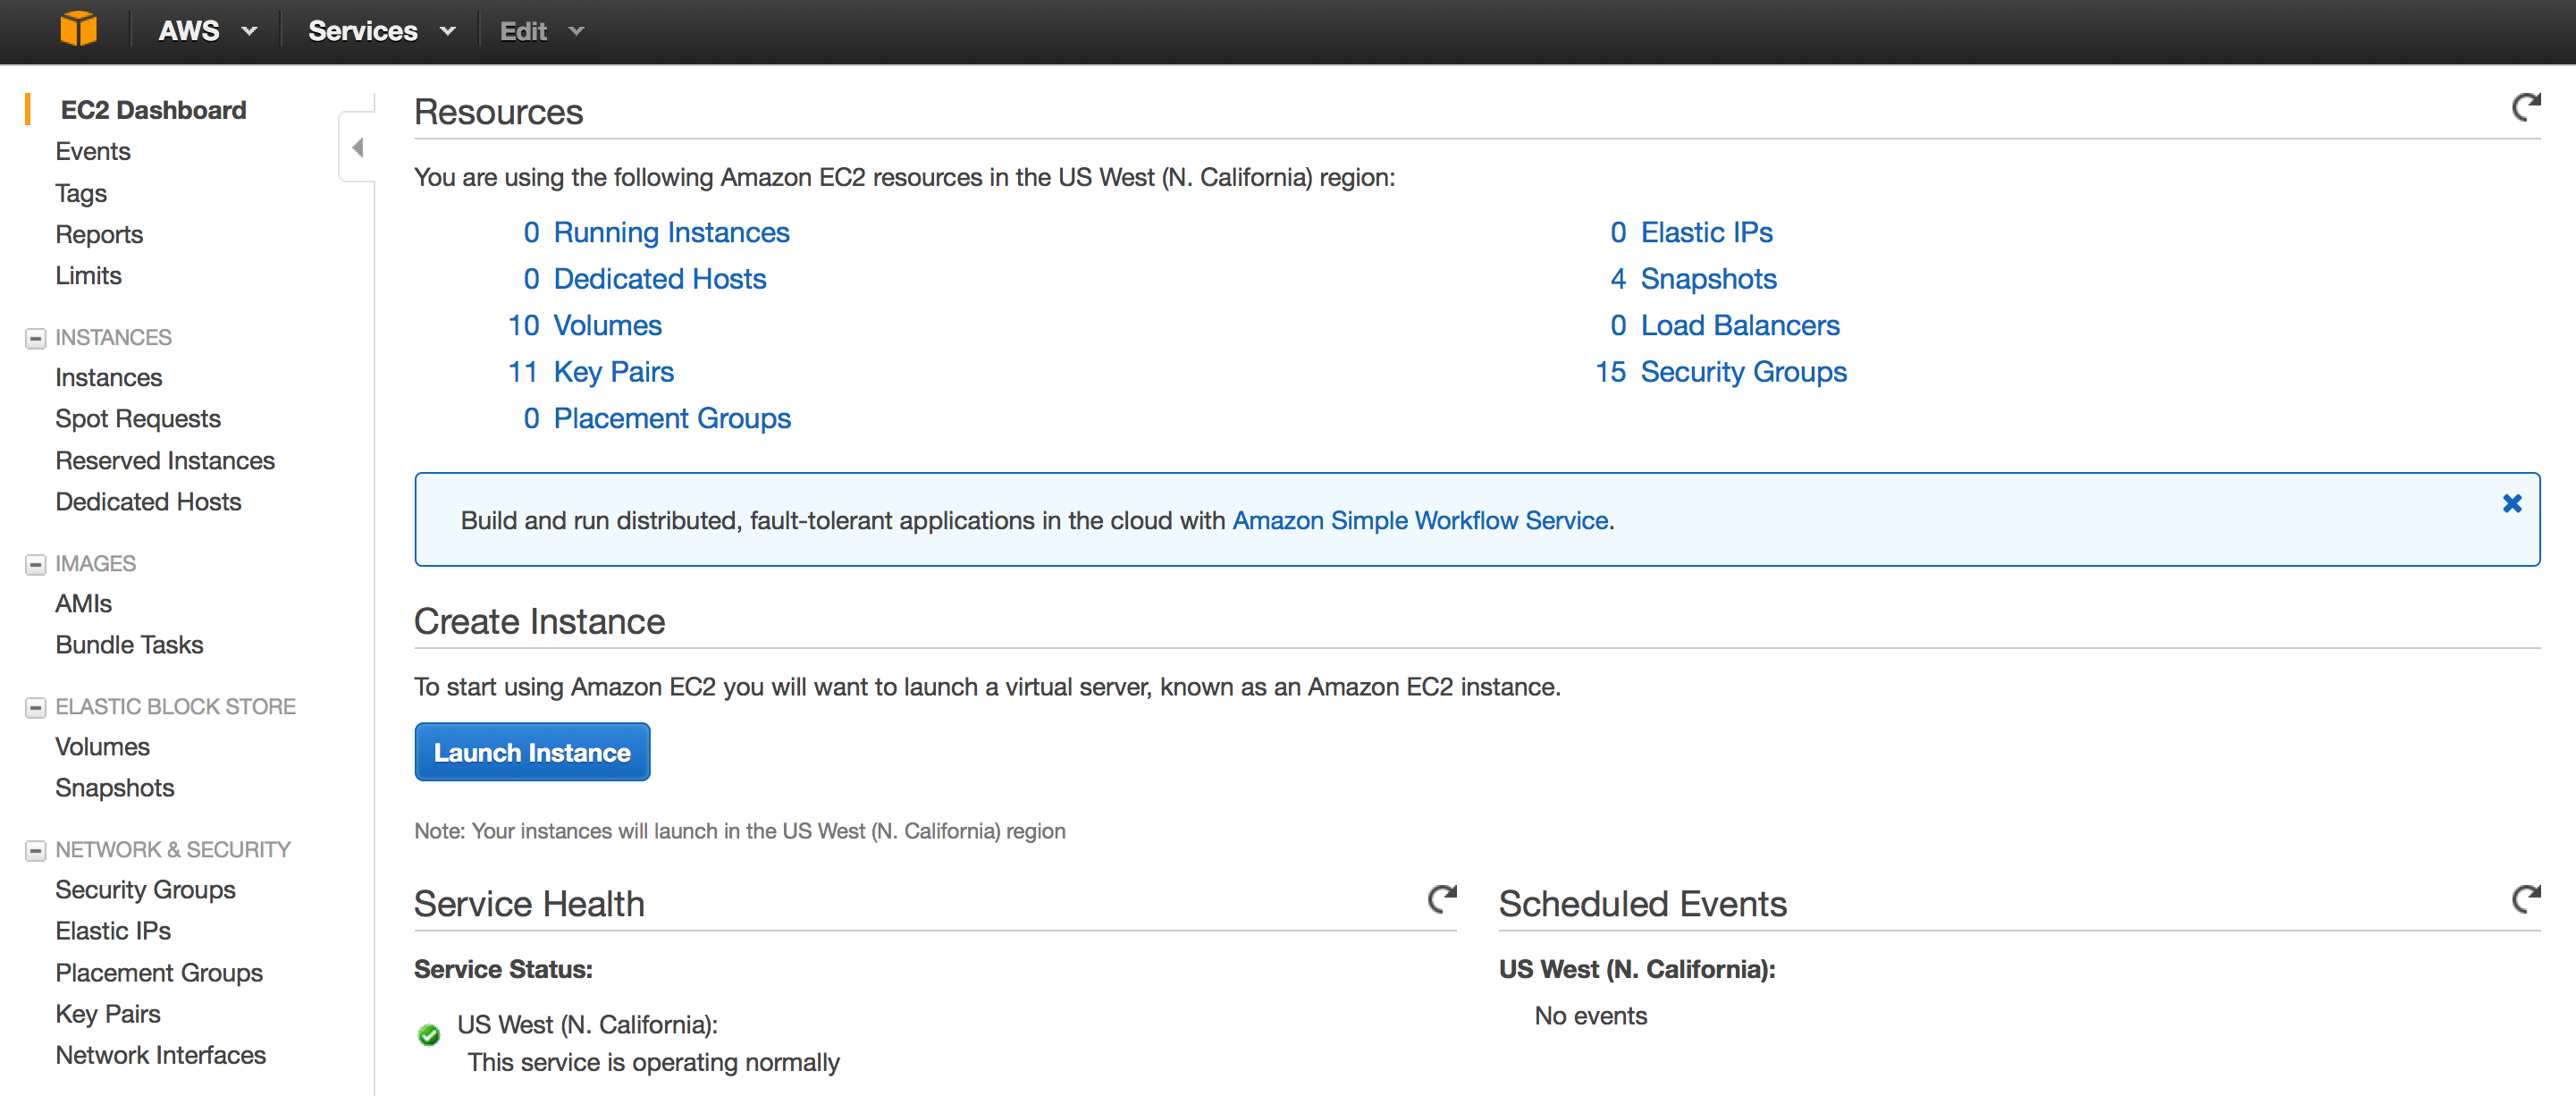
- Login to your AWS EC2 cloud and navigate to the EC2 dash board.
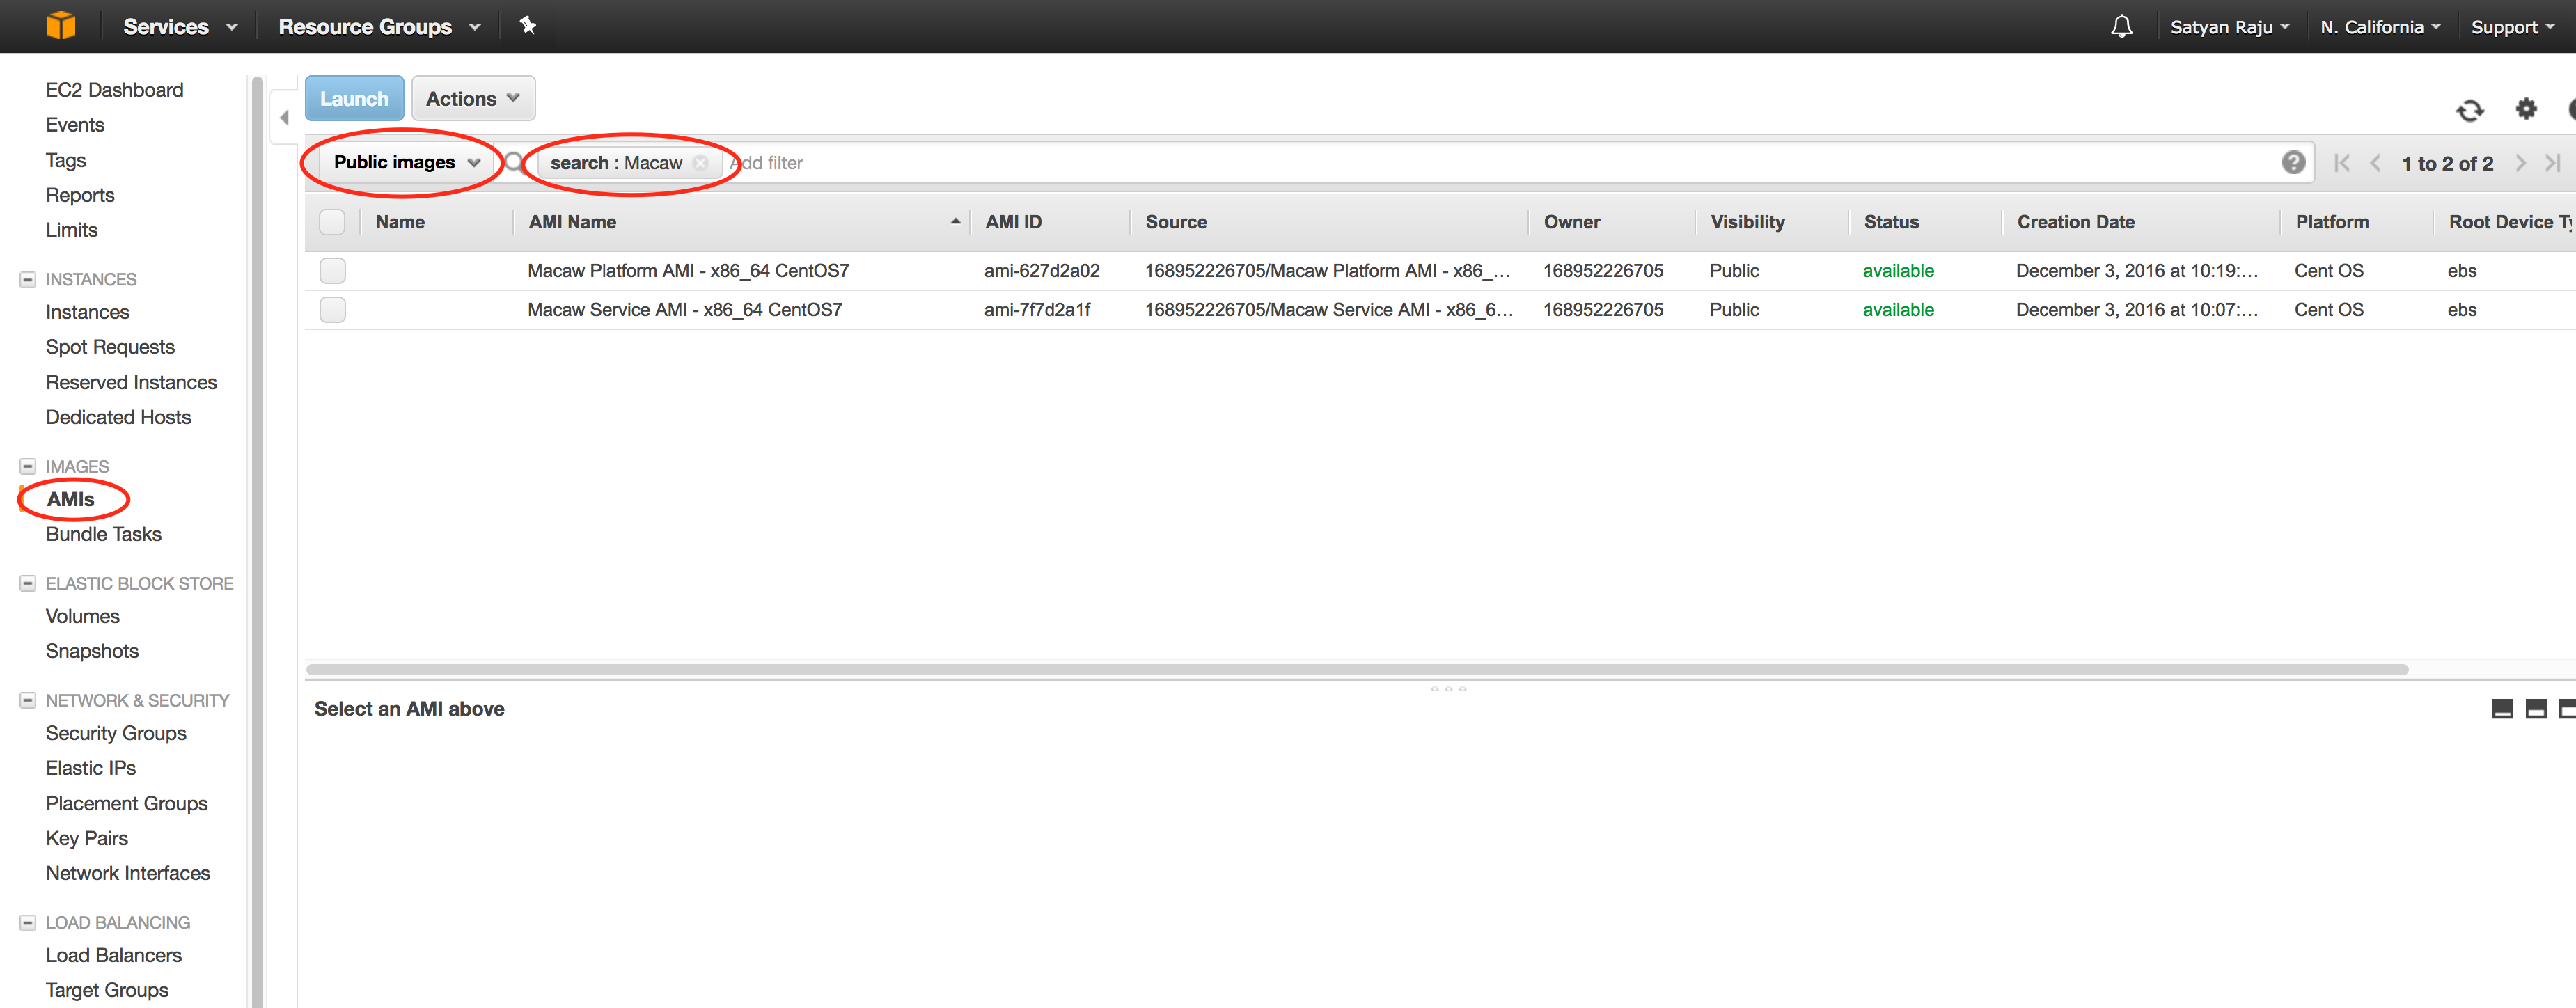
- Go to the AMIs and look for macaw Platform and Service Instances by typing ‘Macaw’ in the search filter like shown below. These are public AMIs currently. Contact POC or support contact at support@www.macaw.io to get further details on the AMI.
- Refer to the AWS link on how to find public AMIs. Refer to the below screen on how search.
- Select the Public Images view under the AMIs.
- Select the macaw Platform Instance and click on Launch.
- Chose an Instance Type.
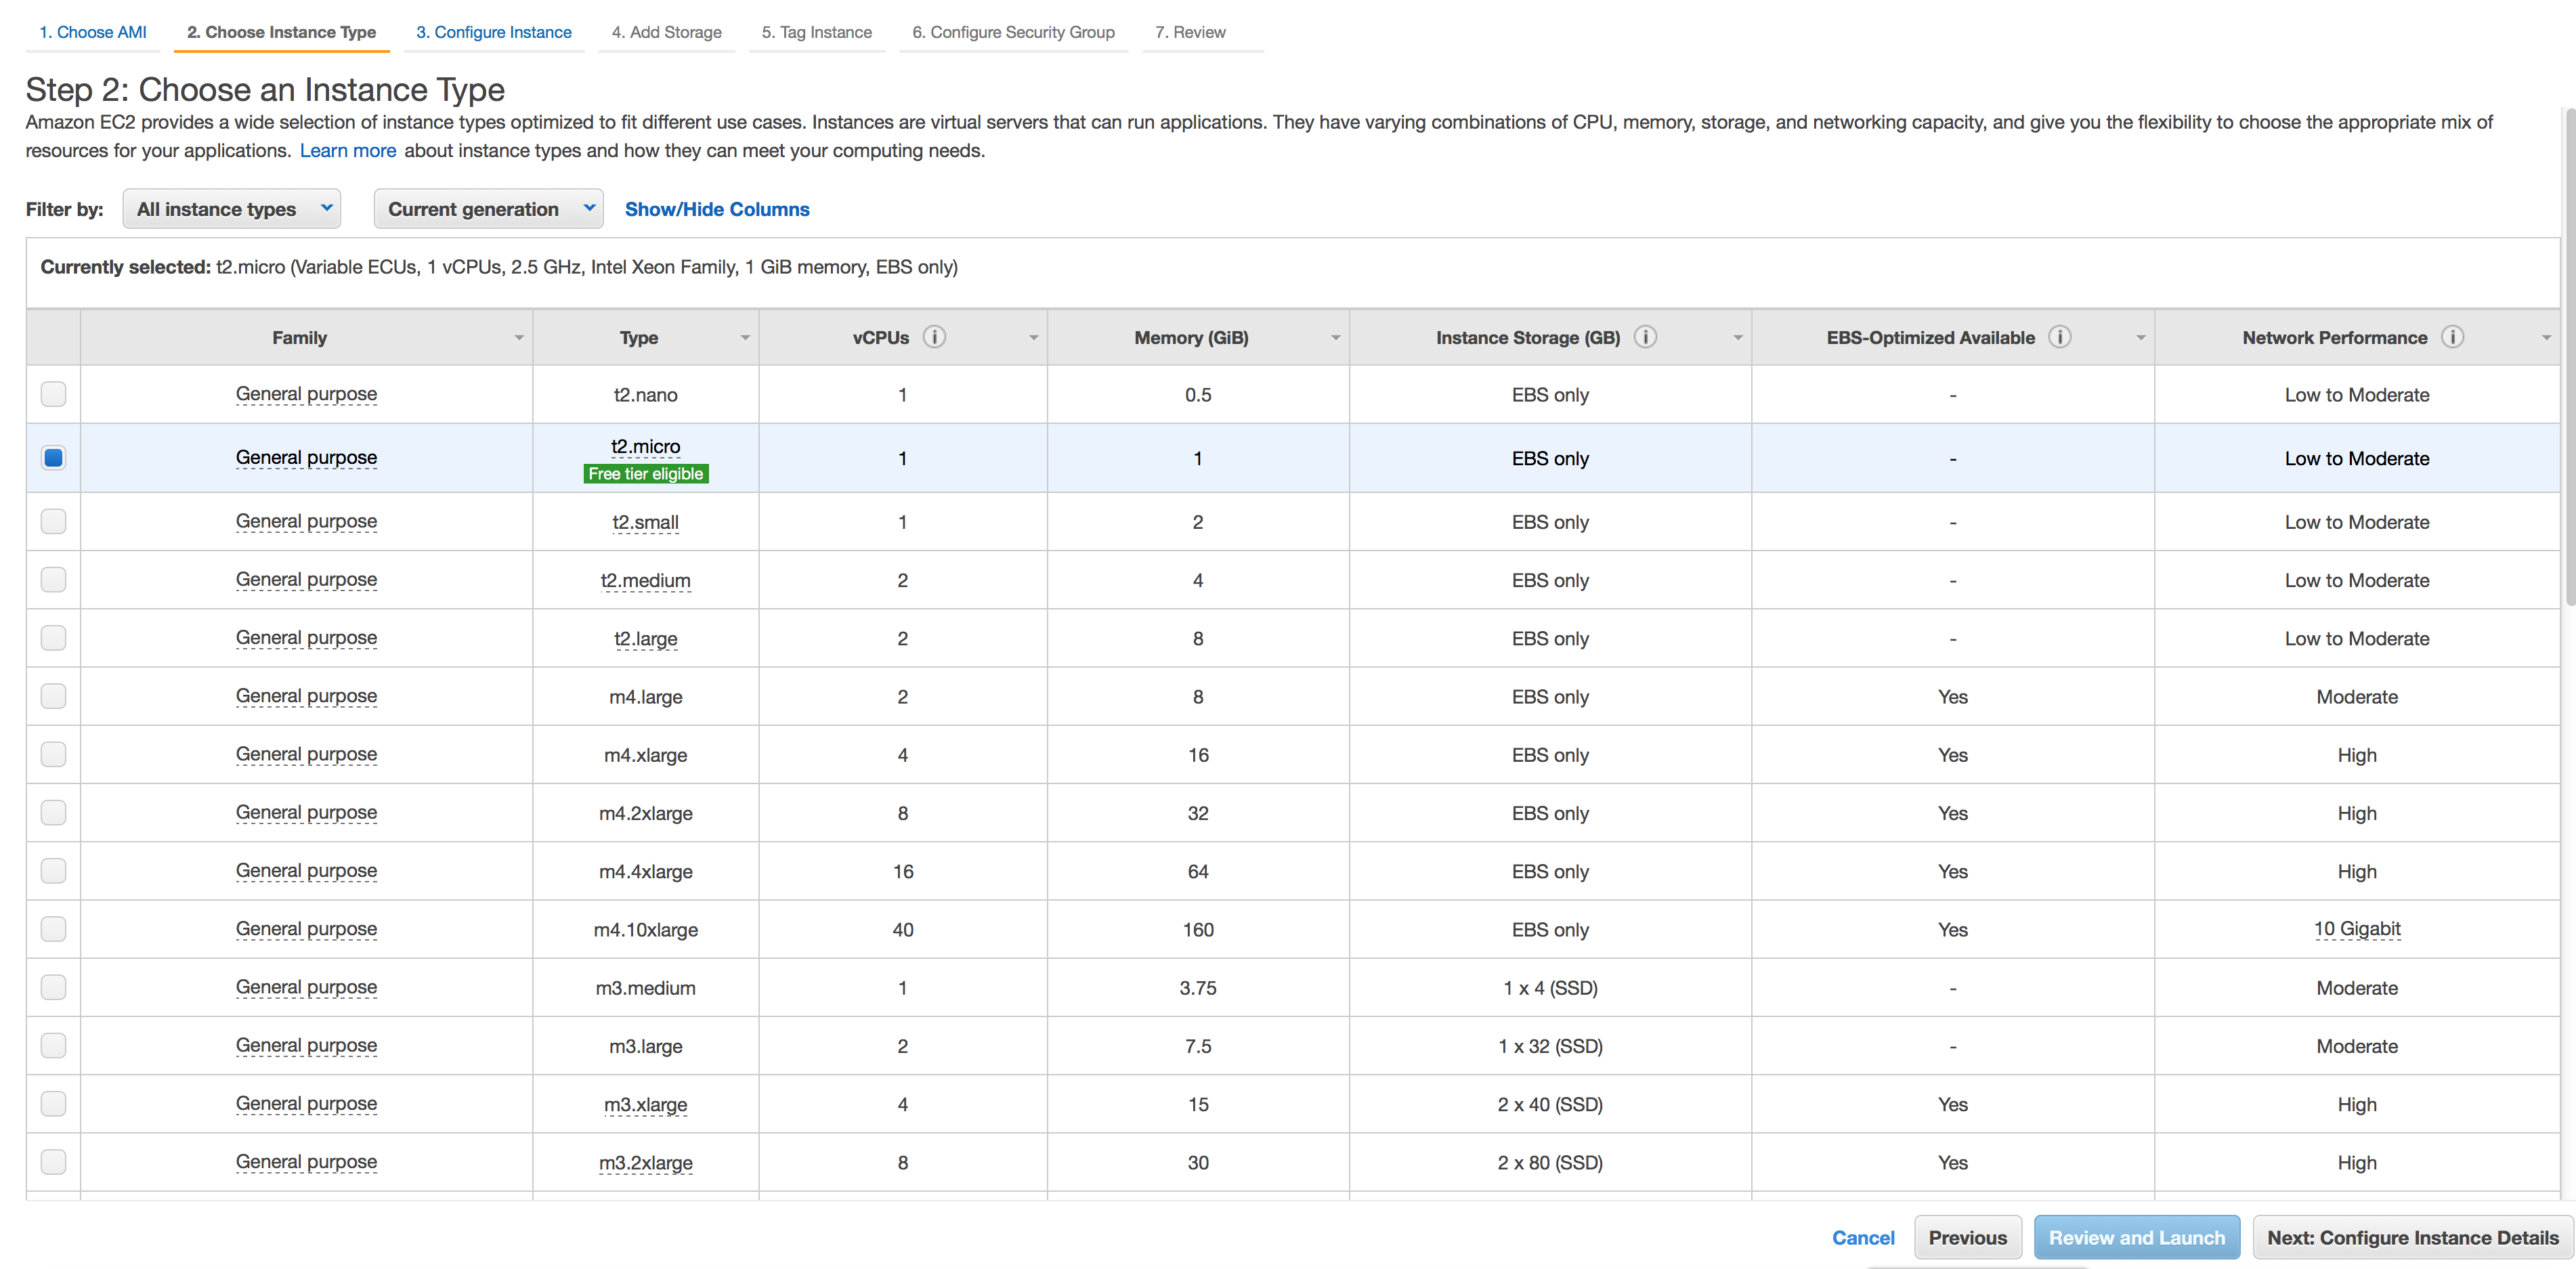
Note: Production installation of macaw Platform AMI requires minimum 8 vCPUs and 24 GIB of Memory.Select m4.2xlarge as the instance type for
production installations and click on Configure Instance Details. For POCs you can chose a smaller type like t2.large or above. Minimum
8GB RAM is required for macaw platform.
- The below settings in the next page are specific to your AWS environment. Brief explanation is provided below with some details.
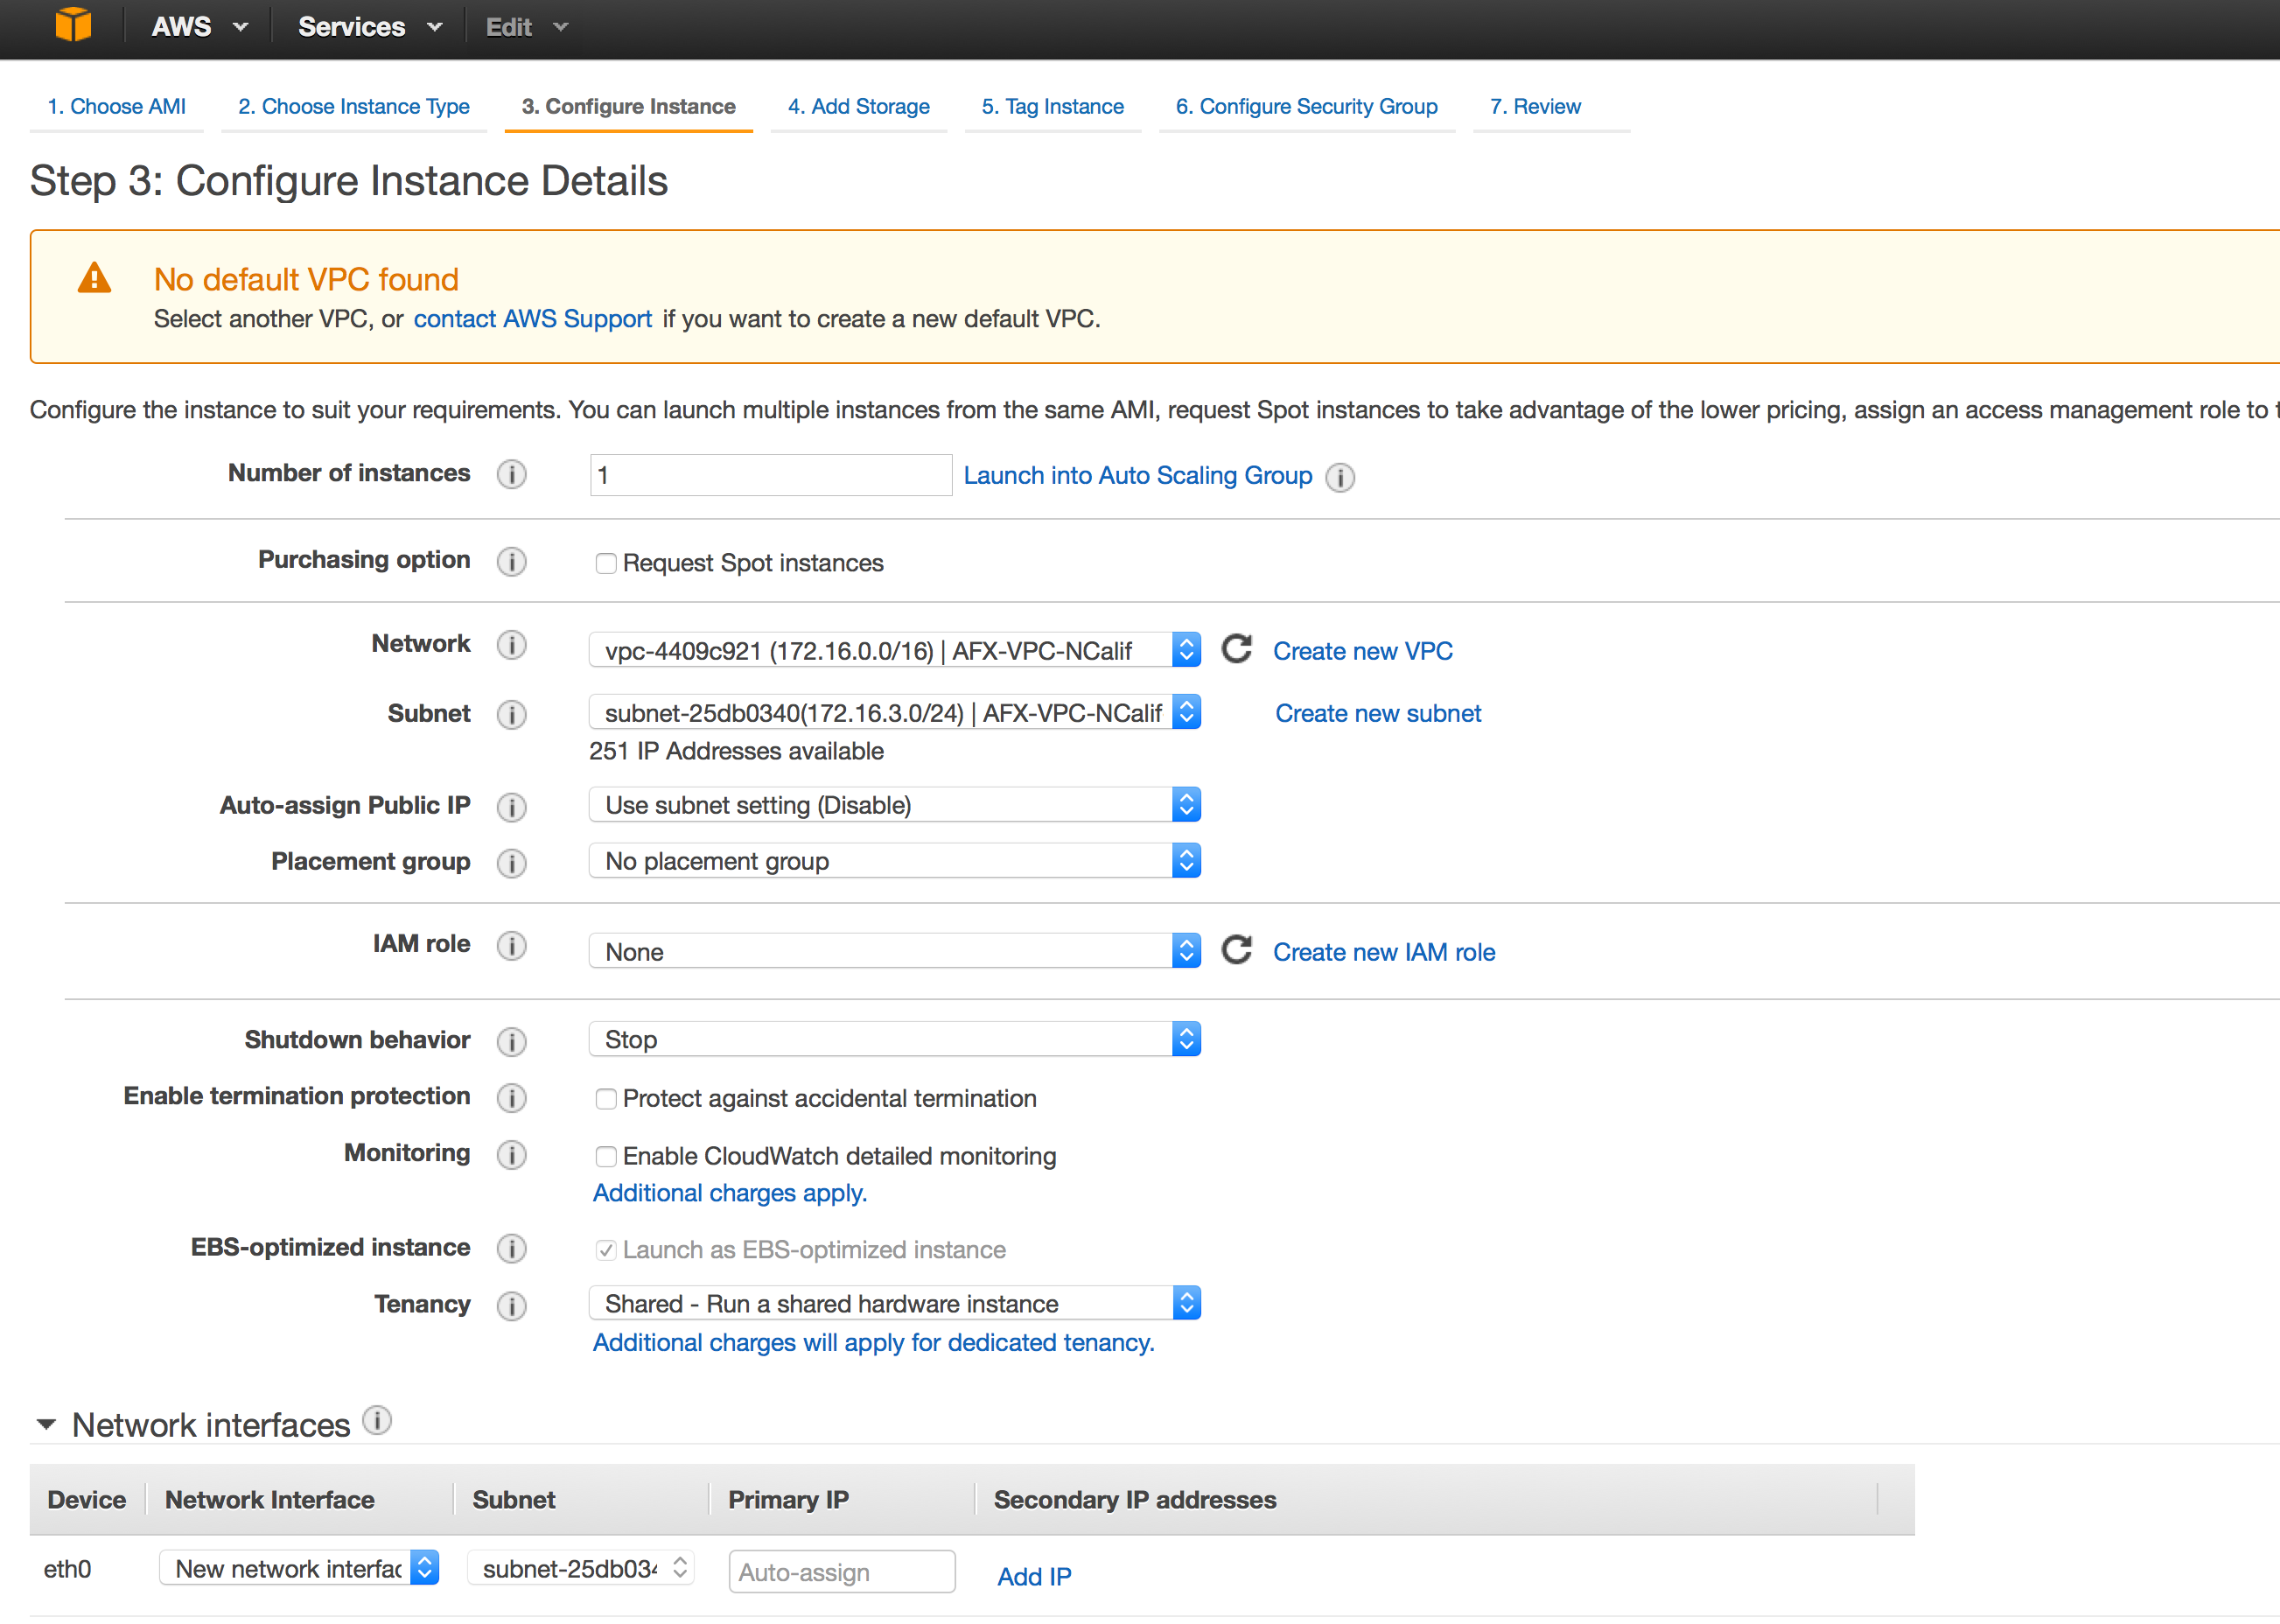
Number of Instances: Select 1

Purchasing Option: <This is specific to your AWS Environment. If not sure, please leave it unchecked>

Network: This is specific to your AWS environment. This is the VPC for AWS region your are operating in.
Check with your admin on what VPC to use.

Subnet: This is also specific to your AWS Environment. Try selecting a subnet for which public IP is
assigned, so that you can access the machines from outside.

Auto-assign Public IP: If you are not sure of Public IP assignment for the above subnet,
you can select this to Enable.

Placement group: <Check with AWS Admin. If not sure, leave default>

IAM Role: <Check with AWS Admin. If not sure, leave default>

Shutdown Behavior: <Check with AWS Admin. If not sure, leave default>

<Rest All Options Leave Default>
- Adding Storage
macaw Platform AMI runs disk intensive programs like kafka/zookeeper/cassandra. Hence it is absolutely necessary to have separate disks hosting the relevant data for these programs. The AMI also supports minimal installation mode, where extra disks are not needed and the user can select default disks with the AMI and just change the size.
Non Production Disk Configuration
| Disk | Purpose | Recommended Min Size | Details |
| sda1 | Root OS Disk | 50G | This is the root OS disk. |
| sdb | Docker data disk (/var/lib/docker) | 50G | This is the data disk for docker. |
| sdc | Docker LVM Volume | 80G | This is storage disk from which containers are provided the disks. Depending on the number of containers you plan to run, it is recommended to increase this size. This is thin volume and each container is assigned (thin) 10G. |
| sdd | For the macaw operational and configuration data. This disk is also used for serving a shared NFS volume. | 80G |
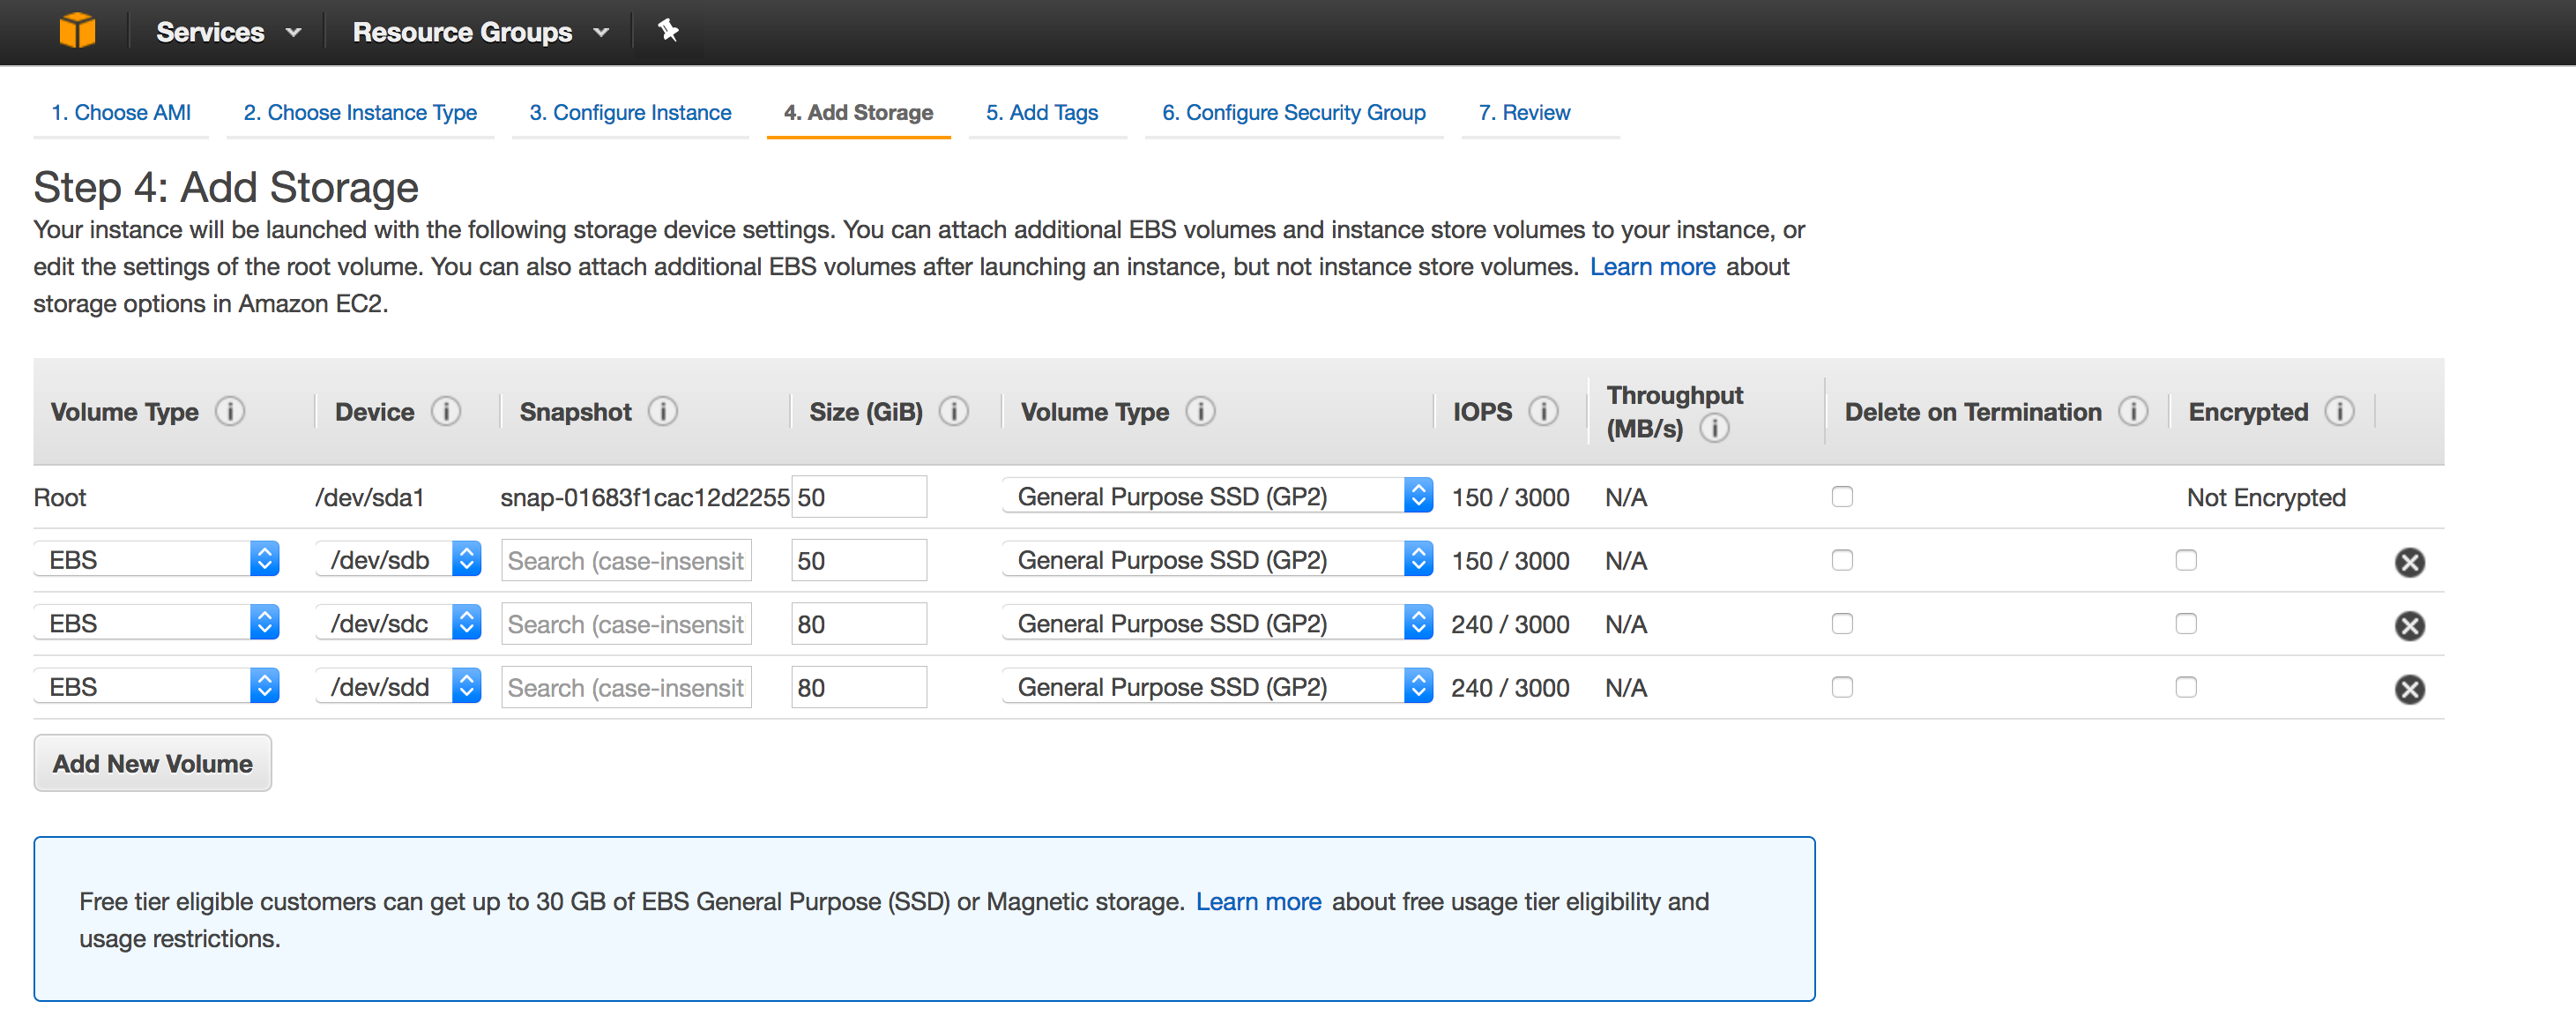
Production Disk Configuration
| Disk | Purpose | Recommended Min Size | Details |
| sda1 | Root OS Disk | 50G | This is the root OS disk. |
| sdb | Docker data disk (/var/lib/docker) | 50G | This is the data disk for docker. |
| sdc | Docker LVM Volume | 200G | This is storage disk from which containers are provided the disks. Depending on the number of containers you plan to run, it is recommended to increase this size. This is thin volume and each container is assigned (thin) 10G. |
| sdd | For the macaw operational and configuration data. This disk is also used for serving a shared NFS volume. | 120G | |
|
sde |
For Zookeeper Data (/zookeeper) | 20G | This for storing the macaw platform infra service ‘zookeeper’ data |
|
sdf |
For Kafka Logs (/kafka-logs1) | 100G to 200G | Kafka Logs are persisted on disk with periodic cleanup. It is recommended to increase this volume size, if you anticipate to run 100’s of micro services. |
|
sdg |
For Kafka Logs (/kafka-logs2) | 100G to 200G | Kafka Logs are persisted on disk with periodic cleanup. It is recommended to increase this volume size, if you anticipate to run 100’s of micro services. |
|
sdh |
For Cassandra (/cassandra-db-01) | 100G | This is for Cassandra DB Data. |
|
sdi |
For Cassandra (/cassandra-db-02) | 100G | This is for Cassandra DB Data. |
|
sdj |
For Cassandra Commit Logs (/cassandra-commit-logs) | 40G | This is for storing cassandra commit logs. |
|
sdk |
For Elasticsearch (/elasticsearch) | 60G | For Elastic search Data. |
|
sdl |
For Redis (/redis) | 60G | For Redis Data |
|
sdm |
For MySQL (/var/mysql) | 50G | For MySQL Data. |
Note: The Platform AMI auto mounts all these additional volumes.
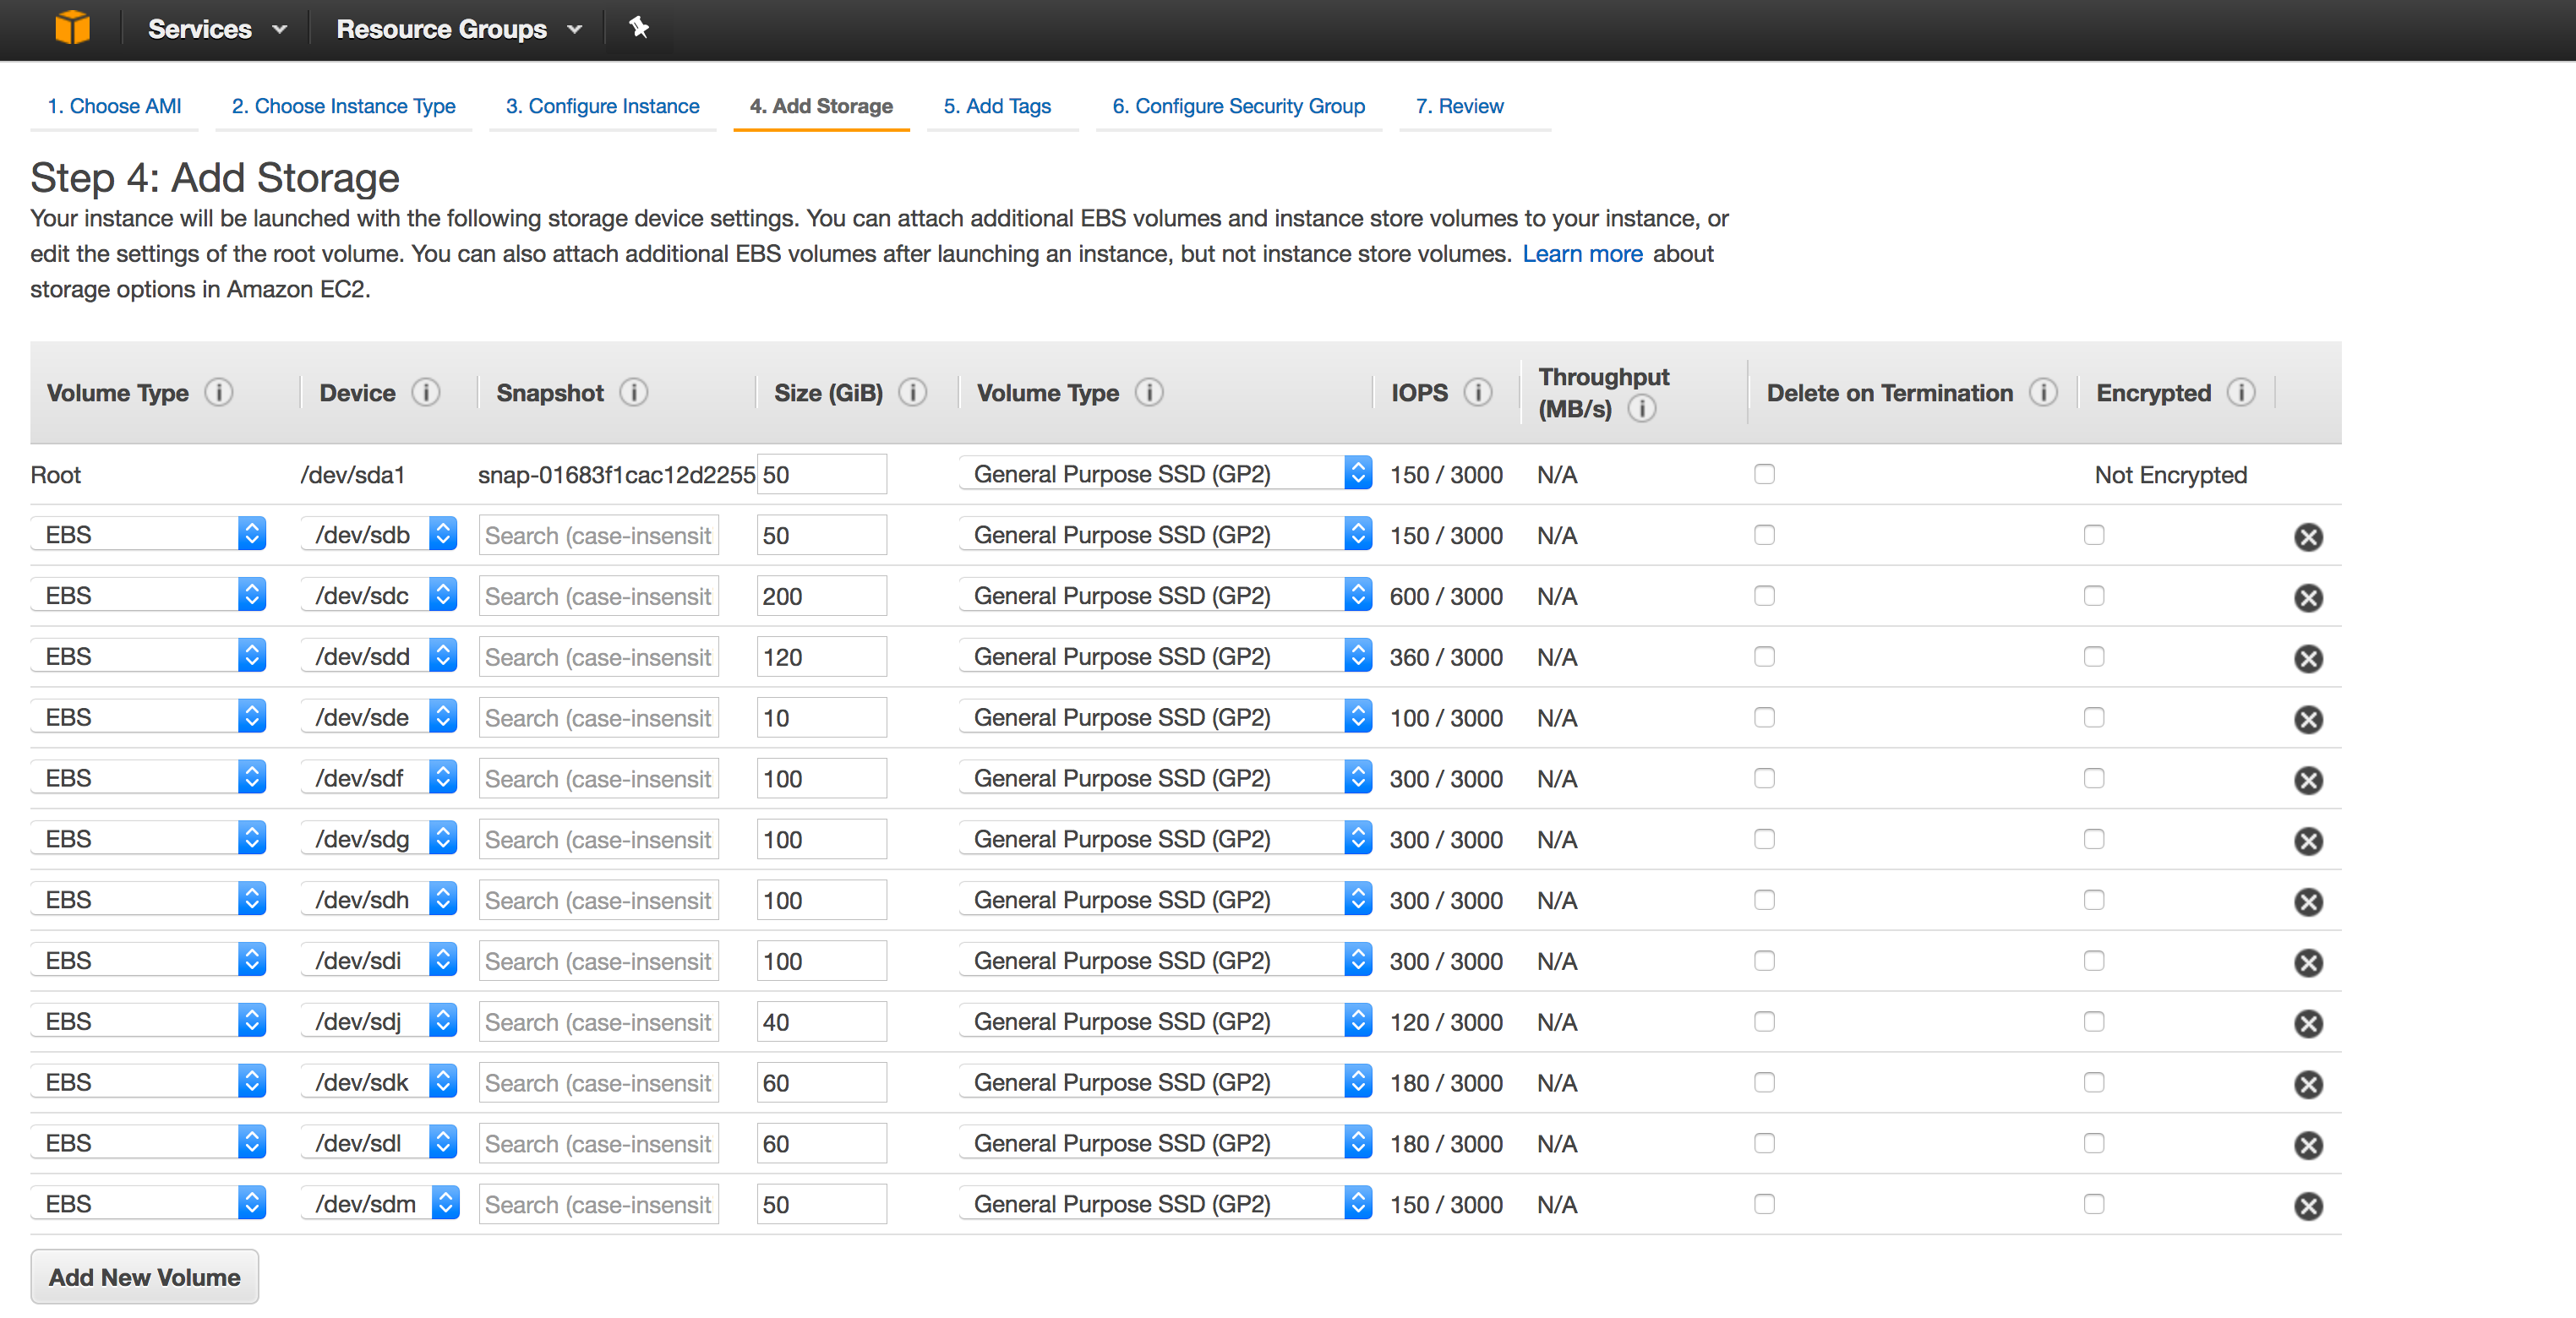
Once the storage is configured, please click “Next: Tag Instance”
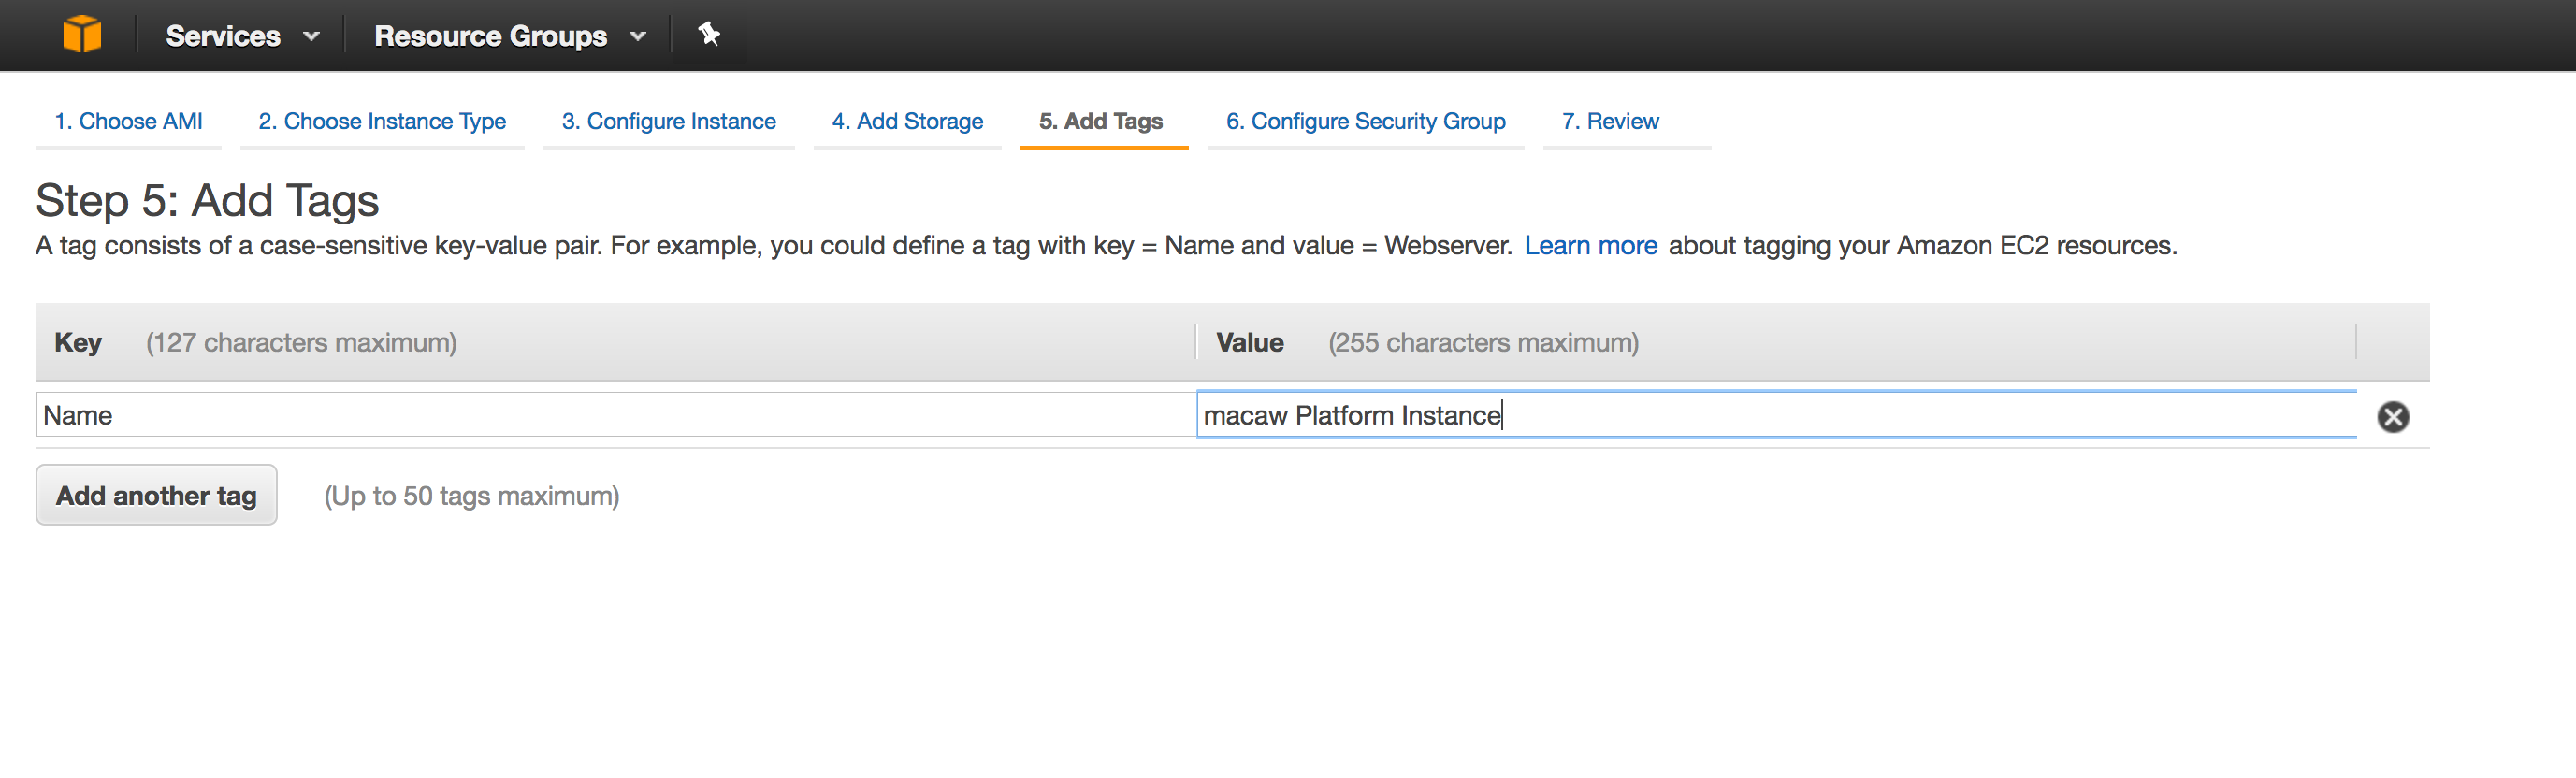
- Tag Instance
Provide a name to the platform instance and then click “Configure Security Group”
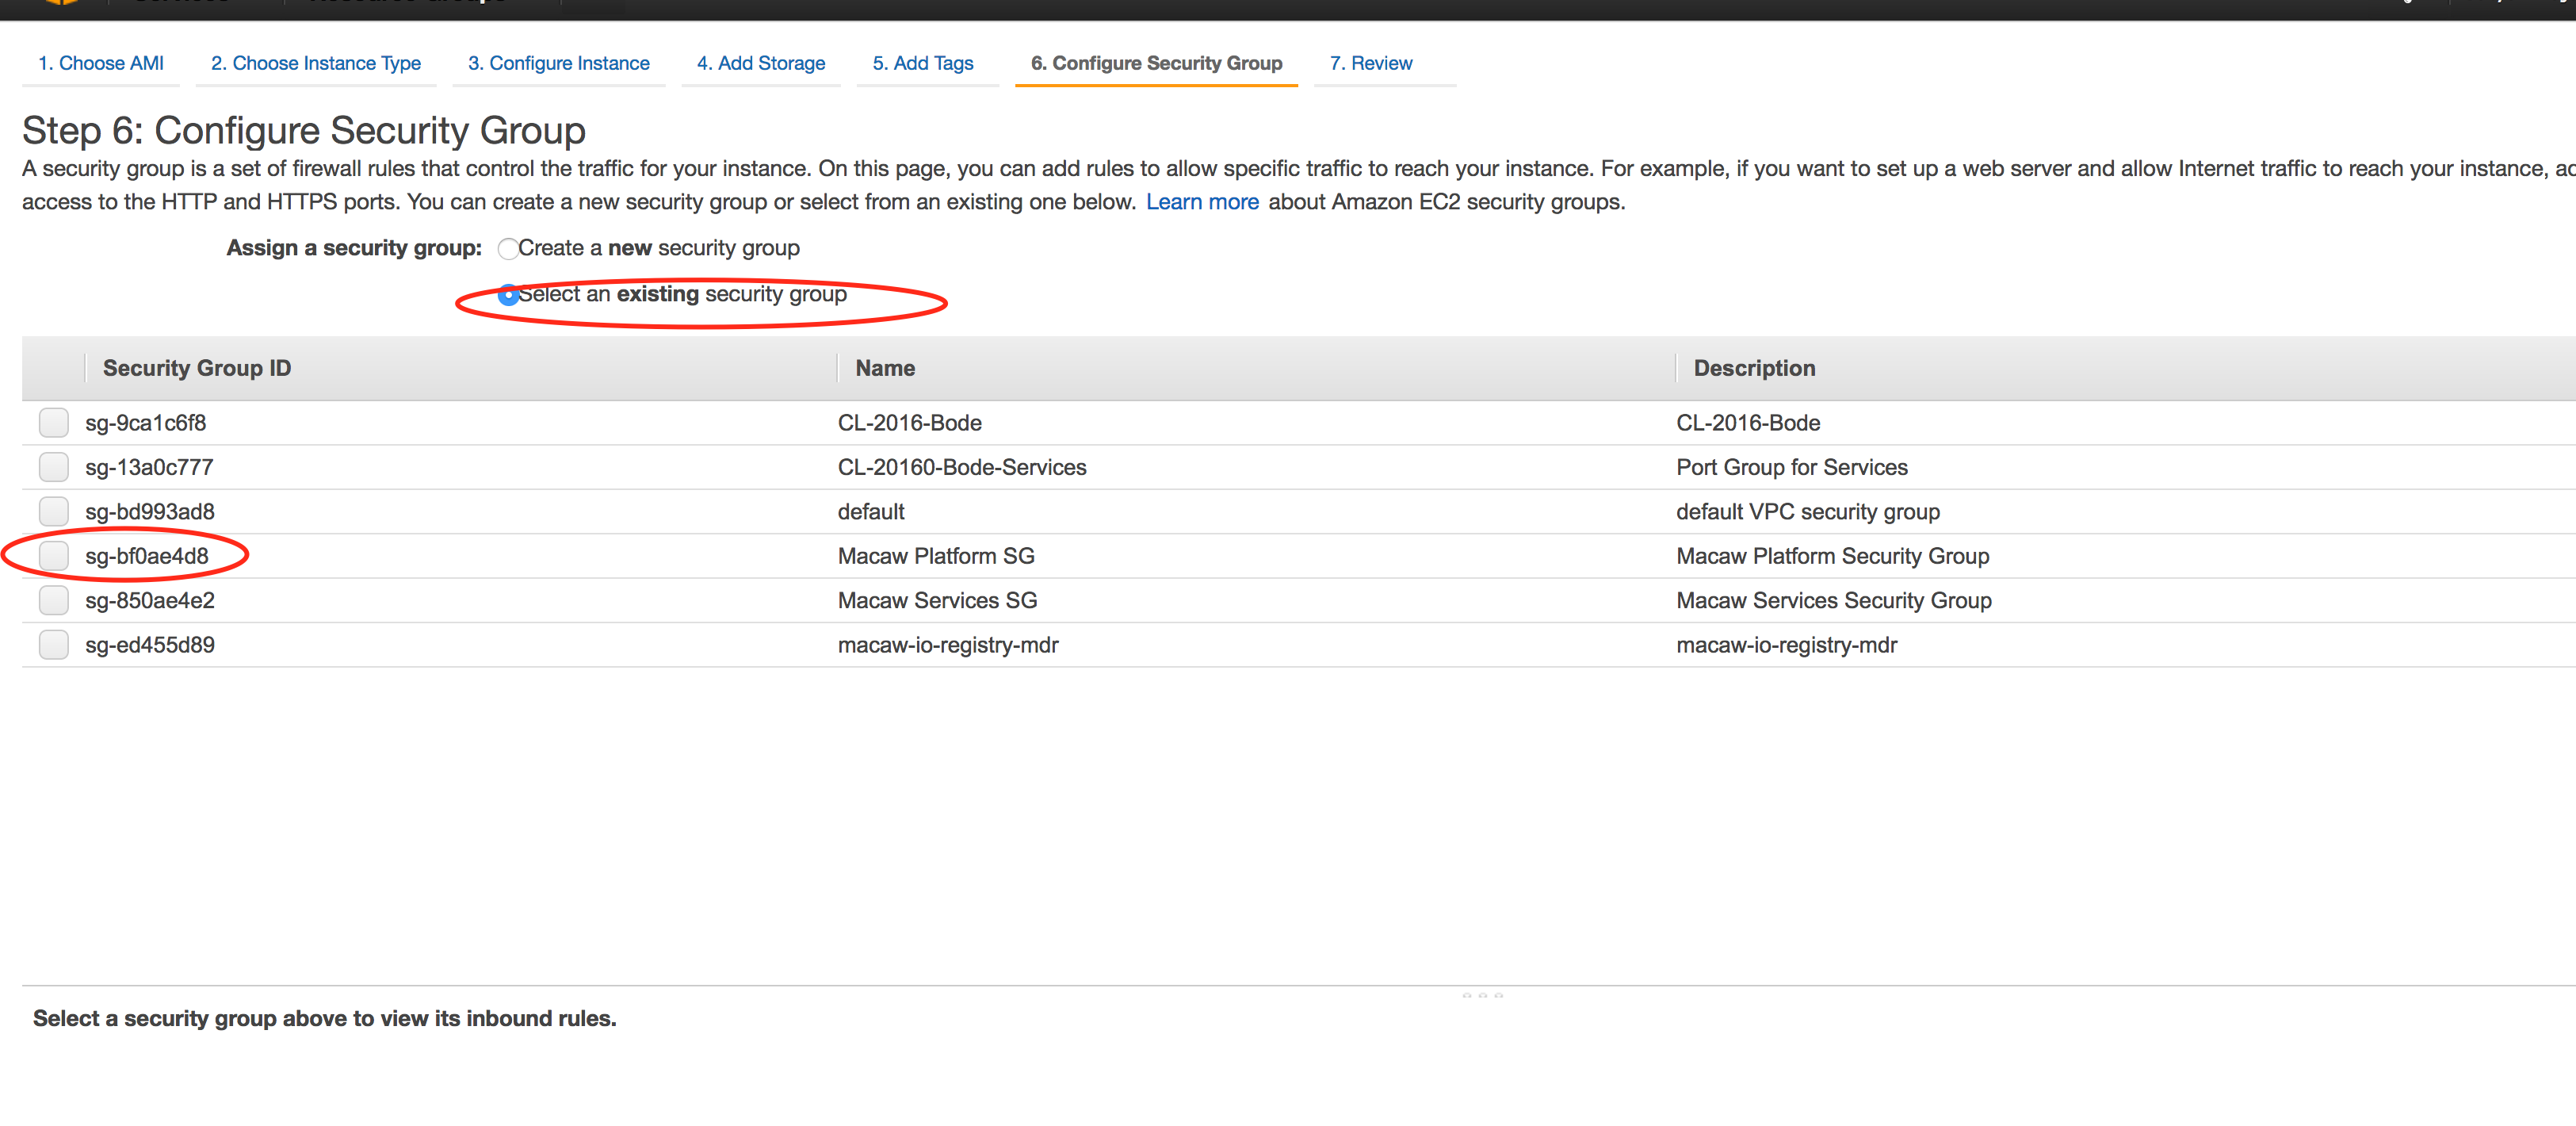
- Configure Security Group
Select the option “Select an existing security group” and then select the Platform Instance Security Group you defined earlier and click on “Review and Launch”.
- Review your selections and then click launch.
- Next your will be prompted for selection of keys. This is where AWS will let your chose an exiting key or to create a key pair and program your instance with the public key of the key pair. You are supposed to be holding the private key of the pair. If you lose the private key, it cannot be downloaded again. AWS only lets you download the key pair once when it is created.
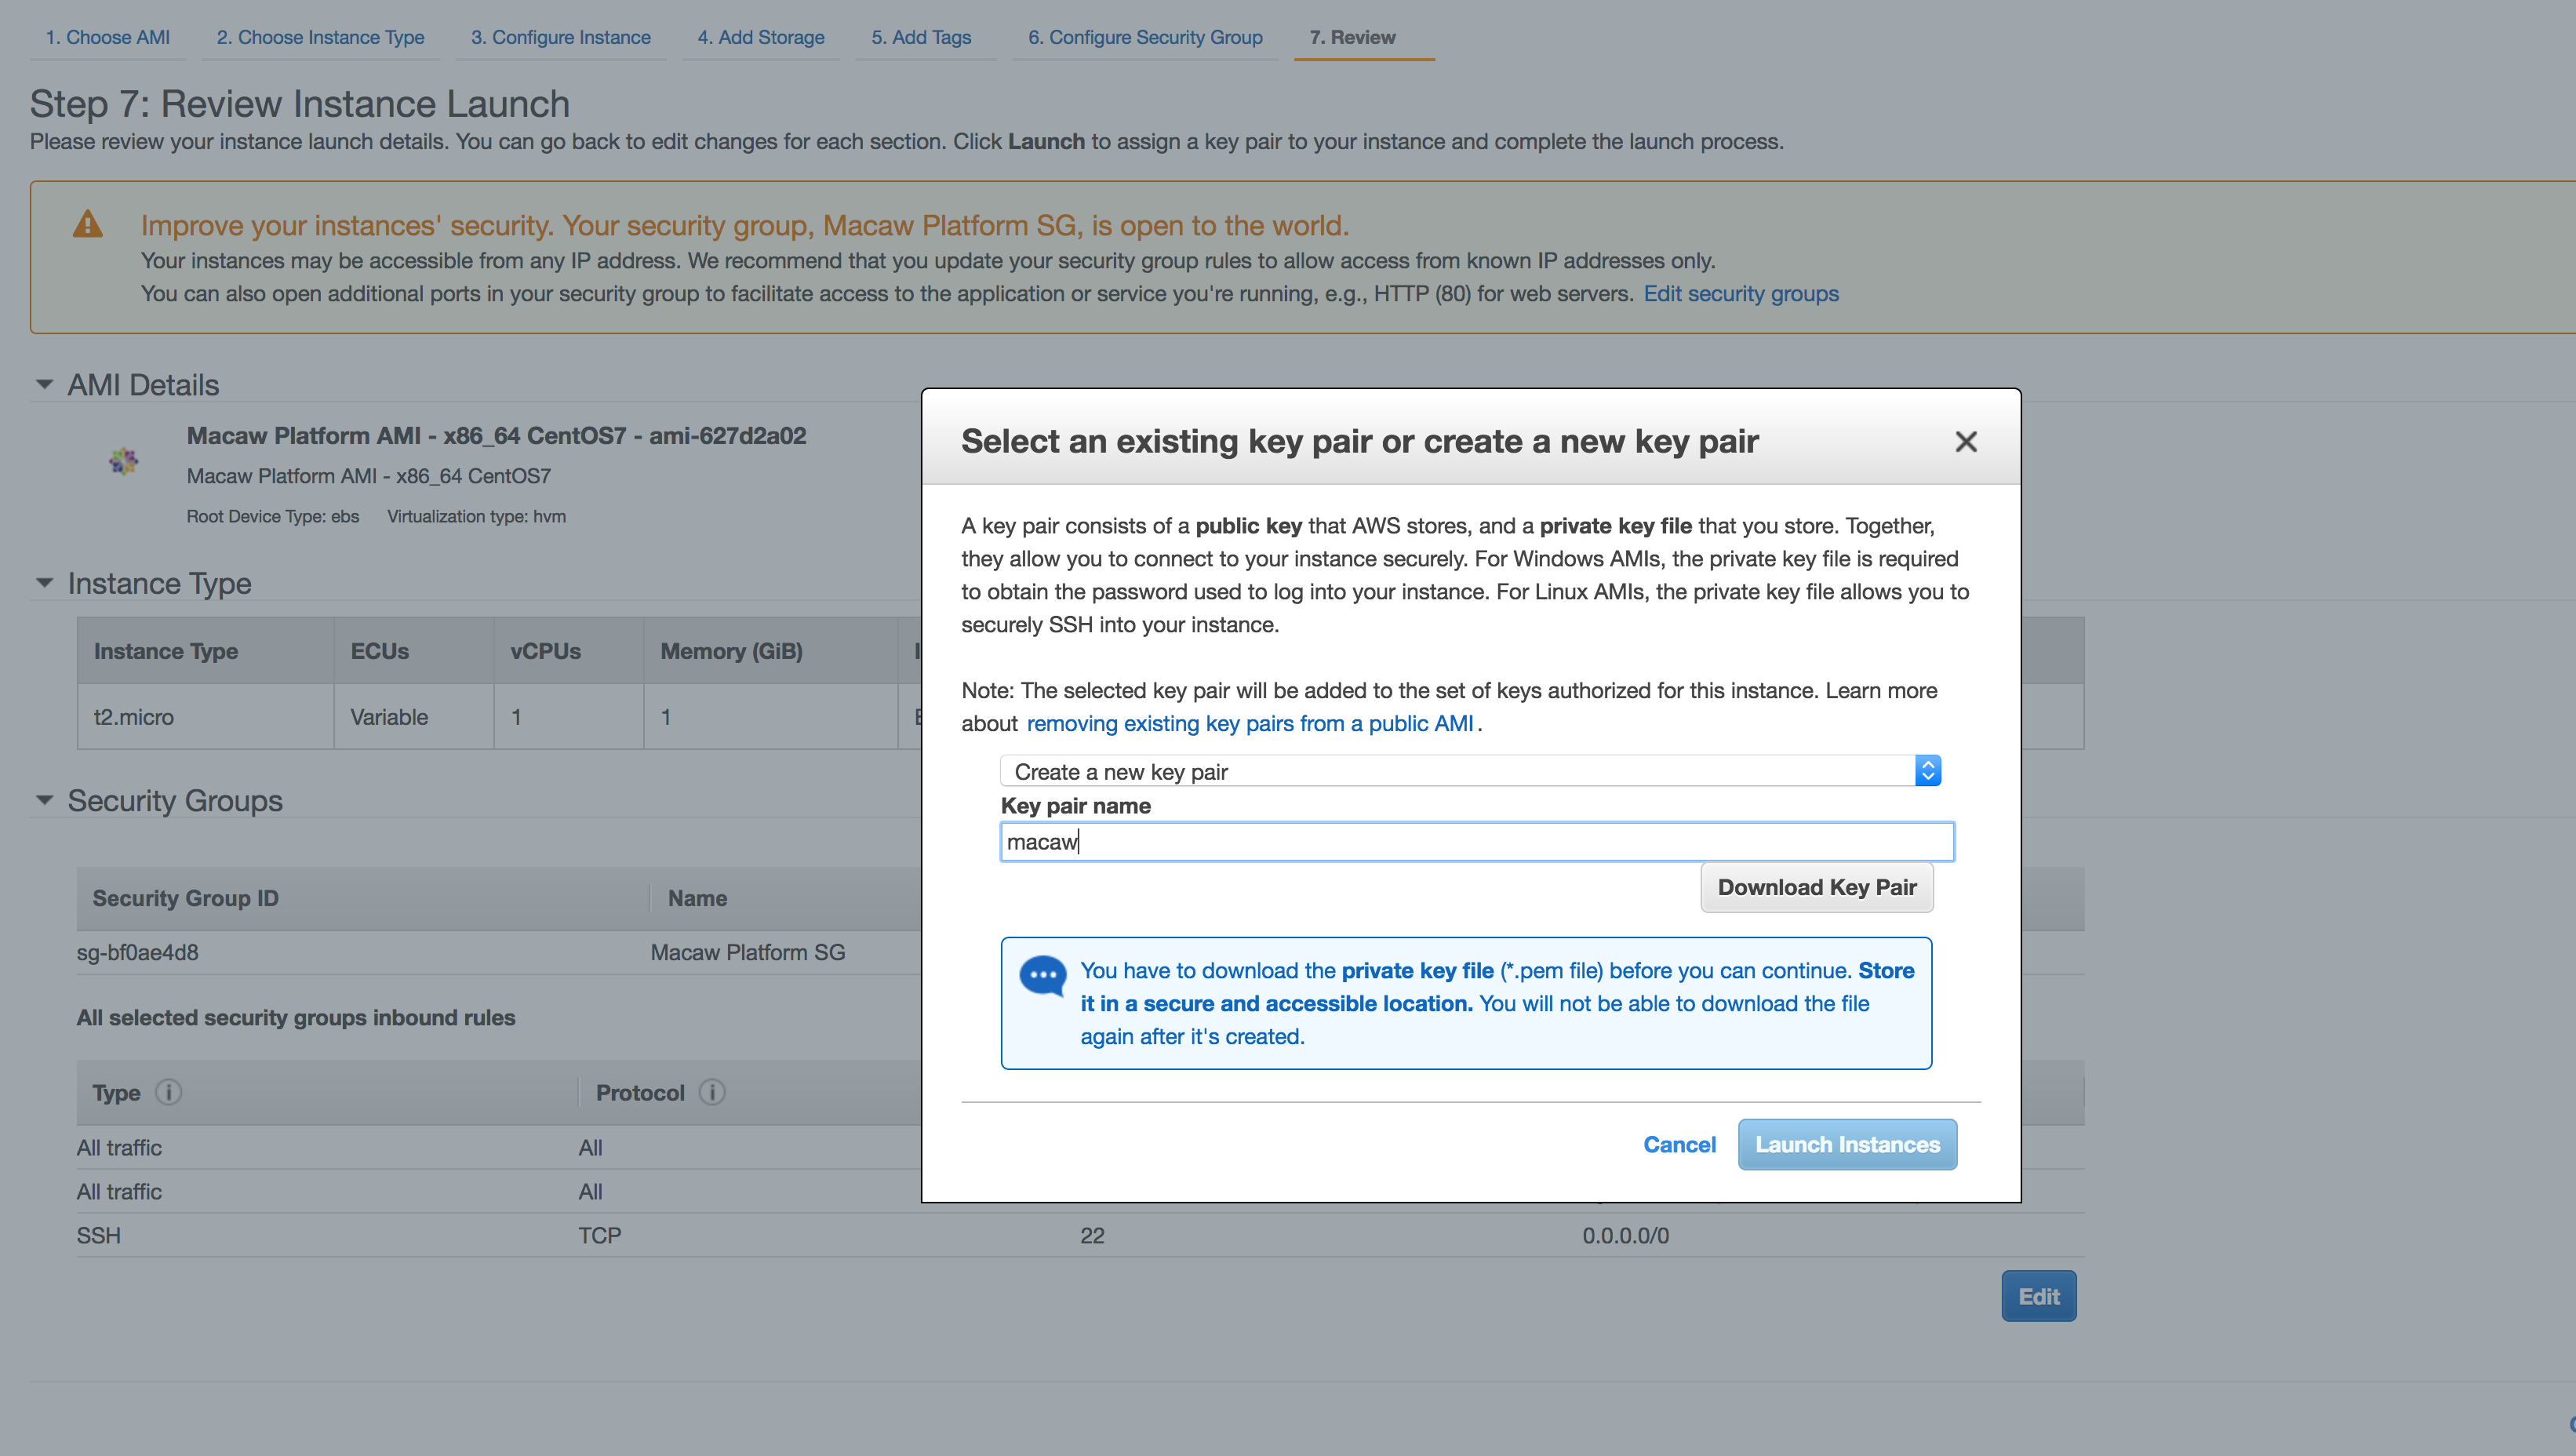
Note: You can chose to create a new pair and use this for all macaw related AWS instances. Make sure to download the private key and store it securely.
- Click Launch and wait for instance to be available.
Launching Service Instance
If you need service instance as well, follow similar instructions on the launch service instance as well. The service instance AMI doesnt require any additional disks. For the pre-populated disks, chose the sizes as described above for the platform instance (These base mandatory disks follow the same recommendations). When selecting the security group, make sure to select the one which is defined for the Services.
Elastic IP
While AWS provides public DNS/IP to each of the instance you launch based on your network settings, it is highly recommended to use Elastic IP to the platform instance. You can refer to this document from AWS for more details on the Elastic IP.
Please follow the below instructions on how to get an Elastic IP and assign it to the platform instance.
- Go to the EC2 Dashboard.
- Select the “Elastic IPs” from left side.
- Click on “Allocate New Address”
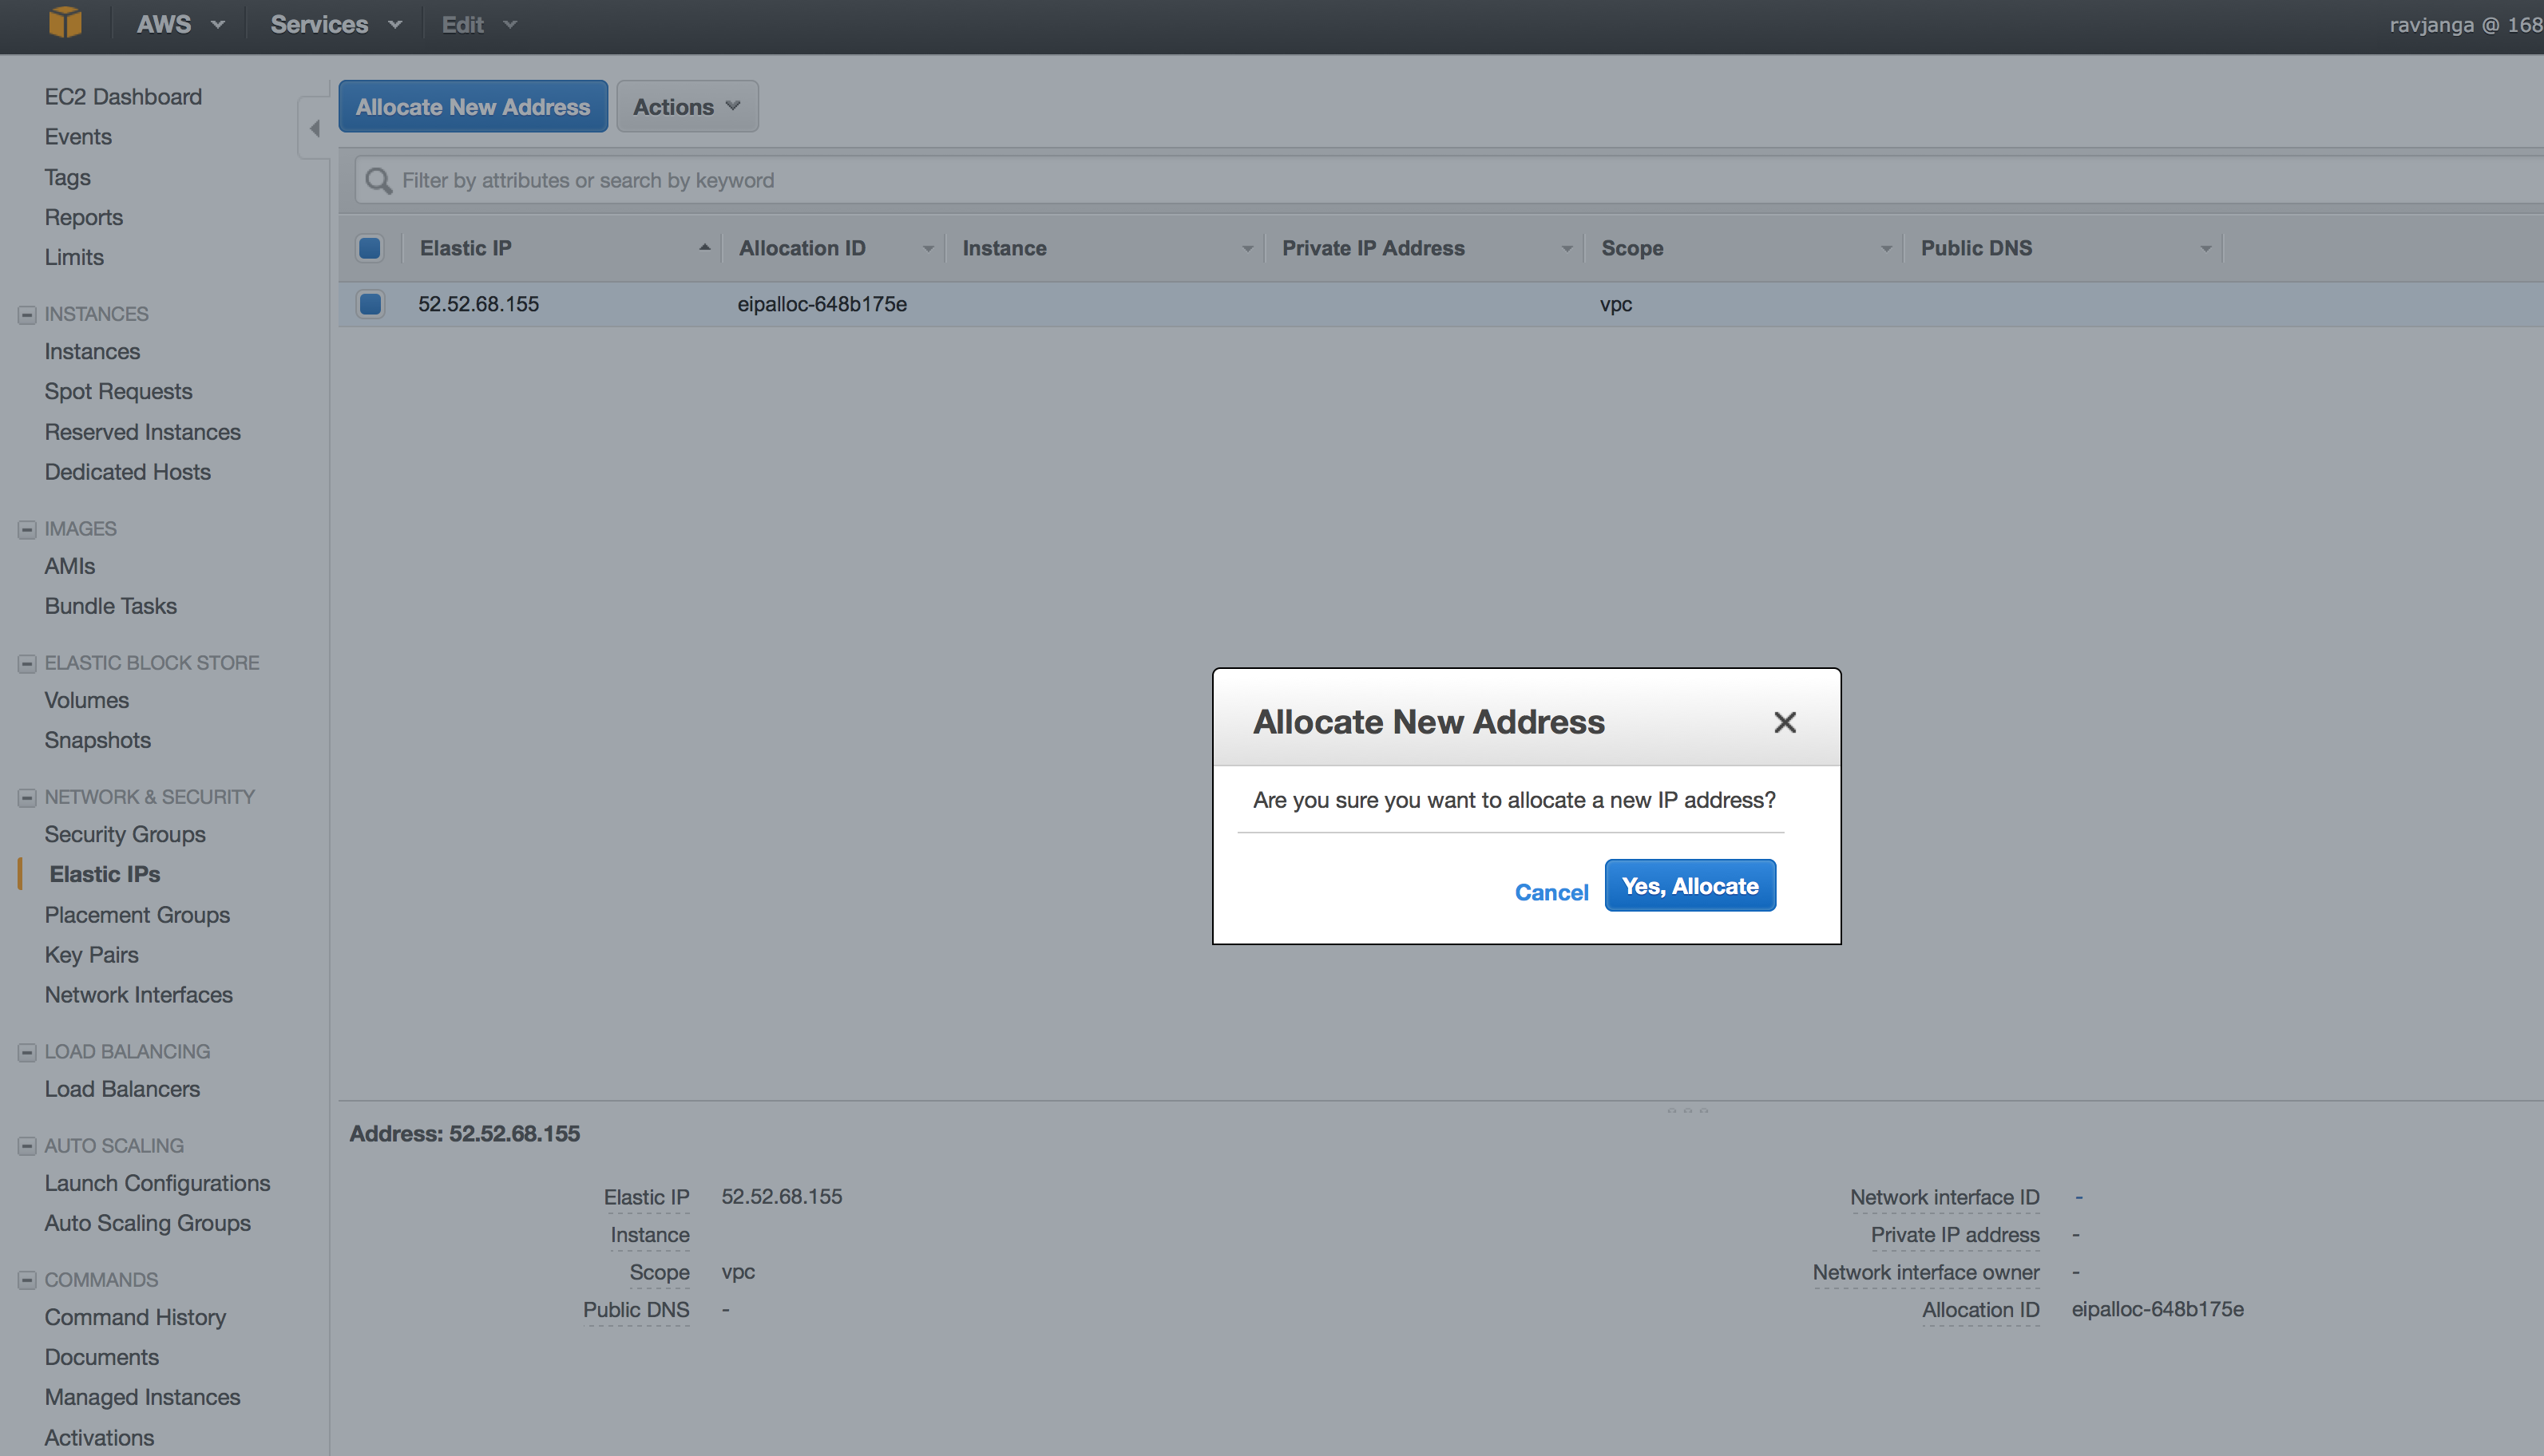
- Select the IP address and from the “Action” select the action “Associate Address”
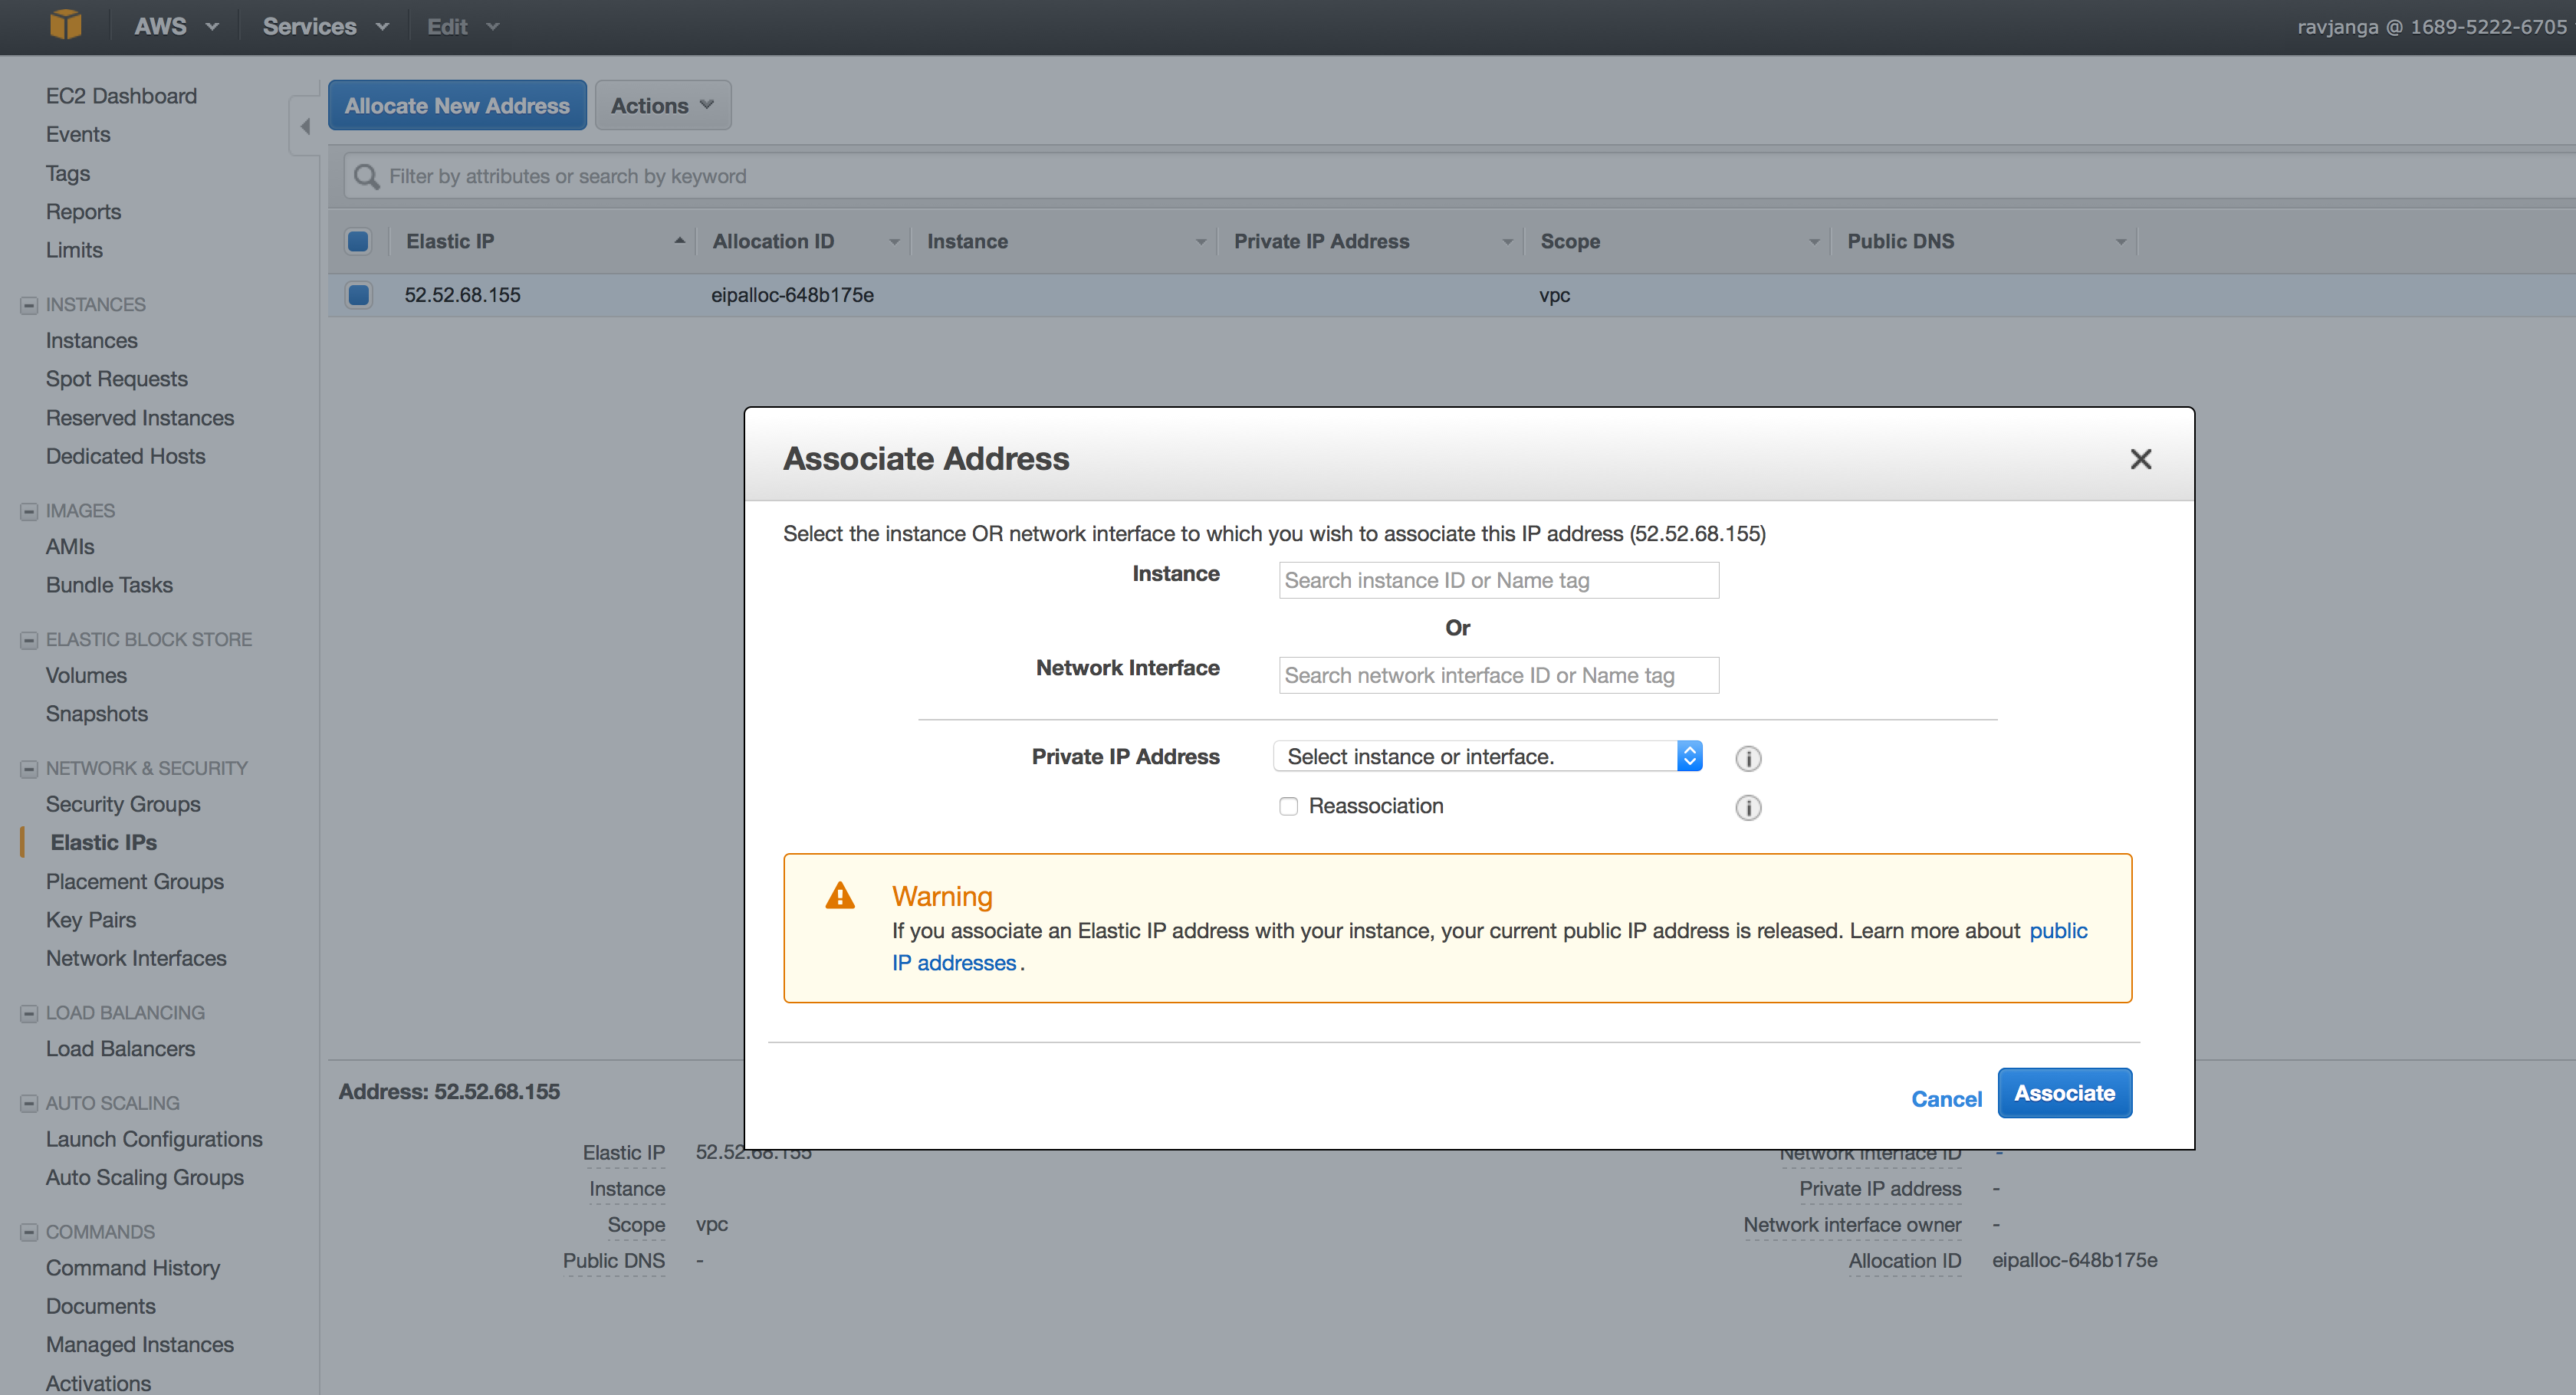
In the Instance, find the platform instance and click “Associate”
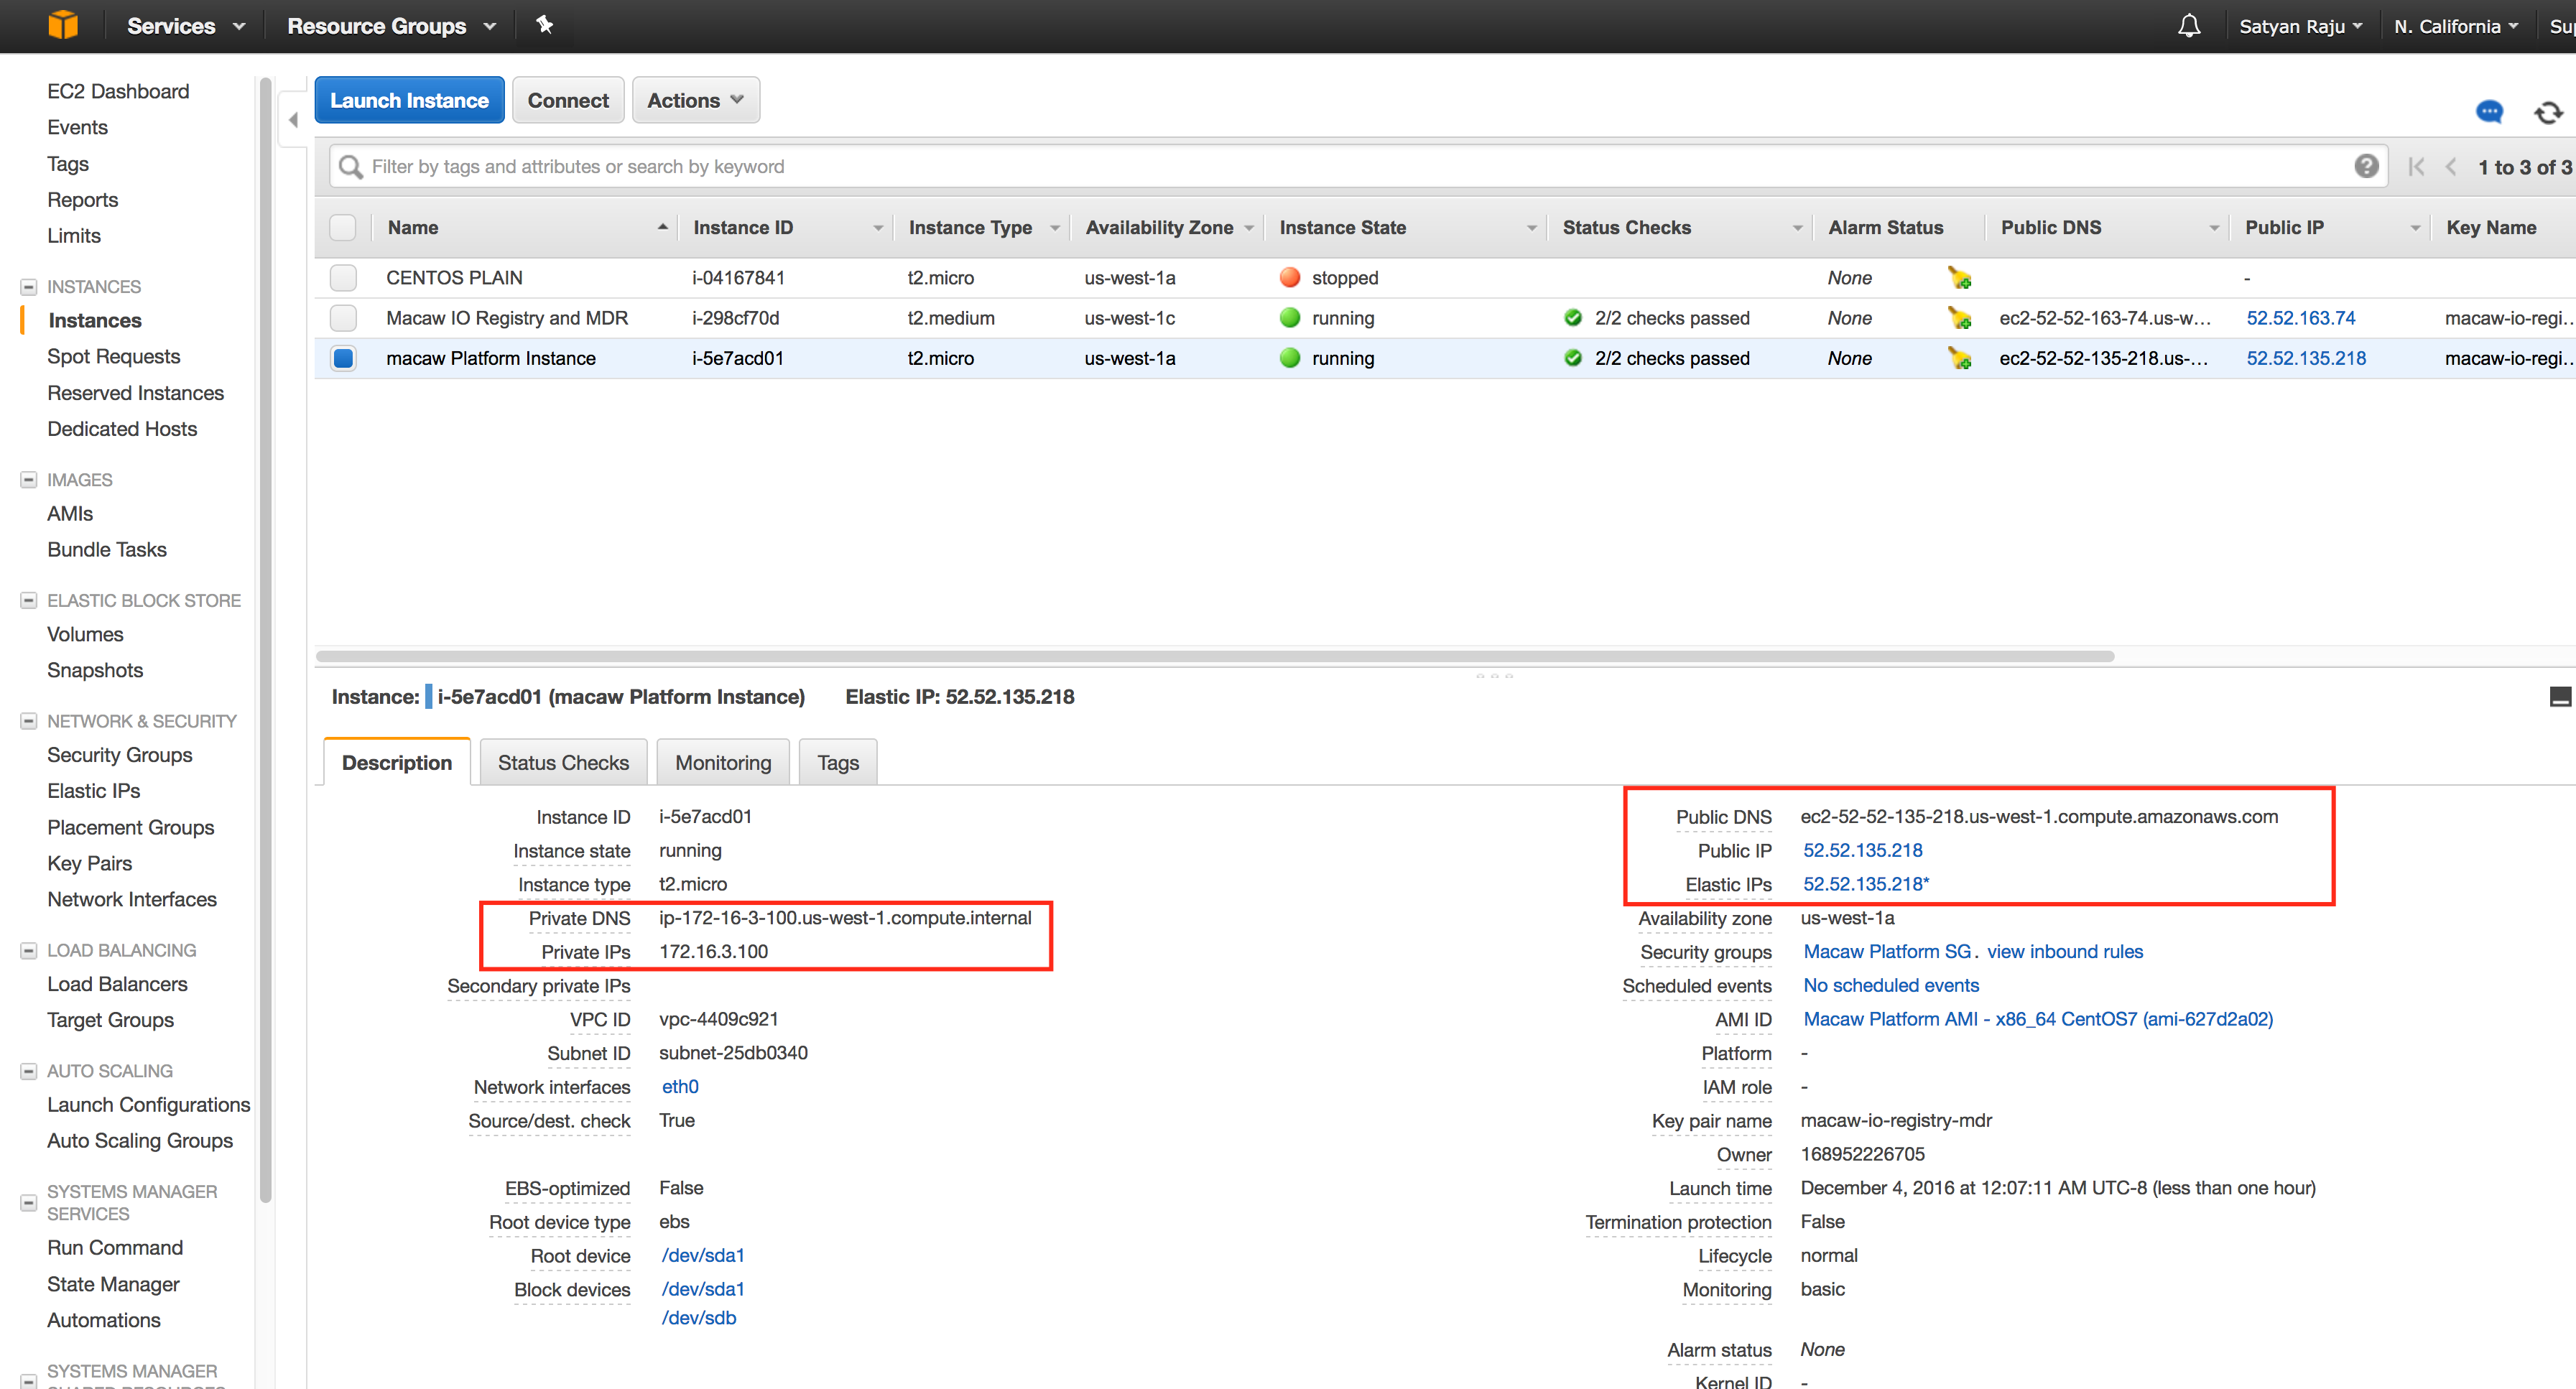
- Go to the instances option on the left side and select the platform VM to check the Elastic IP assignment.
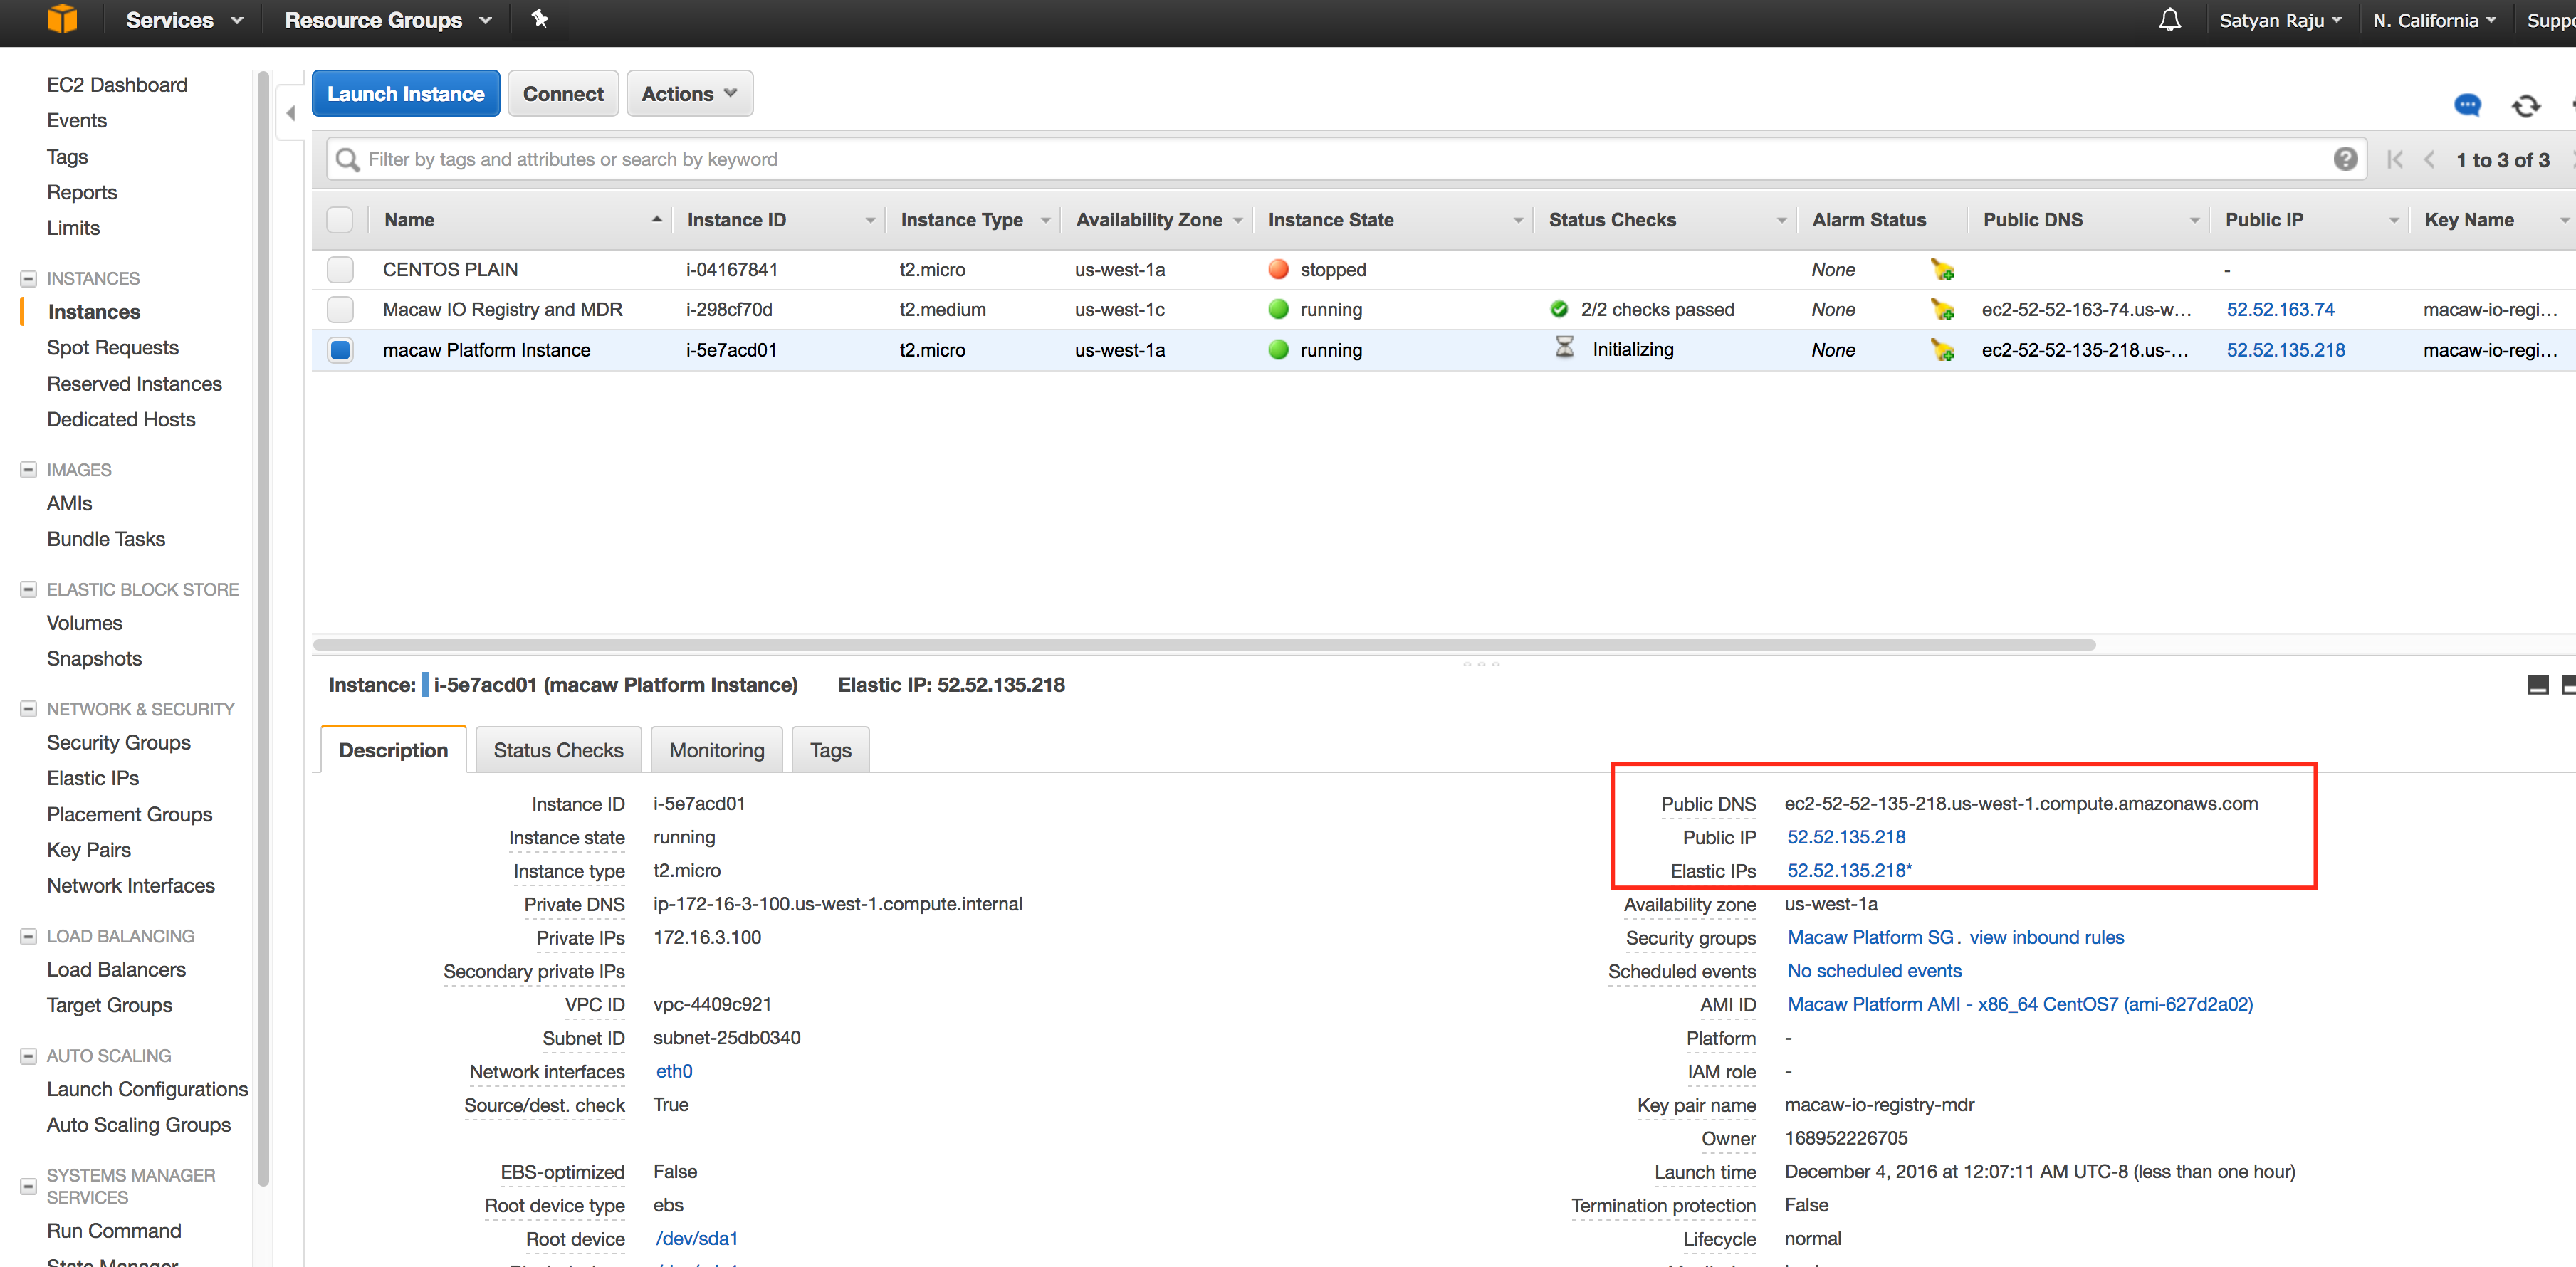
- From here onwards, you can use this IP/DNS for accessing the platform Instance externally from anywhere.
Internal IP and DNS
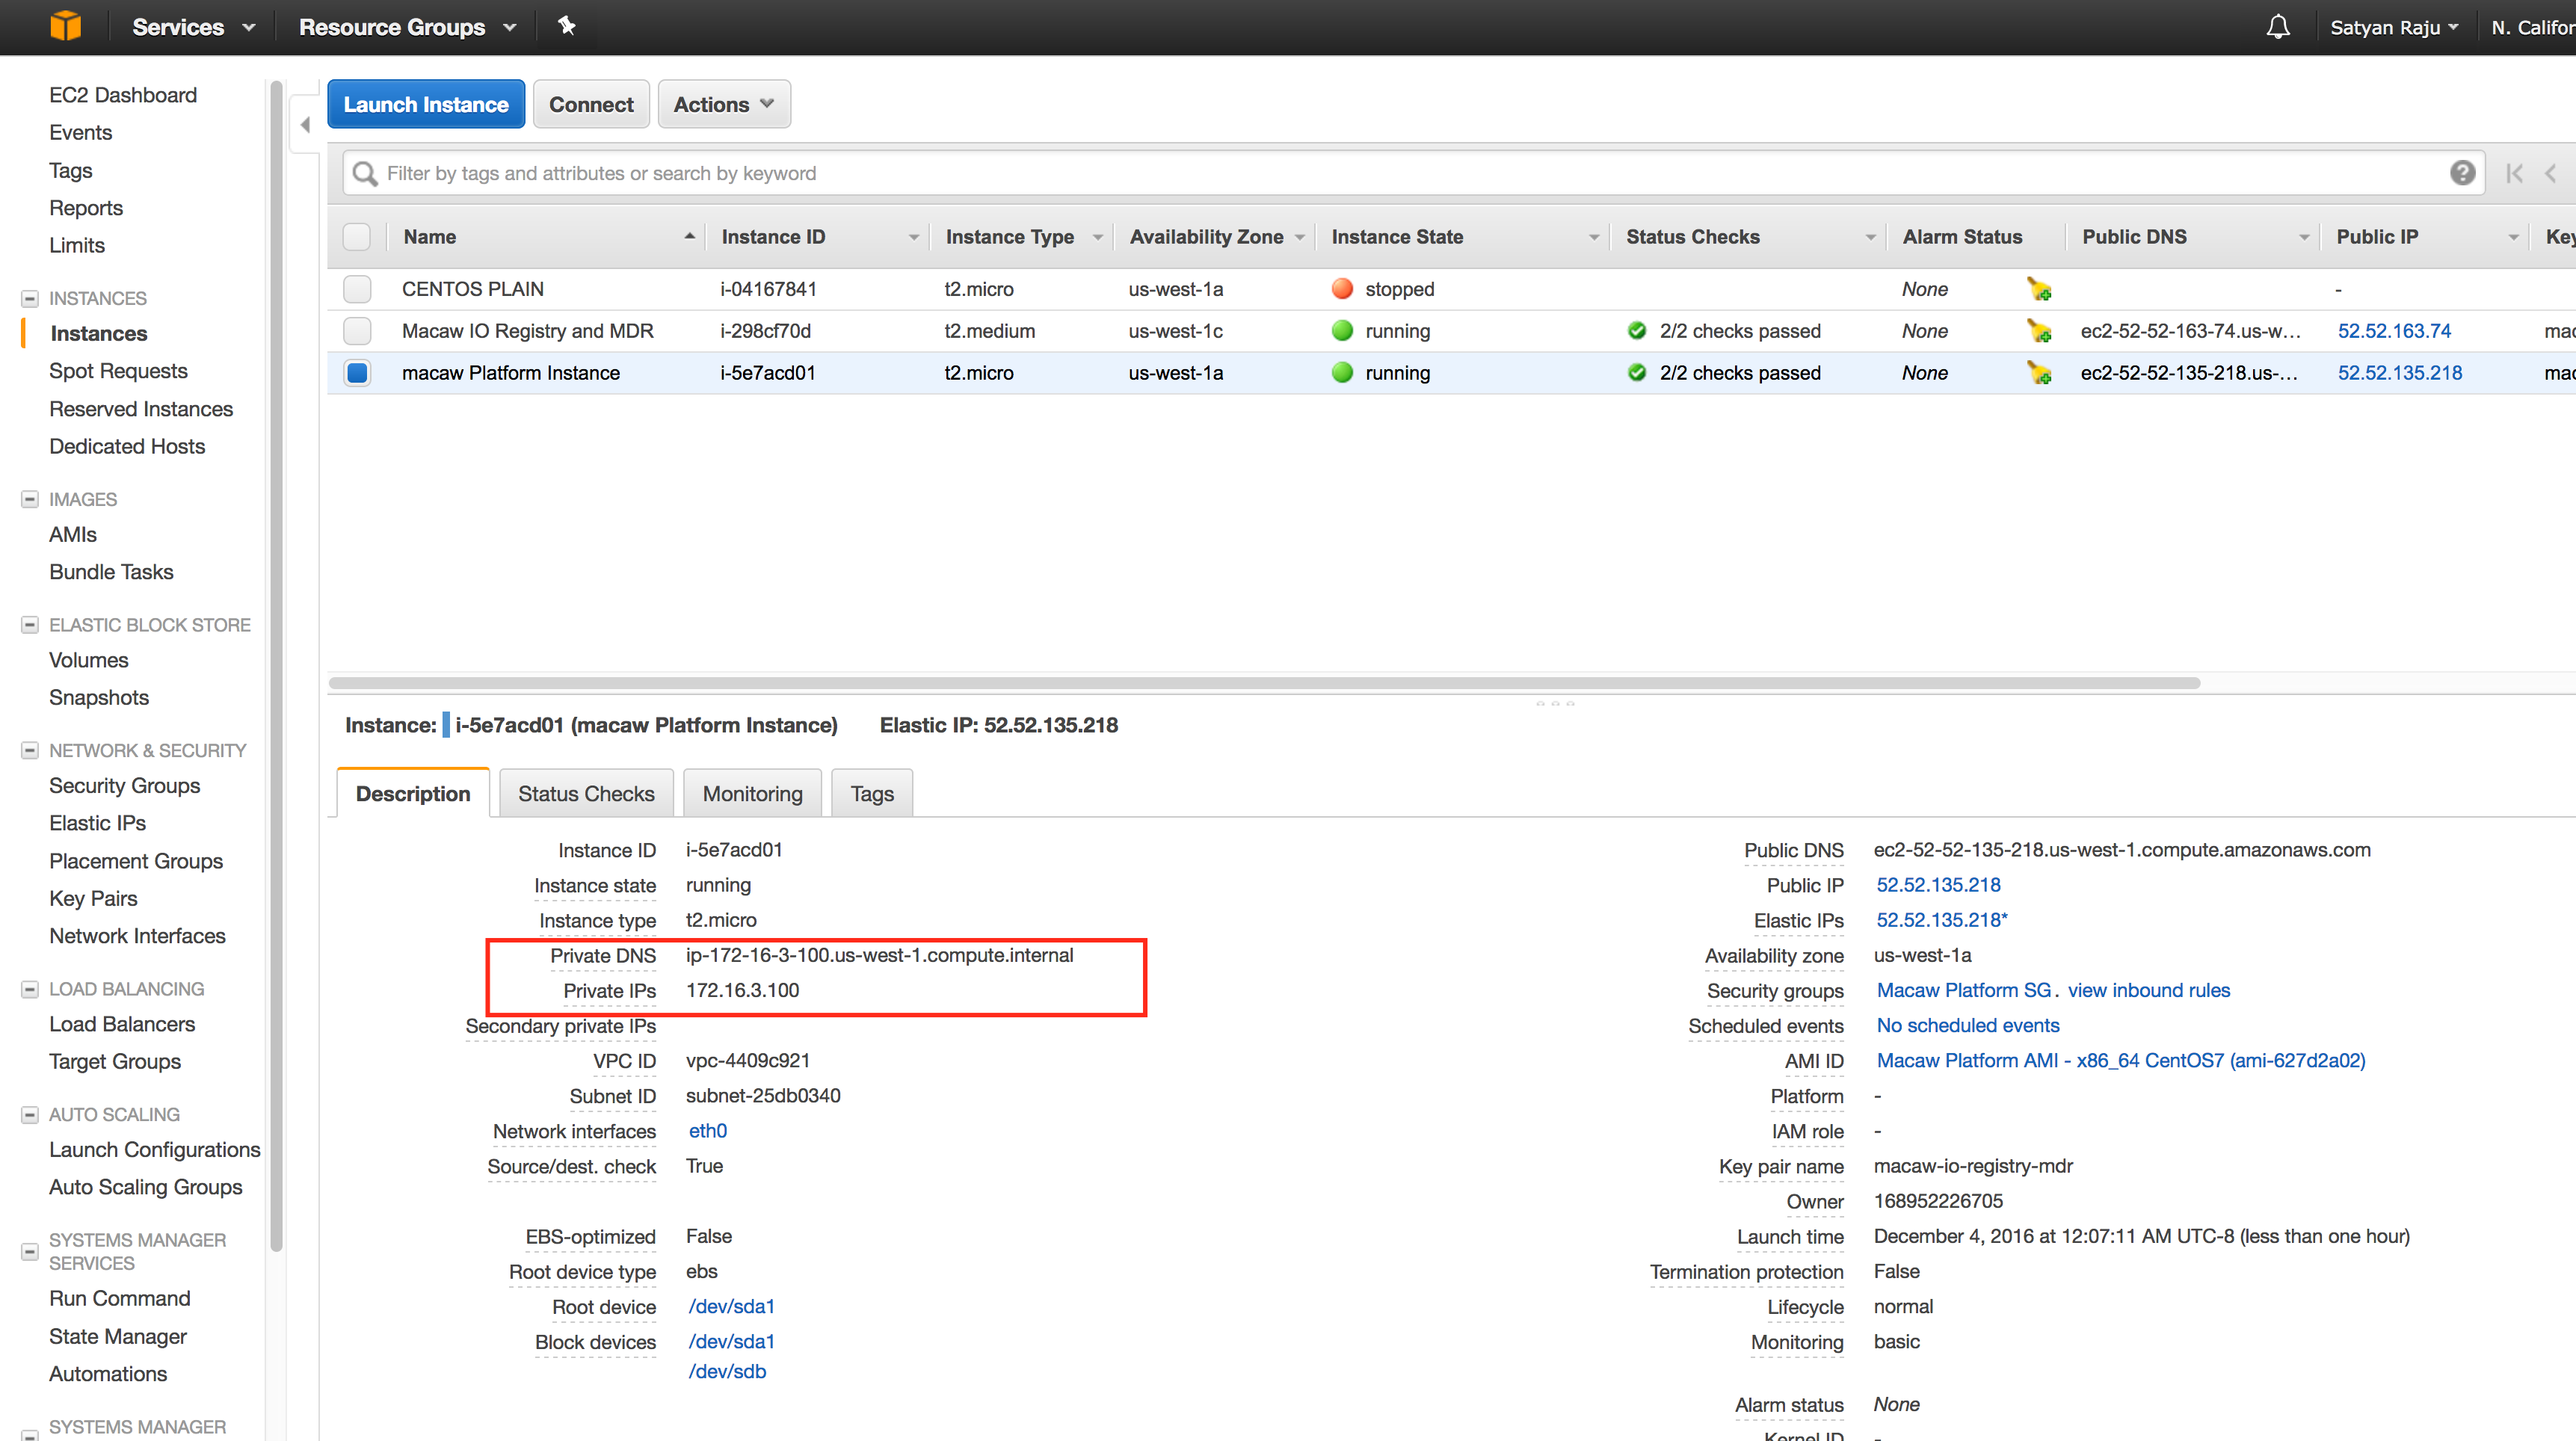
Each instance in EC2 would receive an internal private IP and DNS based on your VPC settings. You should be using this IP address or DNS of the platform Instance and service instances while setting up the necessary platform configuration using macaw setup describe at this link.
How to find my Internal IP/DNS of my AWS Instance
- Go to the EC2 Dashboard and select the Instances on the left side.
- On the right window, it would show all your instances. Identify your Platform/Services Instance and select the check box.
- You should be using either private DNS or IP for setting up the necessary platform configuration.
Note:
For Platform Instance, Elastic IP assignment is recommended so that it can be reached from the external world.
For Service Instances, Public IP assignment is optional. The only requirement is for the instances to reach the outside world. It is typically recommended to get the public IP assigned by default by the AWS so that the instance can be accessed externally for any troubleshooting.
Logging into Instances
Viewing Instance Details
- Click on the Instances in the EC2 dashboard view.
- In the list shown, select either Macaw platform or Service Instance.
The Public DNS/IP can be used to access the instance using SSH.
Accessing Instance
macaw AMI instances are based on standard x86_64 CentOS7. The AMIs are programmed with centos user and the public key of the key pair you have used during the launch of the AMIs, is programmed for this user. You can use the private key of the pair to login.
ssh -i <path to the private key> macaw@<Platform Instance Public IP>
ssh -i <path to the private key> macaw@<Service Instance Public IP>
Refer to the below AWS links for accessing the instance using the key.
https://docs.aws.amazon.com/AWSEC2/latest/UserGuide/putty.html
https://docs.aws.amazon.com/AWSEC2/latest/UserGuide/AccessingInstancesLinux.html
The macaw AMIs are programmed with macaw user. Password based SSH is enabled for this specific user. The default password is “macaw”. It is strongly recommended to changed the password on all the instances.
ssh macaw@<Platform Instance Public IP>
ssh macaw@<Service Instance Public IP>
You can use putty or any other standard windows based SSH client to access the Instance using SSH. From linux, SSH client is standard utility and should be available on all flavors of Linux.
macaw CLI Tool Installation
Once you finished the launching of the required AMIs, you need to install macaw CLI tool on the platform Instance. Execute the below command to install the macaw CLI packge.
sudo pip install <Location or HTTP link of macawcli tar Package>
When you registered for the macaw software download, the email confirmation will provide you a link to the macaw CLI package. Download the package locally to platform instance or you can use the direct HTTP/HTTPS link in the above command.
Next Steps
Please refer to the platform installation and follow the guidelines..
Vagrant
Vagrant provides easy to configure, reproducible, and portable work environments built on top of industry-standard technology. Vagrant is controlled by a single consistent workflow to help maximize the productivity and flexibility of the user and their team. For more details on Vagrant Installation, refer to the Vagrant documentation.
Macaw platform can be installed locally on a Windows desktop/MAC running Vagrant/Virtual Box. The below documentation assumes that working installation of Vagrant and Virtual box on the system are in place. The recommended version of Vagrant and virtual box are listed below.
Vagrant Download Link | Virtual Box Download Link
Note: To install Vagrant on Windows , openssh for Windows must also be installed as a prerequisite.
$vagrant version
Installed Version: 1.8.7
Latest Version: 1.8.7
You're running an up-to-date version of Vagrant!
$ VBoxManage --version
5.1.10r112026
Download the macaw Box Image
- Get the http link for the box image. Please contact the Macaw support team to help provide an http link for the downloadable box.
- Execute the below command to download the macaw box image terminal window (Mac) or a Command Window (Windows).
$ vagrant box add <HTTP Link for macaw Box>
box: Loading metadata for box '<HTTP Link>'
box: Adding box 'macaw' (v1.0.0) for provider: virtualbox
box: Downloading: <HTTP Link>/boxes/macaw-1.0.0.box
box: Box download is resuming from prior download progress
box: Calculating and comparing box checksum...
box: Successfully added box 'macaw' (v1.0.0) for 'virtualbox'!
Note: Depending on network speed, the download may take some time.
3. Verify if the box has been downloaded properly using the below command.
$ vagrant box list
centos/7 (virtualbox, 1609.01)
macaw    (virtualbox, 1.0.0)
Running the macaw Box Image
- Depending on the version of the operating system running, create a folder with any name like ‘macawplatform’. Change to that directory.
- Run the command below from either terminal window (Mac) or a Command Window (Windows)
$ mkdir macawplatform
$ cd macawplatform/
$ vagrant init macaw
A `Vagrant file` has been placed in this directory. You are now
ready to `vagrant up` your first virtual environment! Please read
the comments in the Vagrant file as well as documentation on
`vagrantup.com` for more information on using Vagrant.
You need to define an environment variable MACAW_PLATFORM_VERSION=<platform Version> For Example, if you are using 0.9.4, please provide like below.
$ export MACAW_PLATFORM_VERSION=0.9.4

Note: For Windows you can use the below. Make sure to exit the Powershell Window and re-open after executing this.
The environment variable doesnt take into effect in the current powershell window.

[Environment]::SetEnvironmentVariable("MACAW_PLATFORM_VERSION", "0.9.4", "User")
$ vagrant up

Bringing machine 'default' up with 'virtualbox' provider...

==> default: Importing base box 'macaw'...

==> default: Matching MAC address for NAT networking...

==> default: Checking if box 'macaw' is up to date...

==> default: Setting the name of the VM: macaw-platform-vm-0.9.4

==> default: Fixed port collision for 22 => 2222. Now on port 2200.

==> default: Clearing any previously set network interfaces...

==> default: Preparing network interfaces based on configuration...

    default: Adapter 1: nat

    default: Adapter 2: hostonly

==> default: Forwarding ports...

    default: 22 (guest) => 2200 (host) (adapter 1)

==> default: Running 'pre-boot' VM customizations...

==> default: Booting VM...

==> default: Waiting for machine to boot. This may take a few minutes...

    default: SSH address: 127.0.0.1:2200

    default: SSH username: macaw

    default: SSH auth method: private key

    default: Warning: Remote connection disconnect. Retrying...

    default: Warning: Remote connection disconnect. Retrying...

    default: Warning: Remote connection disconnect. Retrying...

    default: Warning: Authentication failure. Retrying...

    default:

    default: Vagrant insecure key detected. Vagrant will automatically replace

    default: this with a newly generated keypair for better security.

    default:

    default: Inserting generated public key within guest...

    default: Removing insecure key from the guest if it's present...

    default: Key inserted! Disconnecting and reconnecting using new SSH key...

==> default: Machine booted and ready!

==> default: Checking for guest additions in VM...

==> default: Configuring and enabling network interfaces...

==> default: Mounting shared folders...

    default: /vagrant => /Users/ravjanga/Documents/0.9.4.b7

==> default: Running provisioner: macaw Registry Login (shell)...

    default: Running: script: docker login to registry.macaw.io

==> default: Login Succeeded

==> default: Running provisioner: macaw Infra (shell)...

    default: Running: script: Downloading macaw infra components

==> default: Pulling registry.macaw.io/zookeeper:macaw-v0.9.4

==> default: Pulling registry.macaw.io/kafka:macaw-v0.9.4

==> default: Pulling registry.macaw.io/cassandra:macaw-v0.9.4

==> default: Pulling registry.macaw.io/elasticsearch:macaw-v0.9.4

==> default: Pulling registry.macaw.io/mysql:macaw-v0.9.4

==> default: Pulling registry.macaw.io/haproxy:macaw-v0.9.4

==> default: Pulling registry.macaw.io/macaw-tomcat:macaw-v0.9.4

==> default: Pulling registry.macaw.io/redis:macaw-v0.9.4

==> default: Running provisioner: macaw Platform (shell)...

    default: Running: script: Downloading macaw platform components

==> default: Pulling registry.macaw.io/service-registry:macaw-v0.9.4

==> default: Pulling registry.macaw.io/notification-manager:macaw-v0.9.4

==> default: Pulling registry.macaw.io/identity:macaw-v0.9.4

==> default: Pulling registry.macaw.io/service-provisioner:macaw-v0.9.4

==> default: Pulling registry.macaw.io/user-preferences:macaw-v0.9.4

==> default: Pulling registry.macaw.io/console-ui-webapp:macaw-v0.9.4

==> default: Pulling registry.macaw.io/macaw-dbinit:macaw-v0.9.4

==> default: Running provisioner: Installing macawcli Tool (shell)...

    default: Running: script: Downloading macawcli

==> default: Installing macaw CLI packge from https://macaw-amer.s3.amazonaws.com/tools/macawcli-0.9.4.tar.gz

==> default: Macawcli Tool package Installed Successfully

==> default: Running provisioner: IP/Hostname Mapping (shell)...

    default: Running: script: IP/Hostname Mapping

==> default: IP/Hostname Mapping in /etc/hosts successful

==> default: Machine 'default' has a post `vagrant up` message. This is a message

==> default: from the creator of the Vagrantfile, and not from Vagrant itself:

==> default:

==> default: Congratulations!! You are now ready to login to the Macaw Platform VM
Note: The vagrant Macaw box is customized with the properties listed here. Overriding the defaults can be done with a few supported environment variables.
- Memory default is set to 8GB.
- CPU count is set to 2.
- Network is set to private_network with hardcoded IP address of 192.168.33.10. This IP is reachable from the Host only. The VM will be able to access the internet. The documentation of further steps assume this IP address in installing the Macaw platform.
| Environment Variable | Purpose | Mandatory | Default Value |
| MACAW_PLATFORM_VERSION | This is to define what version of the platform version the user would like the vagrant provisioner to bootstrap. | Yes | |
| MACAW_VAGRANT_DISABLE_UPDATE_CHECK | This is to prevent vagrant from checking any updates to the box image. | No | True |
| MACAW_VAGRANT_MEMORY | Memory allocated to the user’s Vagrant Platform VM | No | 8192 |
| MACAW_VAGRANT_CPUS | CPUs allocated to the user’s Vagrant Platform VM | No | 2 |
| MACAW_VAGRANT_NW_MODE | Network Mode – Supports only “private_network” or “public_network” | No | private_network with IP 192.168.33.10 |
| MACAW_IP_ADDRESS | If private_network is selected, then the IP Address can be changed by setting this environment variable. | No | 192.168.33.10 |
| MACAW_SUBNET_MASK | If private_network is selected, then subnet mask can be changed by setting this environment variable. | No | 255.255.255.0 |
Verifications
Once the above command is successful, the user can login to the Macaw platform VM and be able to check a few things to confirm if the installation was performed smoothly.
$ vagrant ssh
Last login: Sat Nov 12 23:26:12 2016
[vagrant@localhost ~]$ ip addr

1: lo: <LOOPBACK,UP,LOWER_UP> mtu 65536 qdisc noqueue state UNKNOWN
    link/loopback 00:00:00:00:00:00 brd 00:00:00:00:00:00
    inet 127.0.0.1/8 scope host lo
       valid_lft forever preferred_lft forever
    inet6 ::1/128 scope host
       valid_lft forever preferred_lft forever
2: enp0s3: <BROADCAST,MULTICAST,UP,LOWER_UP> mtu 1500 qdisc pfifo_fast state UP qlen 1000
    link/ether 08:00:27:40:c1:5d brd ff:ff:ff:ff:ff:ff
    inet 10.0.2.15/24 brd 10.0.2.255 scope global dynamic enp0s3
       valid_lft 85741sec preferred_lft 85741sec
    inet6 fe80::a00:27ff:fe40:c15d/64 scope link
       valid_lft forever preferred_lft forever
3: enp0s8: <BROADCAST,MULTICAST,UP,LOWER_UP> mtu 1500 qdisc pfifo_fast state UP qlen 1000
    link/ether 08:00:27:97:8d:6c brd ff:ff:ff:ff:ff:ff
    inet 192.168.33.10/24 brd 192.168.33.255 scope global enp0s8
       valid_lft forever preferred_lft forever
    inet6 fe80::a00:27ff:fe97:8d6c/64 scope link
       valid_lft forever preferred_lft forever
4: docker0: <NO-CARRIER,BROADCAST,MULTICAST,UP> mtu 1500 qdisc noqueue state DOWN
    link/ether 02:42:cb:86:21:94 brd ff:ff:ff:ff:ff:ff
    inet 172.17.0.1/16 scope global docker0
       valid_lft forever preferred_lft forever
[vagrant@localhost ~]$ ping 8.8.8.8 -c 5
PING 8.8.8.8 (8.8.8.8) 56(84) bytes of data.
64 bytes from 8.8.8.8: icmp_seq=1 ttl=63 time=18.9 ms
64 bytes from 8.8.8.8: icmp_seq=2 ttl=63 time=16.1 ms
64 bytes from 8.8.8.8: icmp_seq=3 ttl=63 time=19.6 ms
64 bytes from 8.8.8.8: icmp_seq=4 ttl=63 time=297 ms
64 bytes from 8.8.8.8: icmp_seq=5 ttl=63 time=14.5 ms

--- 8.8.8.8 ping statistics ---
5 packets transmitted, 5 received, 0% packet loss, time 4007ms
rtt min/avg/max/mdev = 14.558/73.298/297.207/111.969 ms
[vagrant@localhost ~]$
[vagrant@localhost ~]$ nproc

2
[vagrant@localhost ~]$ free -m

              total        used        free      shared  buff/cache   available
Mem:           5807         148        4040           8        1617        5426
Swap:          2047           0        2047

[vagrant@localhost ~]$ macaw -v
Version: macawcli-0.9.4
Note: The Macaw tool version can be different from what is shown above.
After successful execution of the above steps, move forward with the platform installation. Follow the link for Macaw platform installation. For installing the Macaw platform, during setup the user would need to provide FQDN of the platform host. In this case, IP address 192.168.33.10 can be used for the platform IP as well as the service host IP.
Linux Host
Macaw platform is supported on generic 64 Bit Linux OS which supports Docker. The steps below provide an automated way of installing the necessary packages needed for Macaw platform and also manual steps if required. This installed script is only supported on CentOS7 64-bit OS and version 3.10 or higher of the Linux kernel.
Prerequisites
- Check for CentOS Version. It should be minimum 7.
$ more /etc/centos-release
CentOS Linux release 7.3.1611 (Core)
$ uname -r
3.10.0-514.16.1.el7.x86_64
- Check availability of the command curl. This command is available on most linux installations by default.
$ which curl
/usr/bin/curl
- DNS and Hostname
Make sure the platform host is configured with the fully qualified host name with DNS resolution. It is highly recommended to have proper DNS entry for the host name and avoid using the/etc/hosts mapping of the host name to IP.
If DNS is not available in your network, you can use the IP Address of the host. This is not recommended in production deployments. In this have the below entry in your /etc/hosts file on the platform Host.
<Platform HostIP> <Platform Hostname>
- Firewall Settings
If firewall is disabled, the user can ignore this pre-requisite. If firewall is enabled on the Linux Host, then for platform installation the ports/services listed below need to be opened up.
firewall-cmd --list-ports
443/tcp 80/tcp 8181/tcp 4000/tcp 2181/tcp 9200/tcp 3306/tcp 8443/tcp 8637/tcp 9042/tcp 9300/tcp 9092/tcp 7000/tcp 6379/tcp 5000/tcp 9160/tcp

firewall-cmd --list-services
rpc-bind nfs ssh mountd
Install with Automated Script
- Log into the machine as a user who has password-less
sudo permissionsorrootprivileges. - Make sure the existing packages are up-to-date.
sudo yum update
- If yum updates the kernel, it is recommended to restart the machine.
- Run the Macaw installation script.
Note: When the user registered for the Macaw software download, the confirmation email would have a link to the MacawInstall script, a shell script.
$ bash <(curl -s https://s3.amazonaws.com/macaw-amer/tools/macawInstall.sh) --role <Role of the VM/Host>

Note: Once the installation is done, make sure logout and login back again so that group permissions get updated for the user.

To Prepare a Platform VM/Host pass --role platform
To Prepare a Service VM/Host pass --role service
- Install the Macaw CLI Python package. The location of the macaw CLI package should be part of the Macaw download/setup email.
sudo pip install <URL / Location of the macawcli Package>
- Verify the Macaw tool by issuing the command “macaw –version”
Once the installation/verification is done, the user can move to the Platform Installation section.
Manual Installation Steps – Platform VM/Host
If installer is not used or cannot be used in your environment, the below steps can be executed manually.
-
Yum Update
Update the OS to get latest security patches.
yum update -y
Note: Please reboot the system after doing this operation.
-
NFS Client Utils
Macaw platform mandates NFS shared mount between platform and service hosts. To be able to mount NFS, the user needs to install NFS client utilitiess.
sudo yum install -y nfs-utils
sudo systemctl enable rpcbind
sudo systemctl start rpcbind
-
Install autofs
Autofs module is used to mount NFS volumes.
sudo yum install -y autofs
sudo sed -i 's/.*auto.misc.*/\/-      \/etc\/auto.macawnfs/g' /etc/auto.master
sudo touch /etc/auto.macawnfs
sudo systemctl enable autofs
sudo systemctl start autofs
-
Install macaw Trusted certificate
sudo wget -q -P /etc/pki/ca-trust/source/anchors/ https://s3.amazonaws.com/macaw-amer/thirdparty/__macaw_io.ca-bundle
sudo update-ca-trust
-
Install Docker
Follow the docker installation instructions at the below link.
https://docs.docker.com/engine/installation/linux/centos/
Below are simple instructions to install docker 1.13.1 release. It is highly recommended to follow production installation guidelines for Docker.
sudo yum-config-manager --add-repo https://s3.amazonaws.com/macaw-amer/thirdparty/docker.repo
sudo yum makecache fast
sudo yum -y install docker-engine-1.13.1 docker-engine-selinux-1.13.1
sudo systemctl daemon-reload
sudo systemctl enable docker
sudo systemctl start docker
Once the docker installation is done, please perform the below necessary post-installation steps.
sudo usermod -aG docker <current user ID>
Please logout of the current session and login again so that the groups permissions is taken into account.
Note: Current user ID is the user who would be executing the Macaw installation later as well. The user should be using this user ID across the Macaw installation steps.
-
Install JAVA
Java 1.8 must be installed under /opt/java
sudo yum install -y wget
/bin/rm -rf /tmp/java-linux.tar.gz
sudo mkdir -p /opt/java
sudo wget -q -O /tmp/java-linux.tar.gz https://s3.amazonaws.com/macaw-amer/thirdparty/jdk-8u102-linux-x64.tar.gz
sudo tar xf /tmp/java-linux.tar.gz -C /opt/java --strip-components 1
/bin/rm -rf /tmp/java-linux.tar.gz
Now update the PATH of the current user so that Java is found in the PATH. Add the below line to the ~/.bash_profile
PATH=/opt/java/bin:$PATH

export PATH
Note: Make sure to logout and login back. Verify that Java is found in the PATH by executing
$ which java
/opt/java/bin/java

$ java -version
java version "1.8.0_102"
Java(TM) SE Runtime Environment (build 1.8.0_102-b14)
Java HotSpot(TM) 64-Bit Server VM (build 25.102-b14, mixed mode)
-
Enable NFS Server
If the user doesn’t have an external NFS server, they can install and enable NFS on the platform host. Once installed, they can NFS export a mount from the platform host and all the service hosts can NFS mount the directory. The exporting/mounting is all done as part of the Macaw setup.
sudo yum install -y nfs-utils libnfsidmap
sudo systemctl enable rpcbind
sudo systemctl enable nfs-server
sudo systemctl start rpcbind
sudo systemctl start nfs-server
sudo systemctl start rpc-statd
sudo systemctl start nfs-idmapd
-
Install utilities – mysql client, wget
Install mysql client.
sudo yum install -y mysql wget
-
python environment setup
Macaw tool set supports standard Python PIP-based installation. Follow the below instructions to enable pip.
Make sure the Python version is Python 2.7.X
python --version
Enable python PIP tool and make sure it is 8.1.2 or above.
curl --silent --show-error --retry 5 https://bootstrap.pypa.io/get-pip.py | sudo python
sudo pip --version
Macaw tool set uses certain Python libraries which would get installed as part of the Macaw tool installation. However, it would require certain packages to be present on the system. You can remove the package once the installation is done.
sudo yum install -y gcc kernel-devel libffi-devel python-devel openssl-devel

sudo pip install <Full Local or Remote path location of macawcli.tar.gz>
Verify the successful installation of macaw tool using the below command.
macaw -v
Now the user can remove the additional packages that the user may have added above by using the below command.
sudo yum remove -y gcc kernel-devel libffi-devel python-devel openssl-devel
Once the installation is done, the user can move to the Platform Installation section.
Manual Installation Steps – Service VM/Host
If installer is not used or cannot be used in your environment, the below steps can be executed manually.
-
Yum Update
Update the OS to get latest security patches.
yum update -y
Note: Please reboot the system after doing this operation.
-
NFS Client Utils
Macaw platform mandates NFS shared mount between platform and service hosts. To be able to mount NFS, the user needs to install NFS client utilities.
sudo yum install -y nfs-utils
sudo systemctl enable rpcbind
sudo systemctl start rpcbind
-
Install autofs
Autofs module is used to mount NFS volumes.
sudo yum install -y autofs
sudo sed -i 's/.*auto.misc.*/\/-      \/etc\/auto.macawnfs/g' /etc/auto.master
sudo touch /etc/auto.macawnfs
sudo systemctl enable autofs
sudo systemctl start autofs
-
Install macaw Trusted certificate
sudo wget -q -P /etc/pki/ca-trust/source/anchors/ https://s3.amazonaws.com/macaw-amer/thirdparty/__macaw_io.ca-bundle
sudo update-ca-trust
-
Install Docker
Follow the docker installation instructions at the below link.
https://docs.docker.com/engine/installation/linux/centos/
Below are simple instructions to install docker 1.13.1 release. It is highly recommended to follow production installation guidelines for Docker.
sudo yum-config-manager --add-repo https://s3.amazonaws.com/macaw-amer/thirdparty/docker.repo
sudo yum makecache fast
sudo yum -y install docker-engine-1.13.1 docker-engine-selinux-1.13.1
sudo systemctl daemon-reload
sudo systemctl enable docker
sudo systemctl start docker
Once the docker installation is done, please perform the below necessary post-installation steps.
sudo usermod -aG docker <current user ID>
Please logout of the current session and login again so that the groups permissions is taken into account.
Note: Current user ID is the user who would be executing the Macaw installation later as well. The user should be using this user ID across the Macaw installation steps.
-
Install JAVA
Java 1.8 must be installed under /opt/java
sudo yum install -y wget
/bin/rm -rf /tmp/java-linux.tar.gz
sudo mkdir -p /opt/java
sudo wget -q -O /tmp/java-linux.tar.gz https://s3.amazonaws.com/macaw-amer/thirdparty/jdk-8u102-linux-x64.tar.gz
sudo tar xf /tmp/java-linux.tar.gz -C /opt/java --strip-components 1
/bin/rm -rf /tmp/java-linux.tar.gz
Now update the PATH of the current user so that Java is found in the PATH. Add the below line to the ~/.bash_profile
PATH=/opt/java/bin:$PATH

export PATH
Note: Make sure to logout and login back. Verify that Java is found in the PATH by executing
$ which java
/opt/java/bin/java

$ java -version
java version "1.8.0_102"
Java(TM) SE Runtime Environment (build 1.8.0_102-b14)
Java HotSpot(TM) 64-Bit Server VM (build 25.102-b14, mixed mode)
Platform Installation
Setup
Macaw platform configuration is done through Macaw utility. The setup section documents the full details of the platform’s configuration steps along with details for each specific configuration item.
MACAW Setup
Macaw setup assists in generating the necessary platform and provisioner configuration. This is a mandatory step for the Macaw platform deployment. The section below provides the Macaw setup sequence with a detailed explanation on various prompts.
Note: If using Macaw setup for the first, the user will be prompted for the EULA agreement. For most of the questions, the user can choose the default and make progress.
The below section shows the typical Macaw setup prompts with contextual help. Refer to additional documentation highlighted in blue (The highlighted text is not part of the Macaw setup output).
$ macaw setup

@@@@@@@@@@@@@@@@@@@@@@@@@@@@@@@@@@@@@@@@@@@@@@@@@@@@@@@@@@@@@@@@@@@@@@@@@@@@@@@@@@@@@@@@@@@@@@@@@@@@@@@@@

@ The macaw setup will guide you through sequence of steps prompting you with default values and auto   @
@ generate platform and provisioner configuration. The default values are picked up from your existing  @
@ platform configuration (if any) or suggested based on your host configuration.                        @
@                                                                                                       @
@ If you are manually editing the platform configuration after auto generation, please refer to the     @
@ documentation.                                                                                        @
@ Location of Platform configuration file: ~/platform.cfg                                               @
@ Refer to ~/platform.README for more details on the platform configuration options.                    @
@@@@@@@@@@@@@@@@@@@@@@@@@@@@@@@@@@@@@@@@@@@@@@@@@@@@@@@@@@@@@@@@@@@@@@@@@@@@@@@@@@@@@@@@@@@@@@@@@@@@@@@@@

Please confirm to continue. [yes/no]: yes

+--------------------+----------------------------------------+
|  System            |  Details                               |
+--------------------+----------------------------------------+
|  OS                |  Linux                                 |
|  Kernel            |  3.10.0-327.36.2.el7.x86_64            |
|  Distribution      |  ('CentOS Linux', '7.2.1511', 'Core')  |
|  Memory Total      |  32774672 KB                           |
|  Memory Available  |  31925112 KB                           |
|  CPU Cores         |  8                                     |
+--------------------+----------------------------------------+

This is the FQDN of the platform host (your current host). FQDN needs to be fully DNS
resolvable. Adding to /etc/hosts will not be sufficient. If you do not have DNS configured
properly, you can provide IP address.

It is strongly suggested to use FQDN names. Since the services are containerized it is not
going to work if you are simply adding the hostname and IP address mapping in the /etc/hosts file.
The DNS resolution should be through a proper DNS server.
FQDN of platform Host [platform-190.qa.macaw.io]: platform-190.qa.macaw.io

Provide Service Hosts. If you have multiple hosts, please provide them comma separated.
DNS resolvable FQDN is recommended. Adding to /etc/hosts will not be sufficient. If you
do not have DNS configured properly, you can provide IP address.

The user needs to provide comma separated service hosts. Same recommendation on FQDN applies here as well.
This is the zookeeper endpoint. Default is chosen below. This assumes the user is running zookeeper
on the platform host.

FQDN of services hosts (, separated if more than 1): platform-190.qa.macaw.io

This is the zookeeper endpoint. Default is chosen below. This assumes the user is running zookeeper
on the platform host.

This is the user's zookeeper end point. Zookeeper can be run on any machine. By default macaw tool provisions the
zookeeper container on the platform. Hence, the user sees the default selection as the platform host. If zookeeper is
configured on a different host, provide the same host followed by the zookeeper port.
Same recommendation on FQDN applies here as well.

Zookeeper endpoint [platform-190.qa.macaw.io:2181]:

This is the kafka endpoint. Default is chosen below. This assumes the user is running kafka
on the platform host.

This is the user's kafka end point. kafka can be run on any machine. By default macaw tool provisions the zookeeper container
on the platform. Hence the user sees the default selection as the platform host. If kafka is configured on a different host, provide
the same host followed by the kafka port. Same recommendation on FQDN applies here as well.

Kafka endpoint [platform-190.qa.macaw.io:9092]:

This is the MYSQL DB endpoint. Default is chosen below. This assumes the user is running MYSQL  on the platform host.

MYSQL endpoint [platform-190.qa.macaw.io:3306]:

MYSQL User. If the user is already using an existing mysql installation, please make sure this user has the right access permissions.
If the user is installing mysql via 'macaw infra install', this user will be automatically programmed for access. Also all default users of the system will be deleted.

MYSQL Credentials. If the user is provisioning the mysql through macaw tool, the mysql is automatically provisioned  with this user.
If not, this user is expected to be configured with read/write privileges to mysql and also enable  remote connection for the same user.

MYSQL user [root]:

MYSQL password for the above user.

MYSQL password [Nl71dm31@12]:

This is the cassandra DB endpoint. Default is chosen below. This assumes the user is running cassandra  on the platform host.

Cassandra endpoint [platform-190.qa.macaw.io:9042]:

Cassandra User. If the user is already using an existing cassandra installation, please make sure this user has the right access permissions.
If the user is installing mysql via 'macaw infra install', this user will be automatically programmed for access.
Also all default users of the system will be deleted.

Cassandra DB credentials. cassandra/cassandra are the default credentials. If the user prefers to change this is the time to change.
The user will be configured by the macaw tool in the cassandra DB.

Cassandra user [cassandra]:

Cassandra password for the above user.

Cassandra password [cassandra]:

This is the Elasticsearch DB endpoint. Default is chosen below. This assumes the user running Elasticsearch  on the platform host.

Elasticsearch host (DB) [platform-190.qa.macaw.io:9300]:

This is the Elasticsearch Log endpoint. Default is logging to elastic search is disabled. Please refer to documentation on how to enable this before bootstrapping the macaw platform.

Elasticsearch host (Logging) []:

MACAW platform uses common NFS mount across the platform and service VMs to be able to share  the data on the mount points.
Please provide an end NFS mount point. By default this is pointing  to platform VM.
If the user selects the default option, then the user needs to have the necessary NFS Server  packages installed on the platform VM.
The below config would be reflected in the user's platform configuration.
[nfs] host = <NFS Host>
remote_mount = <Shared Mount on NFS>
local_mount = <Local mount point to NFS mount>

Note: If NFS utilities are not installed on the platform and Service VM, select the defaults and then skip  autosetup of the NFS mount
and the user can update the  ~platform.cfg manually once they setup the NFS mounts manually by following the documentation.

NFS Server [platform-190.qa.macaw.io]:
NFS Server Mountpoint [/opt/macaw-shared]:
Local NFS Mount [/opt/appd-shared-9ba77ea521865282]:

This is deployment config directory where we store certificates and configurations.
The sensitive data like certificates/keys are given restrictive permissions and can only be read & written by the current user.
Certificate Repository:       $deploymentDir/certificates
Common Configuration:         $deploymentDir/common
Provisioner Configuration:    $deploymentDir/provisioner
Systems Keys:                 $deploymentDir/keys

Deployment config directory [/opt/macaw-config]:

When self-signed certificates are generated, Macaw uses this as the pass phrase for the truststores.
If the user is providing their own certificates (Please refer to documentation on how to) and if  the trust store is protected by
passphrase please provide that passphrase here.

Pass-phrase for certificate Trust stores [macaw@1234]:

Platform configuration saved to: /home/macaw/platform.cfg
Creating the configuration directory: /opt/macaw-config
Service Provisioning Environment configuration saved to: /opt/macaw-config/provisioner/macaw-service-provisioner.properties

Creating the platform macaw user

Platform and Provisioner configuration are sync'ed.

Key already exists at: /home/macaw/.ssh/id_rsa.

Deploying SSH Key: /home/macaw/.ssh/id_rsa.pub to remote hosts

SSH already deployed to: platform-190.qa.macaw.io for user: macaw

Deploying self-signed certificates. Follow help/documentation for replacing them.

Certificate Repository: /opt/macaw-config/certificates macaw-info:

Certificate for: Self Signed CA macaw-info:

Location: /opt/macaw-config/certificates/ca

macaw-info:    Generating Self-Signed CA certificate
macaw-info:    Importing Trusted CAs into Trust store
macaw-info:    Certificate generation - Success

macaw-info:    Certificate for: haproxy
macaw-info:    Location: /opt/macaw-config/certificates/haproxy
macaw-info:    Now generating the haproxy server certificate
macaw-info:    Changing permissions and granting restrictive access
macaw-info:    Certificate generation - Success

macaw-info:    Certificate for: serviceregistry
macaw-info:    Location: /opt/macaw-config/certificates/serviceregistry
macaw-info:    Now generating the serviceregistry server certificate
macaw-info:    Changing permissions and granting restrictive access
macaw-info:    Certificate generation - Success

macaw-info:    Certificate for: mdr
macaw-info:    Location: /opt/macaw-config/certificates/mdr
macaw-info:    Now generating the mdr server certificate
macaw-info:    Changing permissions and granting restrictive access
macaw-info:    Certificate generation - Success

macaw-info:    Certificate for: dockerregistry
macaw-info:    Location: /opt/macaw-config/certificates/dockerregistry
macaw-info:    Now generating the dockerregistry server certificate
macaw-info:    Changing permissions and granting restrictive access
macaw-info:    Certificate generation - Success
macaw-info:    Certificate for: kafka

macaw-info:    Location: /opt/macaw-config/certificates/kafka
macaw-info:    Now generating the kafka server certificate
macaw-info:    Changing permissions and granting restrictive access
macaw-info:    Certificate generation - Success

Do you want NFS setup to be configured? This will require sudo access to the current user.
Please confirm to continue. [yes/no]: yes

Enabling NFS Server on the platform VM NFS Server enabled on Platform VM
Verifying NFS mount...

NFS mount successful: platform-190.qa.macaw.io

Copying trust store to shared location for services: /opt/appd-shared-9ba77ea521865282/certificates/truststore

MACAW Setup done. $
Once the Macaw setup is complete, the user should see platform.cfg, macaw-service-provisioner.properties and macaw-resource-profiles.json. If they need to make any modifications, they should be made before installing infrastructure and platform configurations. For particular information on platform and provisioner configurations, the user can read the README files that reside in the same directory as configuration files.
Refer to the Configuration section on a precise explanation of platform and provisioner configuration. It further elaborates on what changes can be made and what needs to be done after changing the auto-generated configuration.
$ ls -lat ~/platform.cfg
-rw-------. 1 macaw macaw 3478 Nov 25 12:11 /home/macaw/platform.cfg

$ ls -lat ~/platform.README
-rw-r--r--. 1 macaw macaw 9298 Nov 25 12:11 /home/macaw/platform.README
$

$ ls -lat /opt/macaw-config/provisioner/macaw-service-provisioner.properties
-rw-------. 1 macaw macaw 3152 Nov 25 12:11 /opt/macaw-config/provisioner/macaw-service-provisioner.properties

$ ls -lat /opt/macaw-config/provisioner/macaw-service-provisioner.README
-rw-r--r--. 1 macaw macaw 6327 Nov 25 12:11 /opt/macaw-config/provisioner/macaw-service-provisioner.README

$ $ ls -lat /opt/macaw-config/provisioner/macaw-resource-profiles.json
-rw-------. 1 cfx cfx 7955 Feb  4 14:24 /opt/macaw-config/provisioner/macaw-resource-profiles.json
Platform Configuration
Macaw setup auto-generates the platform configuration. Once the platform configuration is auto-generated, if you make any changes to the configuration, make sure to execute the command ‘macaw sync’ which keeps the platform configuration and provisioner configuration in sync.
To under details of the platform configuration, refer to the platform.README file under the home directory.
Provisioner Configuration
macaw-service-provisioner.properties is a JSON file which feeds Macaw service provisioner with environments where the user can provision their microservices. The JSON specification is an array of environment definitions. A default environment is mandated and created during the macaw setup with inputs provided for service hosts.
Each environment is required to provide this group of mandatory details:
- Fields of ID, name, type.
- Docker enabled Service End Hosts where your microservices are provisioned. Instead of providing service end hosts, the environment can also refer to a swarm cluster manager or Kubernetes master which in turn manages the cluster of docker nodes. (Refer to How to Enable Kubernetes Environment)
- Repositories: Array of MDR/Docker Registry pairs: Each repository is a pair of MDR (Service Meta Data Repository) and Docker Registry End point. During the provisioning time from the macaw-console, an option will be given to select a specific repository. Once a repository is selected, the user will be shown the available service blueprints from the MDR. When a provisioning request is issued after selecting a specific blueprint, the Macaw provisioner will be using the docker registry in that selected repo and will be downloading the container images. This data is absolutely necessary to be able to provision service blueprints via Macaw console. For more details on MDR, please refer to the Macaw documentation.
- List of capabilities. Below are the various capabilities an environment can provide.
restart-policy – This is the docker container restart policy setting. Any container deployed into this environment will inherit this policy.
https://docs.docker.com/engine/reference/run/#/restart-policies-restart
dns-configuration for containers – This is automatically appended to the capabilities during the macaw setup based on the user’s DNS settings defined in the platform configuration. The user can override this if needed.
log-configuration for containers – This setting controls the JSON log settings for the deployed containers into the environment.
volumes – These are the mandatory values that would be attached to every container deployed in this environment. For example, the user can store the truststore on a common NFS location and mount this to every container. The Service Blueprint doesn’t need to know about this specific mount point. These volumes are controlled and mandated by the environment.
storage – This defines the various mount/volumes that your environment can provide. Based on the name, the user’s service can request that it needs the specific volume. The provisioner/macaw console does the check before the provisioning if the user service blueprint is requesting volumes which are supported by the environment. If not, an error would be shown to the user. More details on the storage would be found under the Service Blueprints section.
env-variables – Mandatory environment variables for any container deployed in this environment.
resource-profiles – The list of resource profiles this environment can support. The resource profiles are defined in macaw-resource-profiles.json. Essentially through the resource profiles the user’s control the memory/cpu reservations/limits to the container. The environment enforces a default resource profile setting. If a service doesn’t request any specific resource profile the provisioner applies the default resource profile. For more details refer to macaw documentation. Sample JSON file.
opt-in-capabilities – This provides unique capabilities to the macaw platform to enable optional features like Debug, Memory Tracking for the deployed features. During the Service Blueprint deployment into a specific environment, the user can select any one or multiple of these optional capabilities to be applied to the deployed service. This JSON object defines each unique optional capability of the environment. Within the capability, you can specify resources like volumes, ports, labels, environment variables. If the capability is selected during the provisioning time, then volumes, ports, labels, environments defined under this capability are applied to the deployed services. Using this unique way user can define custom optional services.
{
  "environments": [
    {
      "type": "standalone-docker",
      "id": "dda6e47c-e594-5a0a-9637-c747f090cc24",
      "machines": [
        {
          "pass-phrase": "",
          "ip": "macaw-s1.engr.cloudfabrix.com",
          "login": "macaw",
          "version": "7.1",
          "os": "centos"
        },
        {
          "pass-phrase": "",
          "ip": "macaw-s2.engr.cloudfabrix.com",
          "login": "macaw",
          "version": "7.1",
          "os": "centos"
        }
      ],
      "ui-pairs": [
        {
          "url": "https://macaw-p.engr.cloudfabrix.com",
          "name": "platform_uipair",
          "description": "Platform HAProxy and Tomcat",
          "volumes": [
            {
              "path": "/warfiles",
              "sub-path": "platform_uipair",
              "name": "MACAW_PLATFORM_MOUNT",
              "read-write-mode": "rw"
            }
          ],
          "port": 443
        }
      ],
      "name": "macaw-default-env-01",
      "repositories": [
        {
          "mdr": {
            "protocol": "https",
            "name": "Internal MDR",
            "host": "10.95.100.10",
            "repo": "dev",
            "token": "6f009a42-9a9a-4cfa-a248-fb82deff8a12",
            "version": "v2",
            "port": 8639,
            "description": "This is the internal development MDR"
          },
          "docker-registry": {
            "username": "macaw",
            "protocol": "https",
            "name": "Internal Docker Registry",
            "port": 5000,
            "host": "cfx-docker-01.engr.cloudfabrix.com",
            "password": "password",
            "email": "macaw@www.macaw.io",
            "description": "This is the internal development docker registry"
          },
          "name": "cfx-internal-repo",
          "description": "Development MDR and Docker Registry Repository"
        },
        {
          "mdr": {
            "protocol": "http",
            "name": "macaw onprem MDR",
            "token": "dda6e47c-e594-5a0a-9637-c747f090cc24",
            "repo": "dev",
            "host": "macaw-p.engr.cloudfabrix.com",
            "version": "v2",
            "port": 8637,
            "description": "This is the onprem MDR"
          },
          "docker-registry": {
            "username": "macaw",
            "protocol": "https",
            "name": "macaw onprem Docker Registry",
            "port": 5000,
            "host": "macaw-p.engr.cloudfabrix.com",
            "password": "macaw@local",
            "email": "macaw@local.com",
            "description": "This is the onprem docker registry"
          },
          "name": "onprem MDR/Docker",
          "description": "onprem installed MDR/Docker"
        }
      ],
      "capabilities": {
        "restart-policy": {
          "name": "unless-stopped"
        },
        "installation": [],
        "resource-profiles": {
          "default": "macaw-rp-mwr.small",
          "supported": [
            "macaw-rp-mwr.small",
            "macaw-rp-mwr.medium",
            "macaw-rp-mwr.large",
            "macaw-rp-mwr.2xlarge",
            "macaw-rp-mwr.4xlarge",
            "macaw-rp-mwr.8xlarge",
            "macaw-rp-mwr.iota",
            "macaw-rp-mwr.iota-small",
            "macaw-rp-mwr.iota-medium"
          ]
        },
        "env-variables": [
          {
            "name": "MACAW_SSL_TRUSTSTORE_LOCATION",
            "value": "/opt/macaw/secrets/truststore/ca_truststore"
          },
          {
            "name": "MACAW_SSL_TRUSTSTORE_PASSWORD",
            "value": "macaw@1234"
          }
        ],
        "labels": [
          {
            "name": "io.macaw.type",
            "value": "macaw-micro-services"
          }
        ],
        "storage": [
          {
            "path": "/opt/java",
            "name": "JAVA_1.8",
            "read-write-mode": "ro"
          },
          {
            "path": "/opt/macaw-platform-dda6e47ce5945a0a",
            "name": "MACAW_PLATFORM_MOUNT",
            "read-write-mode": "rw"
          },
          {
            "path": "/opt/appd-shared-dda6e47ce5945a0a",
            "name": "MACAW_ENVIRONMENT_DEFAULT_MOUNT",
            "read-write-mode": "rw"
          }
        ],
        "dns-configuration": {
          "search-domain": [],
          "opts": [],
          "server": []
        },
        "volumes": [
          {
            "path": "/opt/java",
            "name": "JAVA_1.8",
            "read-write-mode": "ro"
          },
          {
            "path": "/opt/macaw/secrets/truststore",
            "sub-path": "certificates/truststore",
            "name": "MACAW_PLATFORM_MOUNT",
            "read-write-mode": "ro"
          }
        ],
        "log-configuration": {
          "enable": true,
          "driver": {
            "name": "json-file",
            "opts": {
              "max-size": "10m",
              "max-file": 5
            }
          }
        }
      },
      "opt-in-capabilities": {
        "debug": {
          "name": "Macaw Debug",
          "labels": [
            {
              "name": "io.macaw.debug.port",
              "value": "enabled"
            }
          ],
          "env-variables": [
            {
              "name": "MACAW_ENABLE_DEBUG_PORT",
              "value": "true"
            }
          ],
          "actions": [],
          "volumes": [],
          "ports": [
            {
              "protocol": "tcp",
              "endpoint": "Debug",
              "type": "dynamic",
              "name": "Macaw Debug Port",
              "port": 8787
            }
          ],
          "description": "Enables debug port for Macaw Microservices"
        },
        "nmt-summary": {
          "name": "Native Memory Tracking Summary",
          "labels": [
            {
              "name": "io.macaw.jvm.nativememory",
              "value": "summary"
            }
          ],
          "env-variables": [
            {
              "name": "MACAW_JVM_ARGS_ADDITIONAL",
              "value": "-XX:NativeMemoryTracking=summary"
            }
          ],
          "actions": [],
          "volumes": [],
          "ports": [],
          "description": "Enables Native Memory Tracking Summary flag on the JVM for Macaw Microservices"
        },
        "logtoES": {
          "name": "Elasticsearch Logging",
          "labels": [
            {
              "name": "io.macaw.logging.elasticsearch",
              "value": "true"
            }
          ],
          "env-variables": [
            {
              "name": "MACAW_PLATFORM_LOGGING_URL",
              "value": "http://macaw-p.engr.cloudfabrix.com:9200/_bulk"
            }
          ],
          "actions": [],
          "volumes": [],
          "ports": [],
          "description": "Enables Elasticsearch Logging for Macaw Microservice"
        },
        "nmt-detail": {
          "name": "Native Memory Tracking Detail",
          "labels": [
            {
              "name": "io.macaw.jvm.nativememory",
              "value": "detail"
            }
          ],
          "env-variables": [
            {
              "name": "MACAW_JVM_ARGS_ADDITIONAL",
              "value": "-XX:NativeMemoryTracking=detail"
            }
          ],
          "actions": [],
          "volumes": [],
          "ports": [],
          "description": "Enables Native Memory Tracking Detail flag on the JVM for Macaw Microservices"
        },
        "adpm": {
          "name": "Macaw APM with ADPM Provider",
          "labels": [
            {
              "name": "io.macaw.apm.provider",
              "value": "adpm"
            }
          ],
          "env-variables": [
            {
              "name": "MACAW_APM_PROVIDER",
              "value": "adpm"
            },
            {
              "name": "MACAW_APM_CENTRAL_REPO",
              "value": "macaw-p.engr.cloudfabrix.com:8181"
            }
          ],
          "actions": [
            {
              "url": "https://demo.macaw.io/adpm",
              "name": "Launch ADPM"
            }
          ],
          "volumes": [
            {
              "path": "/opt/macaw/apm",
              "sub-path": "apm/adpm/agent",
              "name": "MACAW_PLATFORM_MOUNT",
              "read-write-mode": "rw"
            }
          ],
          "ports": [],
          "description": "Enables APM capabilities for Macaw Microservices"
        }
      }
    }
  ]
}
Environments
Macaw Platform segregates compute resources into environments. During the Service Blueprint deployment, you provision into an environment which is either backed by individual docker hosts or a Kubernetes cluster or swarm cluster.
Macaw supports the following provisioning environments:
- Standalone Docker Hosts
- Swarm Cluster
- Kubernetes Cluster (Kubernetes v1.5.2)
Standalone Docker Hosts
A group of individual docker hosts can be grouped together under an environment. The only criteria for grouping the nodes is: the storage definition defined under the environment should be accessible from all the nodes in the environment. For example, if you have defined a storage mount like below in the environment, then it is expected that all the nodes provide this storage.
 "storage": [
 {
 "path": "/opt/java",
 "name": "JAVA_1.8",
 "read-write-mode": "ro"
 }
 ]
Though Macaw Platform doesn’t enforce this, it is highly recommended to group hosts with same Docker Version, Storage Mounts, CPU/Memory resources into an environment.
As part of the Macaw setup, it is mandated to provide a single service host which is then used to create a default environment.
Below is how compute resources are provided in the environment definition.
  "machines": [
 {
 "pass-phrase": "",
 "ip": "macaw-s1.engr.cloudfabrix.com",
 "login": "macaw",
 "version": "7.1",
 "os": "centos"
 },
 {
 "pass-phrase": "",
 "ip": "macaw-s2.engr.cloudfabrix.com",
 "login": "macaw",
 "version": "7.1",
 "os": "centos"
 }
 ]
During the Macaw setup phase, password less SSH communication is established to these service endpoints from the platform host. Without this password-less SSH provisioning requests would fail.
Kubernetes
Macaw Platform provides the capability to provision services onto the Kubernetes cluster. Below are the requirements before a Kubernetes environment can be created.
- Kubernetes Master
- Credentials – User/password or Token based Authentication
- Namespace – If no namespace is available, default can be provided. Any non-default namespace should be created upfront on the Kubernetes.
- Mandatory PVCs and any optional PVCs required by services should be created up front on the K8 cluster
In the below section we will cover in detail on how to enable Kubernetes environment in Macaw platform. Below is a sample K8 environment JSON spec.
{
  "environments": [
    {
      "id": "9ba77ea5-2186-5282-9b88-93b373a59f32",
      "name": "macaw-k8-env-01",
      "type": "kubernetes",
      "kubernetes-master": {
        "url": "http://k8-master-qa.qa.engr.cloudfabrix.com:8080",
        "username": "user@k8",
        "password": "password",
        "namespace": "macaw",
        "auth": "basic-auth"
      },
      "repositories": [
        {
          "name": "macaw-k8-repo",
          "description": "Internal MDR and Docker Registry Repository",
          "mdr": {
            "protocol": "https",
            "name": "Internal MDR",
            "host": "1.1.1.1",
            "repo": "dev",
            "token": "6f009a42-9a9a-4cfa-a248-fb82d12f8a01",
            "version": "v2",
            "port": 8639,
            "description": "This is the internal development MDR"
          },
          "docker-registry": {
            "username": "foo",
            "protocol": "https",
            "name": "Internal Docker Registry",
            "port": 5000,
            "host": "docker-01.local.host",
            "password": "123456",
            "email": "macaw@www.macaw.io",
            "description": "This is the internal development docker registry"
          }
        }
      ],
      "ui-pairs": [
        {
          "url": "https://macaw-p.engr.cloudfabrix.com",
          "name": "platform_uipair",
          "description": "Platform HAProxy and Tomcat",
          "volumes": [
            {
              "path": "/warfiles",
              "sub-path": "platform_uipair",
              "name": "MACAW_PLATFORM_MOUNT",
              "read-write-mode": "rw"
            }
          ],
          "port": 443
        }
      ],
      "capabilities": {
        "restart-policy": {
          "name": "unless-stopped"
        },
        "installation": [],
        "resource-profiles": {
          "default": "macaw-rp-mwr.small",
          "supported": [
            "macaw-rp-mwr.small",
            "macaw-rp-mwr.medium",
            "macaw-rp-mwr.large",
            "macaw-rp-mwr.2xlarge",
            "macaw-rp-mwr.4xlarge",
            "macaw-rp-mwr.8xlarge",
            "macaw-rp-mwr.iota",
            "macaw-rp-mwr.iota-small",
            "macaw-rp-mwr.iota-medium"
          ]
        },
        "env-variables": [
          {
            "name": "MACAW_ENV_VARIABLE_NAMES_TRANSLATOR",
            "value": "FIXED_SET_ENV_NAMES_TRANSLATOR"
          },
          {
            "name": "MACAW_SSL_TRUSTSTORE_LOCATION",
            "value": "/opt/macaw/secrets/truststore/ca_truststore"
          },
          {
            "name": "MACAW_SSL_TRUSTSTORE_PASSWORD",
            "value": "macaw@1234"
          }
        ],
        "labels": [
          {
            "name": "io.macaw.type",
            "value": "macaw-micro-services"
          }
        ],
        "storage": [
          {
            "persistent-volume-claim": {
              "claim-name": "macaw.installation.java",
              "claim-description": "Java Host Volume"
            },
            "name": "JAVA_1.8",
            "read-write-mode": "ro"
          },
          {
            "persistent-volume-claim": {
              "claim-name": "macaw.platform",
              "claim-description": "K8 Macaw Platform PVC Claim."
            },
            "name": "MACAW_PLATFORM_MOUNT",
            "read-write-mode": "rw"
          },
          {
            "persistent-volume-claim": {
              "claim-name": "macaw.environment.default",
              "claim-description": "K8 Macaw Environment Default PVC"
            },
            "name": "MACAW_ENVIRONMENT_DEFAULT_MOUNT",
            "read-write-mode": "rw"
          }
        ],
        "dns-configuration": {
          "search-domain": [],
          "opts": [],
          "server": []
        },
        "volumes": [
          {
            "path": "/opt/java",
            "name": "JAVA_1.8",
            "read-write-mode": "ro"
          },
          {
            "path": "/opt/macaw/secrets/truststore",
            "sub-path": "certificates/truststore",
            "name": "MACAW_PLATFORM_MOUNT",
            "read-write-mode": "ro"
          }
        ],
        "log-configuration": {
          "enable": true,
          "driver": {
            "name": "json-file",
            "opts": {
              "max-size": "10m",
              "max-file": 5
            }
          }
        }
      },
      "opt-in-capabilities": {
        "debug": {
          "name": "Macaw Debug",
          "labels": [
            {
              "name": "io.macaw.debug.port",
              "value": "enabled"
            }
          ],
          "env-variables": [
            {
              "name": "MACAW_ENABLE_DEBUG_PORT",
              "value": "true"
            }
          ],
          "actions": [],
          "volumes": [],
          "ports": [
            {
              "protocol": "tcp",
              "endpoint": "Debug",
              "type": "dynamic",
              "name": "Macaw Debug Port",
              "port": 8787
            }
          ],
          "description": "Enables debug port for Macaw Microservices"
        },
        "nmt-summary": {
          "name": "Native Memory Tracking Summary",
          "labels": [
            {
              "name": "io.macaw.jvm.nativememory",
              "value": "summary"
            }
          ],
          "env-variables": [
            {
              "name": "MACAW_JVM_ARGS_ADDITIONAL",
              "value": "-XX:NativeMemoryTracking=summary"
            }
          ],
          "actions": [],
          "volumes": [],
          "ports": [],
          "description": "Enables Native Memory Tracking Summary flag on the JVM for Macaw Microservices"
        },
        "logtoES": {
          "name": "Elasticsearch Logging",
          "labels": [
            {
              "name": "io.macaw.logging.elasticsearch",
              "value": "true"
            }
          ],
          "env-variables": [
            {
              "name": "MACAW_PLATFORM_LOGGING_URL",
              "value": "http://macaw-p.engr.cloudfabrix.com:9200/_bulk"
            }
          ],
          "actions": [],
          "volumes": [],
          "ports": [],
          "description": "Enables Elasticsearch Logging for Macaw Microservice"
        },
        "nmt-detail": {
          "name": "Native Memory Tracking Detail",
          "labels": [
            {
              "name": "io.macaw.jvm.nativememory",
              "value": "detail"
            }
          ],
          "env-variables": [
            {
              "name": "MACAW_JVM_ARGS_ADDITIONAL",
              "value": "-XX:NativeMemoryTracking=detail"
            }
          ],
          "actions": [],
          "volumes": [],
          "ports": [],
          "description": "Enables Native Memory Tracking Detail flag on the JVM for Macaw Microservices"
        },
        "adpm": {
          "name": "Macaw APM with ADPM Provider",
          "labels": [
            {
              "name": "io.macaw.apm.provider",
              "value": "adpm"
            }
          ],
          "env-variables": [
            {
              "name": "MACAW_APM_PROVIDER",
              "value": "adpm"
            },
            {
              "name": "MACAW_APM_CENTRAL_REPO",
              "value": "macaw-p.engr.cloudfabrix.com:8181"
            }
          ],
          "actions": [
            {
              "url": "https://demo.macaw.io/adpm",
              "name": "Launch ADPM"
            }
          ],
          "volumes": [
            {
              "path": "/opt/macaw/apm",
              "sub-path": "apm/adpm/agent",
              "name": "MACAW_PLATFORM_MOUNT",
              "read-write-mode": "rw"
            }
          ],
          "ports": [],
          "description": "Enables APM capabilities for Macaw Microservices"
        }
      }
    }
  ]
}
- Kubernetes Master Endpoint
Macaw Platform communicates with the Kubernetes Master for provisioning/de-provisioning/scale up/scale down/rolling update of Service Pods. Macaw supports simple basic-auth or token based authentication to the Kubernetes cluster.
Simple Basic Authentication
"kubernetes-master": {
        "url": "http://k8-master-qa.qa.engr.cloudfabrix.com:8080",
        "username": "user@k8",
        "password": "password",
        "namespace": "macaw",
        "auth": "basic-auth"
      }
Token Authentication
"kubernetes-master": {
        "url": "http://k8-master-qa.qa.engr.cloudfabrix.com:8080",
        "username": "user@k8",
        "password": "password",
        "namespace": "macaw",
        "auth": "basic-auth"
      }
Namespaces are virtual clusters in Kubernetes. Macaw Platform provides the ability to attach a namespace to the environment. The only restriction is the namespace should be created on the cluster and the storage PVCs belong to this namespace.
- Storage PVCs
This is the most important section. Below is how storage mount points defined for a Kubernetes environment.
        "storage": [
          {
            "persistent-volume-claim": {
              "claim-name": "macaw.installation.java",
              "claim-description": "Java Host Volume"
            },
            "name": "JAVA_1.8",
            "read-write-mode": "ro"
          },
          {
            "persistent-volume-claim": {
              "claim-name": "macaw.platform",
              "claim-description": "K8 Macaw Platform PVC Claim."
            },
            "name": "MACAW_PLATFORM_MOUNT",
            "read-write-mode": "rw"
          },
          {
            "persistent-volume-claim": {
              "claim-name": "macaw.environment.default",
              "claim-description": "K8 Macaw Environment Default PVC"
            },
            "name": "MACAW_ENVIRONMENT_DEFAULT_MOUNT",
            "read-write-mode": "rw"
          }
        ]
In the above section when we consider the JAVA_1.8 storage mount, shown below is how it has to be interpreted.
Macaw Platform refers to this storage definition by name JAVA_1.8 and this refers to the PVC ‘macaw.installation.java’ in the Kubernetes. It is mandatory for this PVC to be defined and created upfront on the Kubernetes master.
It is mandatory for the storage mounts/PVCs below to be defined in the environment as these are utilized by Macaw platform.
- JAVA_1.8 (Name can be different) storage mount and associated PVC to be created. This storage mount provides the Java installation path on the host. Therefore it is mandatory for all the Kubernetes hosts to have this mandatory Java volume. This can be avoided, if you are building Microservices with Java embedded into the container.
- MACAW_PLATFORM_MOUNT (Name can be different) storage mount and associated PVC. This is an NFS mount point pointing to the shared NFS mount from the platform host. Platform Host shares the necessary self signed certificate truststores via the NFS and this has to be mounted to all the containers.
Note: Make sure you edit the /etc/exportfs on the platform host and add the platform directory export entries to all the Kubernetes nodes. Once this is done, make sure to refresh export definitions via export ‘sudo exportfs -avr’
more /etc/exports

/opt/macaw-shared/platform k8-m1(rw,async,no_root_squash)
/opt/macaw-shared/platform k8-m2(rw,async,no_root_squash)
/opt/macaw-shared/platform k8-m3(rw,async,no_root_squash)
/opt/macaw-shared/platform k8-m4(rw,async,no_root_squash)
Below is a sample Kubernetes JSON spec to create the necessary Physical Volumes and PVCs for the above mandatory storage mounts.
{
  "apiVersion": "v1",
  "kind": "List",
  "items": [
    {
      "apiVersion": "v1",
      "kind": "PersistentVolume",
      "metadata": {
        "labels": {
          "macaw_purpose": "platform"
        },
        "name": "macaw.platform"
      },
      "spec": {
        "accessModes": [
          "ReadWriteMany"
        ],
        "capacity": {
          "storage": "20Gi"
        },
        "nfs": {
          "path": "/opt/macaw-shared/platform",
          "server": "10.95.110.100"
        },
        "persistentVolumeReclaimPolicy": "Retain"
      }
    }
    {
      "apiVersion": "v1",
      "kind": "PersistentVolume",
      "metadata": {
        "labels": {
          "macaw_purpose": "java"
        },
        "name": "macaw.java"
      },
      "spec": {
        "accessModes": [
          "ReadOnlyMany"
        ],
        "capacity": {
          "storage": "5Gi"
        },
        "hostPath": {
          "path": "/opt/java"
        },
        "persistentVolumeReclaimPolicy": "Retain"
      }
    },
    {
      "apiVersion": "v1",
      "kind": "PersistentVolumeClaim",
      "metadata": {
        "name": "macaw.platform",
        "namespace": "demomacawio"
      },
      "spec": {
        "accessModes": [
          "ReadWriteMany"
        ],
        "resources": {
          "requests": {
            "storage": "20Gi"
          }
        },
        "selector": {
          "matchLabels": {
            "macaw_purpose": "platform"
          }
        }
      }
    }
    {
      "apiVersion": "v1",
      "kind": "PersistentVolumeClaim",
      "metadata": {
        "name": "macaw.installation.java",
        "namespace": "demomacawio"
      },
      "spec": {
        "accessModes": [
          "ReadOnlyMany"
        ],
        "resources": {
          "requests": {
            "storage": "5Gi"
          }
        },
        "selector": {
          "matchLabels": {
            "macaw_purpose": "java"
          }
        }
      }
    }
  ]
}
Now execute the kubectl CLI on the Kubernetes master and create these resources like below. The above JSON spec is stored in the file storage.json.
kubectl create -f storage.json
Now verify the storage creation using the below commands
kubectl get pv
kubectl get pvc --namespace=demomacawio
Install
Macaw platform installation involves the installation of Macaw infrastructure and platform components. The below sequence of commands will install the Macaw platform. The prerequisite for platform installation is the Macaw setup, completed in the previous step.
Various Installation Commands
macaw infra install --tag <tag>
macaw apm install --tag <tag>
macaw platform dbinit --tag <tag>
macaw platform install --tag <tag>
macaw tools install --tag <tag> --service macaw-mdr
macaw tools install --tag 2.3.1 --service docker-registry
Stated here are additional details on infrastructure, apm, platform, and tools installation sections of the Macaw platform.
Infrastructure Installation
As part of the Macaw infrastructure installation, the following components would be provisioned to present critical services to the Macaw platform. This installation is mandatory for the Macaw Platform.
Zookeeper
Kafka
Elasticsearch
Mysql
Cassandra
HAProxy
Tomcat
Redis
Install infrastructure using the below command.
$ macaw infra install --tag macaw-v0.9.4
		***********************************************
		**************** Macaw Infra  *****************
		***********************************************


Bootstrapping zookeeper with tag: macaw-v0.9.4
WARNING: Updating/Saving docker credentials to : /home/macaw/.docker/macawauth.json
...
Bootstrapping zookeeper: SUCCESS

Bootstrapping kafka with tag: macaw-v0.9.4
...
Bootstrapping kafka: SUCCESS

Bootstrapping elasticsearch with tag: macaw-v0.9.4
...
Bootstrapping elasticsearch: SUCCESS

Bootstrapping cassandra with tag: macaw-v0.9.4
...
Bootstrapping cassandra: SUCCESS

Bootstrapping mysql with tag: macaw-v0.9.4
...
Bootstrapping mysql: SUCCESS

Bootstrapping haproxy with tag: macaw-v0.9.4
...
Bootstrapping haproxy: SUCCESS

Bootstrapping macaw-tomcat with tag: macaw-v0.9.4
...
Bootstrapping macaw-tomcat: SUCCESS

Bootstrapping redis with tag: macaw-v0.9.4
...
Bootstrapping redis: SUCCESS

Done Bootstrapping the Macaw Infra.
Initialization Done

Status of the Macaw Infra:
+-----------------+------------------------+----------------+----------------+-------------------------------------------+-----------+------------+
|  Name           |  Status                |  Container Id  |  Image Tag     |  Container Name                           |  Mem(MB)  |  Version   |
+-----------------+------------------------+----------------+----------------+-------------------------------------------+-----------+------------+
|  zookeeper      |  Up 35 seconds         |  936f2c2f8b8d  |  macaw-v0.9.4  |  zookeeper_39426d8f-dc83-4d8f-8980-44843  |  60       |  0.10.2.0  |
|  kafka          |  Up 24 seconds         |  d44429853eb2  |  macaw-v0.9.4  |  kafka_8fb42cfe-5936-4918-bc04-d201e0453  |  263      |  0.10.2.0  |
|  elasticsearch  |  Up 19 seconds         |  012e5bbdb2a9  |  macaw-v0.9.4  |  elasticsearch_bf79b13a-e75f-46ab-a5ae-8  |  310      |  1.7.5     |
|  cassandra      |  Up 17 seconds         |  2ab48ca422ee  |  macaw-v0.9.4  |  cassandra_b82a3ae1-f4c7-4f2e-b269-07a61  |  1251     |  2.2.6     |
|  mysql          |  Up 7 seconds          |  582c5ac342f1  |  macaw-v0.9.4  |  mysql_0c391328-cf97-426f-82f2-527de8095  |  186      |  5.5.49    |
|  haproxy        |  Up 1 second           |  b947e443d000  |  macaw-v0.9.4  |  haproxy_254cfc7f-2ed2-4ec0-a40d-9015292  |  97       |  1.7.1     |
|  macaw-tomcat   |  Up Less than a secon  |  7b80495e68d7  |  macaw-v0.9.4  |  macaw-tomcat_16daf0b5-d6b9-49cd-91d8-ba  |  60       |  8.0.37    |
|  redis          |  Up Less than a secon  |  5a868d71ae66  |  macaw-v0.9.4  |  redis_05032cff-e552-4268-918a-78441f2c9  |  12       |  3.2.8     |
|  NFS Server     |  [OK]                  |  --            |  --            |  --                                       |  --       |  v4        |
|  docker         |  [OK]                  |  --            |  --            |  --                                       |  --       |  1.13.1    |
+-----------------+------------------------+----------------+----------------+-------------------------------------------+-----------+------------+
APM Installation
APM Install commands would install the Performance Monitoring Agent and Collector. This is an optional installation.
macaw apm install --tag macaw-v0.9.4
		***********************************************
		************* Macaw APM Services **************
		***********************************************


Bootstrapping macaw-apm-agent with tag: macaw-v0.9.4
WARNING: Updating/Saving docker credentials to : /home/macaw/.docker/macawauth.json
...................................................................
Bootstrapping macaw-apm-agent: SUCCESS

Bootstrapping macaw-apm-collector with tag: macaw-v0.9.4
...................................................................
Bootstrapping macaw-apm-collector: SUCCESS

Status of the Macaw APM:
+-----------------------+------------------------+----------------+----------------+---------------------------------+-----------+-------------+
|  Name                 |  Status                |  Container Id  |  Image Tag     |  Container Name                 |  Mem(MB)  |  Version    |
+-----------------------+------------------------+----------------+----------------+---------------------------------+-----------+-------------+
|  macaw-apm-agent      |  Up 4 seconds          |  fd701a7e5bbe  |  macaw-v0.9.4  |  macaw-apm-agent_26b6a333-4153  |  1        |  0.9.16.14  |
|  macaw-apm-collector  |  Up Less than a secon  |  7ae28569b33b  |  macaw-v0.9.4  |  macaw-apm-collector_63fe6707-  |  37       |  0.9.16.14  |
+-----------------------+------------------------+----------------+----------------+---------------------------------+-----------+-------------+

ADPM UI can be accessed at - https://192.168.33.10/adpm
Platform DBInit
Platform dbinit command initializes the database sections of mysql and Cassandra. This is mandatory step that needs to be executed before proceeding with the installation of platform core components.
macaw platform dbinit --tag macaw-v0.9.4

*******WARNING**********WARNING********WARNING********

This will initialize the DB schema for macaw platform services. Initialization involves dropping existing
tables/data and creating new. Any data for the macaw platform services in the DB will be lost.

WARNING: The dbinit need to be done only once before the platform is installed. Doing this initialization post
platform installation or when platform is active/runing, will result in data inconsistencies and loss of data.


Do you want to continue with DB Initialization? [yes/no]: yes

Bootstrapping macaw-dbinit with tag: macaw-v0.9.4
Note: macaw-dbinit is a transient service and will be removed.
WARNING: Updating/Saving docker credentials to : /home/macaw/.docker/macawauth.json
...
Bootstrapping macaw-dbinit: SUCCESS

Verifying checksum of the DB Init package

Platform Admin User [admin@www.macaw.io]:
Password :
Re-enter Password :


2017-06-21 14:49:45 : macaw-dbinit-info: DB Init - Start
2017-06-21 14:49:45 : macaw-dbinit-info: MYSQL Endpoint: 192.168.33.10:3306
2017-06-21 14:49:45 : macaw-dbinit-info: Cassandra Endpoint: 192.168.33.10:9042
2017-06-21 14:49:45 : macaw-dbinit-info: Initializing DB Endpoints
2017-06-21 14:49:45 : macaw-dbinit-info: Service Registry Init - Start
2017-06-21 14:49:46 : macaw-dbinit-info: Service Registry Init - Done
2017-06-21 14:49:47 : macaw-dbinit-info: Services Init - Start
2017-06-21 14:49:57 : macaw-dbinit-info: Programming Locker master key - Start
2017-06-21 14:50:15 : macaw-dbinit-info: Programming Locker master key - Done
2017-06-21 14:50:15 : macaw-dbinit-info: Services Init - Done
2017-06-21 14:50:15 : macaw-dbinit-info: DB Init - Done

macaw-db-init: DB Init Successful
macaw-db-init: Cleaning up temporary files...
macaw-db-init: Done.
Platform Installation
As part of the platform installation, the following components will be provisioned.
Service Registry
Notification Manager
Service Provisioner
Identity Service
User Preferences
Console UI
Install the platform using the below command.
macaw platform install --tag macaw-v0.9.4
		***********************************************
		************** Macaw Platform  ****************
		***********************************************


Bootstrapping service-registry with tag: macaw-v0.9.4
WARNING: Updating/Saving docker credentials to : /home/macaw/.docker/macawauth.json
...
Bootstrapping service-registry: SUCCESS

Bootstrapping notification-manager with tag: macaw-v0.9.4
...
Bootstrapping notification-manager: SUCCESS

Bootstrapping identity with tag: macaw-v0.9.4
...
Bootstrapping identity: SUCCESS

Bootstrapping service-provisioner with tag: macaw-v0.9.4
...
Bootstrapping service-provisioner: SUCCESS

Bootstrapping user-preferences with tag: macaw-v0.9.4
...
Bootstrapping user-preferences: SUCCESS

Bootstrapping console-ui with tag: macaw-v0.9.4
...
Bootstrapping console-ui: SUCCESS

Status of the Macaw Platform:
+------------------------+-----------------+----------------+----------------+---------------------------------+-----------+-----------+
|  Name                  |  Status         |  Container Id  |  Image Tag     |  Container Name                 |  Mem(MB)  |  Version  |
+------------------------+-----------------+----------------+----------------+---------------------------------+-----------+-----------+
|  service-registry      |  Up 45 seconds  |  a97ffb9b39c3  |  macaw-v0.9.4  |  service-registry_2a0b5d28-eca  |  298      |  0.9.4    |
|  notification-manager  |  Up 24 seconds  |  864342b4eadf  |  macaw-v0.9.4  |  notification-manager_9a980bea  |  151      |  0.9.4    |
|  identity              |  Up 13 seconds  |  f834e9b9e74f  |  macaw-v0.9.4  |  identity_4efca2dd-ac25-4d2b-9  |  209      |  0.9.4    |
|  service-provisioner   |  Up 6 seconds   |  63dab143112d  |  macaw-v0.9.4  |  service-provisioner_9f815ed6-  |  110      |  0.9.4    |
|  user-preferences      |  Up 5 seconds   |  7118dc077872  |  macaw-v0.9.4  |  user-preferences_53bbf6ea-f3e  |  73       |  0.9.4    |
|  console-ui            |  Up 2 seconds   |  ce48a2bec347  |  macaw-v0.9.4  |  console-ui_6d8aa533-17aa-44a1  |  1        |  0.9.4    |
+------------------------+-----------------+----------------+----------------+---------------------------------+-----------+-----------+

Console UI can be accessed at - https://192.168.33.10
MDR/Docker Tools Installation
As part of the tools installation, following components would be provisioned.
Macaw MDR
Docker Registry
Note: Docker Registry is pulled from Docker Public Registry and use 2.3.1 version.
Install tools using the below command.
$ macaw tools install --tag macaw-v0.9.4 --service macaw-mdr
<Please get the tag from the documentation for the current macaw platform version.>
        ***********************************************
        **************** MACAW Tools  *****************
        ***********************************************


Bootstrapping macaw-mdr with tag: macaw-v0.9.4
macaw-info: Creating directory and granting restrictive permissions : /opt/macaw-tools/mdr/auth
macaw-info: Creating directory and granting restrictive permissions : /opt/macaw-tools/mdr/repository
WARNING: Updating/Saving docker credentials to : /home/macaw/.docker/macawauth.json
................................................................................
................................................................................
................................................................................
...............
Bootstrapping macaw-mdr: SUCCESS

Configuration details at: /opt/macaw-config/macaw-tools/provisionerconfig.json

Configuration details at: /opt/macaw-config/macaw-tools/macawpublish.globals

Done Bootstrapping the Macaw Tools.

$
$ macaw tools install --tag 2.3.1 --service docker-registry
<Please get the tag from the documentation for the current macaw platform version.>
        ***********************************************
        **************** MACAW Tools  *****************
        ***********************************************

Bootstrapping docker-registry with tag: 2.3.1
macaw-info: Creating directory and granting restrictive permissions : /opt/macaw-tools/dockerregistry

NOTE: Downloading the docker registry from the docker public repository.
................................................................................
................................................................................
................................................................................
................................................................................
................................................................................
................................................................................
................................................................................
...
Bootstrapping docker-registry: SUCCESS

Docker Registry is installed with self signed private certificate.
Below steps/configuration are needed for the any docker host to be able to talk to this registry.

Step 1: Login to the docker Host(s) and execute the below

    sudo mkdir -p /etc/docker/certs.d/192.168.33.10:5000

Step 2: Download ca.crt from the platform host to the docker host(s).

    sudo scp macaw@192.168.33.10:/opt/macaw-config/certificates/ca/ca.crt /etc/docker/certs.d/192.168.33.10:5000

Step 3: Verify docker login

    docker login -u macaw -p macaw@local -e macaw@local.com 192.168.33.10:5000

Configuration details at: /opt/macaw-config/macaw-tools/dockeregistry.txt

Configuration details at: /opt/macaw-config/macaw-tools/provisionerconfig.json

Configuration details at: /opt/macaw-config/macaw-tools/macawpublish.globals

Done Bootstrapping the Macaw Tools.

$ macaw tools status

Status of the Macaw Tools:
+-------------------+----------------+----------------+----------------+-------------------------------------------+-----------+-----------+
|  Name             |  Status        |  Container Id  |  Image Tag     |  Container Name                           |  Mem(MB)  |  Version  |
+-------------------+----------------+----------------+----------------+-------------------------------------------+-----------+-----------+
|  macaw-mdr        |  Up 4 minutes  |  68e7ccd64ba6  |  macaw-v0.9.4  |  macaw-mdr_6ee9f449-aa86-4b4b-8218-7e86d  |  10       |  --       |
|  docker-registry  |  Up 3 minutes  |  60f259751b74  |  2.3.1         |  docker-registry_90f75822-8ff7-4bb2-9af1  |  16       |  --       |
+-------------------+----------------+----------------+----------------+-------------------------------------------+-----------+-----------+
$
Developer SDK
SDK Introduction
The Macaw Platform SDK bundles tools, documentation, & runtime necessary for rapid development and publishing of custom microservices on the Macaw Platform. Currently, this SDK supports the creation of Java-based microservices. However, in the near future this SDK will be enhanced to support creation of microservices in other languages as well.
This SDK requires a Macaw Platform installation in order for the developed microservice to be deployed and tested.
Current version of the Macaw Platform SDK is 0.9.3.
Downloading the SDK
The Macaw Platform SDK can be downloaded from <TODO: Specify DOWNLOAD URL here>
Once the SDK is downloaded, extract the file by using the following commands based on the file formats
unzip macaw-sdk-version.zip (or) tar xvzf macaw-sdk-version.tar.gz
Supported Operating Systems
This SDK is only certified on latest versions of CentOS, Ubuntu, Linux Mint & Mac OSX at this time. In the near future, support for Windows will be added.
Software Requirements
A Developer using the SDK must have the following software installed to facilitate developing microservices:-
- Oracle JDK, versions 8 and above
- JAVA_HOME env variable should be setup to point to this JDK installation.
- Apache Ant 1.9.x (and above) with Ant-contrib.
- ANT_HOME env variable should be setup to point to this Ant installation.
Publishing a microservice to a target Macaw Platform instance needs additional software installed on the machine:-
- Python 2.7 and above
- pip: package management system for Python
- requests package: See http://docs.python-requests.org/en/master/
- jsonschema package: See http://python-jsonschema.readthedocs.io/en/latest/
- paramiko==2.0.0 package: See http://www.paramiko.org/
- tabulate=0.7.7 package: See https://pypi.python.org/pypi/tabulate
Note: The above Python packages can installed via PIP, using the command ‘sudo pip install requests==2.11.1 jsonschema==2.5.1 paramiko==2.0.0 tabulate==0.7.7″
- Docker version 1.11.x and above
This SDK may be used to generate services and publish them to a Macaw platform installation (version 0.9.3).
The Java-based microservices projects generated by the code-generator tool are Eclipse-based and can be imported into a Eclipse installation. There is no Eclipse version dependency in the project. It should work for all recent Eclipse versions; Eclipse Mars or a later version is recommended. However even if you are a IntelliJ or Netbeans user, the project can be imported into your favorite IDE with almost no extra effort.
SDK Organization
This SDK has the following directory structure:-
macaw-sdk
    |-- docs
    |-- quickstarts
    |-- runtime
`-- tools- docs – this directory houses all the bundled SDK documentation including this document.
- quickstarts – this directory contains some example service projects which have been developed using this SDK.
- runtime – this directory contains the Macaw platform runtime, which is required for compiling microservices.
- tools – this directory has the tools, code-generator (in macaw-service-artifacts-generator subdirectory), and macawpublish (in macaw-publish-tools subdirectory). Code-generator is used to generate initial code for a microservice from a specified spec. macawpublish is used to publish the service to the docker registry.
Microservice Development
The Macaw Platform SDK bundles a code-generator tool for rapid development of custom microservices on Macaw microservices platform.
At this time, this SDK supports generation of Java-based microservices. However, in the near future this SDK will be enhanced to support creation of microservices in other programming languages as well.
The Process for generating a microservice in 3 simple steps is as follows:-
- Define a service API descriptor for the microservice.
- Generate microservice archetype project via the code-generator tool.
- Provide implementation of the microservice API stubs.
In the following sections, each one of the above steps will be discussed in detail.
Service API Descriptor Definition
First step in developing a microservice for Macaw platform involves defining a service api descriptor. This descriptor defines the api which the microservice exposes for consumers within or outside the platform. Service api descriptor is defined either in YANG or JSON format.
YANG is a data modeling language. It was originally intended for modeling configuration and state data manipulated by the NETCONF protocol. The YANG RFC is available here. Please go through the RFC to get familiar with the YANG notations and supported syntax.
|
NOTE
|
We do not use all the YANG notations supported by the Yang RFC. The YANG syntax supported by Macaw is a subset of that specified by the RFC. |
To define the service api in JSON format, take a look at APPENDIX II: JSON Support.
What should be in your microservice’s api descriptor?
Following guidelines will help you, the developer in coming up with the .yang file for your microservice:
- First, list out the methods that are expected to be exposed by the service. Come up with their names, the inputs to the methods and the output of the method
- Each of these service methods will be listed as yang rpc(s).
- Once the list of methods to be exposed by the services is narrowed down, the next step is to identify any input/output types or domain entities expected by those methods and define them using the YANG notations. Please see the section APPENDIX I: YANG Support to understand how to model the domain entities via YANG capabilities.
- Store the rpc descriptor for the service in a file having the .yang extension.
In order to understand how to do this, let’s take the example of a Calculator service. The source code for this service is present under macaw-sdk/quickstarts/calculator directory.
The calculator service is a basic service which exposes the following apis:-
- Add: which accepts numbers as inputs and returns back the sum
- Multiply: which accepts numbers as inputs and returns back the multiplication result
The rpc descriptor calculator.yang for this microservice is present under macaw-sdk/quickstarts/calculator/api/yangdirectory.
This is how the declaration for the apis looks like in YANG.
rpc add {
    description "Adds the numbers given as input";

    input {
        leaf-list numbers {
            type decimal64 {fraction-digits 2;}
            description "Add all numbers";

        }
    }

    output {
        leaf result {
            type decimal64 {fraction-digits 2;}
        }
    }

}

rpc multiply {
    description "Multiplies the numbers given as input";

    input {
        leaf-list numbers {
            type decimal64 {fraction-digits 2;}
            description "Multiplies all numbers";
        }
    }

    output {
        leaf result {
            type decimal64 {fraction-digits 2;}
        }
    }
}
That’s it! You are done defining the external contract of your microservice.
Next step is to validate this contract and use it to generate archetype of a microservice project.
Microservice API Descriptor Elements
These guidelines will help the developer, in coming up with the .yang file for your microservice:
- First, list out the methods that are expected to be exposed by the service. Come up with their names, the inputs to the methods, and the output of the method
- Each of these service methods will be listed as YANG RPC(s).
- Once the list of methods to be exposed by the services is narrowed down, the next step is to identify any input/output types or domain entities expected by those methods and define them using the YANG notations. Please see the section APPENDIX I: YANG Support to understand how to model the domain entities via YANG capabilities.
- Store the RPC descriptor for the service in a file having the .yang extension.
In order to understand the process, let’s take the example of a Calculator service. The calculator service is a basic service which exposes the following apis:-
- Add: which accepts numbers as inputs and returns back the sum
- Multiply: which accepts numbers as inputs and returns back the multiplication result
This is how the declaration for the apis looks like in YANG.
rpc add {
    description "Adds the numbers given as input";

    input {
        leaf-list numbers {
            type decimal64 {fraction-digits 2;}
            description "Add all numbers";

        }
    }

    output {
        leaf result {
            type decimal64 {fraction-digits 2;}
        }
    }

}

rpc multiply {
    description "Multiplies the numbers given as input";

    input {
        leaf-list numbers {
            type decimal64 {fraction-digits 2;}
            description "Multiplies all numbers";
        }
    }

    output {
        leaf result {
            type decimal64 {fraction-digits 2;}
        }
    }
}
That’s it! The user is defining the external contract of your microservice.
Next step, validate this contract and use it to generate archetype of a microservice project.
Microservice Archetype Project
The Macaw Platform SDK bundles a code-generator tool at macaw-sdk/tools/code-generator/macaw-service-artifacts-generator for rapid development of custom microservices on Macaw platform. We’ll call this location as MACAW_SERVICE_GEN_HOME henceforth.
Open the MACAW_SERVICE_GEN_HOME/conf/service-artifacts-gen.properties file in a text editor and specify the properties that are expected in that file. These properties are used by the tool to generate the service artifacts.
# The version of the module/project. Example: 1.0.0
module.version=

# The type of the source model from which the code will be generated. Valid values are "yang", "json"
source.model.type=

# The full path to the directory containing the input model files from which the artifacts will be generated.
# Example: /home/me/input/
input.files.dir=

# The full path to the directory where the generated artifacts need to be placed
# Example: /home/me/cfx/generated
artifacts.output.dir=

# The build tool that will be used for the generated project.
# Valid values are "ivy" or "maven" or "plain-ant" (without those quotes).
# At this time, we only support "plain-ant".
project.build.tool=plain-ant

# The generated project can be built and deployed/released to release repositories. The organization name
# corresponds to the name of the organization under which this project's artifacts will be released.
# Example: org.myapp
project.dist.organization.name=

# The generated project will depend on Macaw service platform/runtime. The dependency version here specifies
# the version of the Macaw platform on which the generated project depends
# Example: 0.9.4
macaw.platform.version=0.9.3


# whether impl part of service needs to be generated afresh
# false(default) -  will check for impl folder, if not present will generate both api and impl else only api is generated
# true -  will generate/overwrite the api and impl
# Example: true/false
service.gen.option.generate.impl.artifacts=false
Save the changes to the properties file.
Go to $MACAW_SERVICE_GEN_HOME/bin and run the run.sh command as shown below
|
IMPORTANT
|
Before running the command below, make sure you have set the MACAW_SDK_HOME environment variable to point to the root directory of the Macaw SDK. Please refer to the Overview section for more details on how to setup the SDK. |
./run.shRemember that the code-generator tool expects the yang files to be having the .yang extension.
That’s it! The stub of your microservice project will be generated under the directory pointed to by artifacts.output.dirproperty.
|
NOTE
|
The service-artifacts-gen.properties used to generate the service is also copied to ${artifacts.output.dir}/<service-name>/tools/macaw-service-generator/ folder so that it is readily available for any regeneration of the service code at a later date. |
|
NOTE
|
At this time this SDK supports generation of Java based microservices. However, in the near future this SDK will be enhanced to support creation of microservices in other programming languages as well. |
Microservice Implementation
In the previous step, you used the code-generator tool to generate the necessary Java interfaces for the domain entities and the services that are defined in the yang file for your microservice.
The generated artifacts are categorized into public api and service implementation.
The public api (jar) contains the necessary artifacts that the service publisher/developer can hand over/publish to consumers of that service. The public apis are generated under the ${artifacts.output.dir}/<service-name>/apidirectory.
The generated api has the following signature:-
public double add(double[] numbers);

public double multiply(double[] numbers);
The service implementation artifacts are meant for the service developer who can then go ahead and implement the apis exposed by the service. The stubs of the service implementation artifacts are generated under the ${artifacts.output.dir}/<service-name>/impl directory.
In the case of Calculator microservice, the service implementation artifact is BasicCalculator.java under macaw-sdk/quickstarts/calculator/impl/src/main/java/http/macaw/io/quickstart/service/calculator/rev160608/impldirectory. In this class, we have provided the implementation of the previously declared add and multiply methods.
@Override
public double add(double[] numbers) {
    double sum = 0.0d;
    for (final double num : numbers) {
        sum+= num;
    }
    return sum;
}

@Override
public double multiply(double[] numbers) {
    double result = 0.0d;
    for (final double num : numbers) {
        result = result * num;
    }
    return result;
}
This completes the implementation of your microservice. It is now ready to be compiled.
Microservice Compilation
This generated api jar of the microservice now needs to be copied over to the microservice implementation as a dependency. This can be done by running following command in the calculator/api directory.
|
IMPORTANT
|
Before building the microservice using the commands below, make sure you have set the MACAW_SDK_HOME environment variable to point to the root directory of the Macaw SDK. Please refer to the Overview section for more details on how to setup the SDK. |
ant clean deployNow, the microservice implementation can be compiled by running following command in the calculator/impl directory.
ant clean deployThis finishes the compilation of your microservice. It is now ready to be published to a target Macaw platform installation.
Microservice Publishing
Dockerfile
Macaw platform runs the microservices as a docker container. Each service that is generated by the code-generator tool, as above, will be provided with a auto-generated Dockerfile and it resides at <service-name>/impl/etc/docker/Dockerfile. Typically the developer doesn’t have to change any of the content of this file.
Metadata and Docker Image
Before proceeding ahead, please ensure that the SDK is configured properly to work against a Macaw platform installation as directed in the README document.
The Macaw Platform SDK bundles a tool called macawpublish for publishing of custom microservices on Macaw platform. The tool is present in macaw-sdk/tools/macaw-publish-tools directory under the /bin sub-directory.
Let’s say you are finished with the development of your microservice and are now ready to publish it. On the Macaw Platform, all microservices must be published as dockerized containers.
Let’s take the example of the calculator service shipped in the quickstarts. In order to publish the docker image for that service, you can use the following command:
|
NOTE
|
macawpublish tool is in the macaw-publish-tools/bin subdirectory. |
For more details on macawpublish configuration, please refer to the link: https://www.macaw.io/documentation/#macaw-tools
./macawpublish service --tag <<specify your tag here>> calculatorThis command will create docker container for your microservice, tag it appropriately, publish metadata about it into the configured metadata repository as well as publish the docker image for the microservice in the configured docker registryassociated with the target Macaw platform instance.
Additionally macawpublish tool supports some more commandline options. They are:-
| Commandline option | Description |
|---|---|
|
–description |
Used to specify tag description |
|
–labels |
Used to specify tag labels (comma separated if multiple labels) |
|
–skip |
Used to skip tag creation |
|
NOTE
|
For the –label option, if any tag labels are not specified, then the mdr.tag.label.default from macaw-sdk/tools/macaw-publish-tools/macawpublish.globals file is used as a default label. If any tag labels (comma separated) are specified, then the labels are checked for validity against those specified in mdr.tag.label.allowed from macaw-sdk/tools/macaw-publish-tools/macawpublish.globals file. |
Microservice Blueprint
Next step after publishing metadata and docker image of a microservice is to publish a blueprint for the microservice.
A microservice blueprint is an entity which can be used to define a provisioning specification for a set of microservices. More often than not, customers have a requirement to provision a set of related microservices collectively. A microservice blueprint is the specification which fulfills that need.
Now, let’s create and publish a blueprint for our Calculator service. A sample blueprint for the same can be found at service-blueprints/calculator.json.
{
  "tag": "custom-service",
  "category": "Custom Services",
  "dependencies": [],
  "description": "Calculator Service",
  "icon": "dashboard",
  "id": "2d8d4867-65fd-4217-904a-718e7109b4d0",
  "name": "Calculator Service",
  "published": {
    "date": "14-03-2016",
    "organization": "Your Organization",
    "user": "sdk-developer"
  },
  "revision": "1.0",
  "services": [
    {
      "defaultQuantity": 1,
      "id": "calculator",
      "maxQuantity": 2,
      "minQuantity": 0,
      "name": "calculator-v1.0.0"
    }
  ],
  "deployment": {
    "order": [
      "calculator"
    ]
  }
}|
NOTE
|
The microservice blueprint must conform to the schema defined at macaw-publish-tools/bin/ServiceBlueprint.schema. Please go through this schema document to understand what each attribute in the blueprint stands for and what are the possible values for any attribute. |
You can use the following command to publish the above microservice blueprint. Note that the macawpublish tool is in the macaw-publish-tools/bin subdirectory.
./macawpublish blueprint <<Name of the blueprint in the service-blueprints directory>>Microservice Deployment on Macaw
Now that you have published your microservice, it is time to deploy it on the target Macaw platform instance. This can be accomplished via the DevOps Console which is part of the Macaw platform installation.
Documentation for the DevOps Console is hosted here.
Invoking Deployed Microservices
Now that you have deployed your microservice, it is time to invoke it. This can also be accomplished via the DevOps Console which is part of the Macaw platform installation.
Documentation for the DevOps Console is hosted here.
Native mode for Macaw services
Introduction
Macaw platform allows microservices to be provisioned and run as containers. Macaw tooling provides the necessary tools to declare the characteristics of the containers backing the microservices. Typically though, as developers, you would like to focus more on the application itself and not get into details about how to create a container image or publish it, every time you do a change/fix to your code. It soon becomes a time consuming effort to do changes to your microservice, build and debug your changes. To overcome such challenges, Macaw has first class support for running your microservices outside of containers, locally on your development machine. This mode of running the microservice is called “native” mode in Macaw.
Running Macaw microservices in Native mode
Before we get into details of running services in native mode, let’s quickly recap what the Macaw platform involves. Macaw platform is composed of multiple components like service registry, service provisioner, identity service and some other components. These components, together, let you provision and run your microservices. Essentially these components provide you a “runtime” ecosystem. For developing microservices, locally on your development/desktop machine, you don’t necessary require the Macaw platform to be available on your local development/desktop machine. As a developer you develop using Macaw SDK tooling and additionally any Macaw client libraries (wherever necessary).
Once you are done coding your microservice and generating a binary (that conforms to the Macaw microservice expectations), it’s time to run your service so that you can test/verify that the API it exposes, work as expected. As noted previously, you can use the Macaw tooling to generate the container images and publish those images and provision them into the Macaw platform (which typically runs on some server that you have access to). The alternate and a quicker development time approach to service development and testing is the “native” mode.
In the “native” mode of running microservices, the step of coding and building the binary of your microservice remains the same as before. When it’s time to run your service, you do this step a bit differently. The sections below explain it in the context of the service you are running. For the sake of explanation let’s assume the service we are going to develop is called hello-world service.
Native mode basics/pre-requisites
Once you have generated the binary for a microservice, using the usual build process, you can extract the generated binary to a directory of your choice. Let’s say we extracted it to /opt/macaw-projects/hello-world. When starting in native mode, the service that you are booting up needs to know the details of which service registry to register and communicate with. The service registry will be running within the installed Macaw platform, which typically is a server to which you have access to. Let’s assume that the Macaw platform is installed on a server with a resolvable hostname macaw-platform-server-01. From the command prompt/shell, where you want to launch the microservice in native mode, setup the following environment variables so that the registry details are available for the microservice that you are booting up:
MACAW_SERVICE_REGISTRY_HOST– The value of this environment variable is the hostname/IP of the server on which the service registry of the Macaw platform is running. In our example above, this value will bemacaw-platform-server-01.MACAW_SERVICE_REGISTRY_PORT– The value of this environment variable is the port of the service registry. Default installation of service registry uses 8443 port, so that’s the port you set for this environment variable. If the service registry has been installed/configured to listen to a different port, use that port here.MACAW_SERVICE_REGISTRY_PROTOCOL– The value of this environment variable is the protocol to use to communicate with the service registry.httpandhttpsare the values that are supported. The default 8443 port that service registry listens to is over HTTPS, so use the valuehttpsin such cases.
Service registry communication over HTTPS requires the client (in this case, the microservice that you are booting up) to trust the certificate presented by the service registry. If the service registry is deployed to use a certificate signed by a CA (certificate authority), then typically as a service developer, you don’t have to configure anything to trust such certificates, since most likely the CA will be part of the truststore of your operating system. However, if you are communicating with a service registry whose certificate isn’t using a CA (self-signed certificates, for example) or using one that’s not part of your operating system truststore, then you need to setup one or more environment variables to setup the trust mechanism.
- Using a custom truststore – If you have a custom truststore which contains the signing authority which signed the certificate of the service registry, then you can configure the following additional environment variables to point to that truststore file:
MACAW_SSL_TRUSTSTORE_LOCATION– The value of this environment variable should be the absolute path to the truststore fileMACAW_SSL_TRUSTSTORE_PASSWORD– The value of this environment variable should be the password of the truststore file. If the truststore file isn’t password protected, then this environment variable need not be set.
- Using a “trust all” trustore – Only recommended for development time use case. You can configure your service to blindly trust the certificate presented by the service registry. This isn’t recommended except for development time where typically you use this approach if your registry is using a self-signed certificate.
MACAW_SSL_USE_TRUSTALL_TRUSTSTORE– The value for this environment variable is eithertrueorfalse. Setting this environment variable totrueimplies that the service is expected to (blindly) trust any certificate presented by the service registry running in the Macaw platform.
Running Java microservice in Native mode
Now that you have setup the necessary environment variables as noted in the Native mode basics section, it’s time to run the microservice in native mode. Remember, we extracted the binary of our microservice to /opt/macaw-projects/hello-world/ directory. Follow the steps below on a shell/command prompt (make sure the environment variables that you set above are accessible to the shell/command prompt which you are using to launch the service):
cd /opt/macaw-projects/hello-world/ (1)
cd bin (2)
./startup.sh (3)- Go to the directory where you have the service’s binary extracted (a.k.a service home directory)
- Go to the bin directory of the service
- Start the service
|
NOTE
|
If you are on Windows OS, instead of startup.sh use startup.bat to launch the service. |
That’s it – you should see logs on the console which show the service booting up and starting. Once the startup (which internally involves, registring with the service registry), you would see a startup completion message which typically resembles:
Service <namespace=..., name=hello-world, version=...> started.Running a sidecar based microservice in Native mode
As you might be aware, Macaw platform let’s you run not just Java microservices but also microservices that are developed in other programming languages (like Python, Nodejs). Such services are backed by an additional (Java) process called the sidecar. The Macaw documentation has more details about the sidecar based services. We won’t get into those details here.
Just like Java microservices, you can run sidecar based microservices (like Python, Nodejs) in native mode. The binary generated, via the build process, for a sidecar based microservice has startup scripts for both the sidecar process as well as the actual microservice. Both the sidecar as well as the service can be run in Native mode.
Before starting them in native mode, make sure you have setup the necessary environment variables noted in the Native mode basics section and those environment variables are accessible from the shell/command prompt which you will be using to launch the sidecar process and the microservice.
First launch the actual microservice in native mode:
cd /opt/macaw-projects/hello-world/ (1)
cd bin (2)
./startup.sh (3)- Go to the directory where you have the service’s binary extracted (a.k.a service home directory)
- Go to the bin directory of the service
- Start the service
Once that starts successfully, start the sidecar in native mode, as follows:
cd /opt/macaw-projects/hello-world/sidecar/ (1)
cd bin (2)
./startup.sh (3)- Go to the service’s sidecar directory
- Go to the bin directory of the service sidecar
- Start the sidecar
|
NOTE
|
If you are on Windows OS, use startup.bat scripts for starting the microservice and the sidecar processes |
The sidecar internally registers with the service registry and communicates (via HTTP/HTTPS) with the actual microservice process and once it’s successfully started, you should see that your service’s relevant lifecycle methods would have been invoked and also the sidecar would show a log message in its logs which look something like:
Service <namespace=..., name=hello-world, version=...> started.That’s it – your microservice is now running in native mode and is deployed into the Macaw platform and available for invocations.
Native mode considerations and summary
A microservice running in Native mode is only different in the deployment environment in which it runs, as compared to the container mode of microservices. From a feature set point of view, it can do the same set of things in the service, that you would have done if it was provisioned and deployed as a container.
Clearly running the microservice in the native mode has the benefits of saving time and resources, during development time. However, in production, native mode microservices aren’t recommended for reasons like deployment environment management and scalability. Use native mode for running microservices, only during development.
Support for different programming languages
Macaw platform supports various programming languages that the developer can choose to develop their microservice in. This article has an in-depth explanation of how Macaw supports this and what it takes to develop such microservice.
Polyglot support for Macaw services
Introduction
Macaw SDK and the runtime platform supports development and deployment of microservices that are implemented in various programming languages. The platform and the SDK themselves are mainly developed using Java and as such have a very strong support for Macaw microservices developed in Java language, but the platform and the development tooling provide first class support for other programming languages too. What that means is, as a service developer, the service developer is free to choose a programming language of his choice to implement the microservice that they have exposed via the service API. The service API is what acts as the formal contract for communication between microservices that are deployed within the Macaw platform.
Languages supported out of the box
Macaw currently supports the following languages that the service developers can choose from, while implementing their microservice:
-
Java (Java 8)
-
Python 2.x
-
Node.js
Design details, terminologies and main concepts
In this section, we will go into the details of how Macaw platform supports developing and running polyglot microservices. Before getting into polyglot details, we will quickly and briefly go over the basic Macaw microservice development and runtime ecosystem.
As we know by now, Macaw runtime platform consists of multiple components which allow you to deploy, run and interact with various microservices within the platform. Macaw enforces certain minimal rules that the service developer has to be follow, for the service to be deployable within the Macaw platform. The rules are minimal and are listed below:
-
A service descriptor which lists the service APIs and the domain entities exposed by the service
-
A directory structure/hierarchy for the service implementation. Enforcing this directory structure allows Macaw tooling to provide service developers with a seamless integration to containerizing, publishing and running of the Macaw microservice.
When developing a Macaw microservice, as long as the above rules are conformed to, the implementation language of the microservice doesn’t play a major role when it comes to development of the service itself.
Service runtime/process
Once a service is developed and published to the Macaw platform, a service developer typically provisions that service. The act of provisioning is the process where the service developer instructs the service provisioner service (which is part of the Macaw platform) to provision a (containerized) runtime for the service and start the service. Internally, the service provisioner does the necessary setup to create and start a container that runs within the environment that the service developer chose while provisioning the service.
As you can imagine, for the service to start, you would need the language specific runtime to be made available to that service. For example, if the service was implemented as a Java service, you can expect a JVM to be launched and the service running within that JVM process. In fact, Macaw microservices which are developed using Java are run in this exact fashion. When such a service gets provisioned as started, the runtime consists of a Java process within which the service instance runs.
Interactions/invocations on the provisioned service
Once provisioned and started, the service is then accessible and its APIs invocable through the Macaw API gatewaywhich exposes endpoints over HTTP/HTTPS for each of the deployed services.
Additionally, for Macaw services developed using Java, a Java client API is available for looking up and invoking these services. This client API bypasses the Macaw API gateway and instead, internally, co-ordiantes with the Macaw service registry to lookup and invoke on the deployed services. The Macaw Java client API for service lookup and invocations is recommended for service developers and users who are more comfortable with Java. It however isn’t mandatory to be used for interacting with the provisioned services.
Sidecar
So far we have seen that when a Macaw service developed in Java is provisioned and started, it translates into a JVM process (within a container). The JVM process hosts the service that you as a service developer have implemented.
To support non-Java based microservices, Macaw uses a concept called sidecar. Imagine sidecar to be a lightweight process which runs alongside the actual service process. The sole responsibility of the sidecar is to act as a “pass through” for the service invocations. What that means is, when a call is made to a service, which is backed by a sidecar, the sidecar “intercepts” that calls and passes on the control to the actual service and then reads back the response for that invocation and returns the response to the actual caller.
The sidecar is implemented in Java and provided out of the box by the Macaw runtime, for non-Java microservices. Service developers don’t develop the sidecar and instead they focus on the actual service implementation.
Internally, the sidecar is nothing more than a Java process which acts as a HTTP/HTTPS client and interacts with the actual service. Furthermore, it also has a web server of its own running and exposes certain well known endpoints, so that the actual service can use these endpoints to communicate with the Macaw platform for things like invocation on other services, publishing of notifications and various such activities.
Here’s a pictorial representation of what a sidecar backed Macaw microservice looks like:
Service shim
As you can notice above, for sidecar based services, the sidecar communicates with the language specific service shim to interact with the actual service during service invocations and servie lifecycle. These shims are provided by the Macaw platform for each of the supported languages. Service shims are developed (and provided by Macaw) in the same language as the service implementation. For example, Macaw has a Python based shim which is used for service implemented in Python.
These shims can be imagined to be a very thin layer around the actual service implementation and are responsible for acting as a web server exposing well known endpoints, so that the sidecar can communicate with the shim at these endpoints. A service developer doesn’t deal with these shims and these shims are an internal implementation detail of the Macaw platform.
Advantages of the sidecar and the service shim
For polyglot support, Macaw service runtime heavily relies on both the service sidecar and the service shim (the implementation of which is hidden from the service developers). Both the service sidecar and the service shim provides the Macaw platform to add various different language support for microservices, without having to develop and maintain language specific libraries for providing the same level of features across languages. Using the (Java) sidecar and the (language specific thin) shim allows Macaw to internally implement the core features in a single language (Java) and yet expose those features as relevant endpoints over HTTP/HTTPS through the sidecar.
Developing a non-Java Macaw service
Now that we understand the terminologies and the internal details of how Macaw supports polyglot services, let’s look into what it takes to develop such a service. We won’t be using Java as the service implementation language and instead will be focussing on other languages.
|
NOTE
|
We will be using the issue-tracker quickstart as the service for demonstrating the development steps. This service is available in the quickstarts that are shipped in the Macaw SDK download. For example, for Python, issue-tracker-python is the directory within the quickstarts, to focus on. Similarly, other languages have their own version of the issue-tracker service in the quickstarts. |
Service API descriptor
Irrespective of what language you choose to implement the service in, the service API descriptor remains the same. There are no structural or semantics differences in the service API descriptor for a service that’s implemented using Java or Python or node.js or any other language.
We won’t be going into the details of what the service API descriptor looks like (that’s explained in a different chapter anwyay). Let’s quickly see what the APIs look like for the service we will be developing. As noted earlier we will be developing a issue-tracker service.
{

	"service" : {
		"namespace" : "io.macaw.services",
		"name" : "issue-tracker",
		"version" : "1.1.0",
		"enumerations" : {
			"issue-type" : {
				"allowed-values" : ["bug", "enhancement", "task"]
			}
		},
		"domain-entities" : {
			"issue" : {
				"description" : "Represents an issue in the issue tracker",
				"properties" : {
					"id" : {
						"type" : "string",
						"description" : "Unique id of the issue"
					},
					"summary" : {
						"type" : "string",
						"description" : "Brief summary of the issue"
					},
					"description" : {
						"type" : "string",
						"description" : "Detailed description of the issue"
					},
					"assigned-to" : {
						"type" : "string",
						"description" : "Id of the user to whom the issue is assigned to"
					},
					"reporter" : {
						"type" : "string",
						"description" : "The id of the user who reported the issue"
					},
					"type" : {
						"type" : "issue-type",
						"description" : "Type of the issue"
					}
				}
			}
		},
		"apis" : [
			{
				"name" : "create-issue",
				"description" : "Creates a new issue",
				"inputs" : [
					{
						"name" : "issue",
						"type" : "issue",
						"description" : "The new issue being created"
					}
				],
				"output" : {
					"type" : "issue",
					"description" : "Returns the newly created issue"
				}
			},
			{
				"name" : "create-account",
				"description" : "Creates a new user account",
				"inputs" : [
					{
						"name" : "user-id",
						"type" : "string",
						"description" : "Unique id of the user"
					},
					{
						"name" : "first-name",
						"type" : "string",
						"description" : "First name of the user"
					},
					{
						"name" : "last-name",
						"type" : "string",
						"description" : "Last name of the user"
					}
				]
			},
			{
				"name" : "get-issue",
				"description" : "Returns the issue corresponding to the passed issue id",
				"inputs" : [
					{
						"name" : "issue-id",
						"type" : "string",
						"description" : "The id of the issue being fetched"
					}
				],
				"output" : {
					"type" : "issue",
					"description" : "The issue corresponding to the passed id. Null, if no such issue exists"
				}
			}
		],
		"notifications" : {
			"publish" : {
				"issue-created" : {
					"payload-type" : "string",
					"description" : "A notification when a new issue is created. The notification payload is the id of the newly created"
				}
			}
		},
		"options" : {
			"code-gen" : {
				"java" : {
					"package-name" : "io.macaw.quickstart.issue.tracker"
				}
			}
		}
	}
}Service artifacts generation
Now that we have the service API descriptor ready, our next step is to generate the Macaw service artifacts to start developing the Macaw service. Service artifact generation is a step where you generate the initial, bare necessary files and directory structure for the service. Service developers can generate this manually (for developers who are comfortable doing that) or the use the recommended approach of using Macaw tools to generate these service artifacts.
Macaw provides more than one tool to generate these artifacts. If you are comfortable using the command line then you can use the macaw-service-artifacts-generator tool that comes bundled within your Macaw SDK download. On the other hand, if you are using Eclipse IDE for your development, you can encouraged to use the Macaw Eclipse Pluginwhich supports generation of services from the service descriptor.
Irrespective of which tool you use to generate the service artifacts, once the artifacts are generated, the directory structure and the relevant files for the service will be the same.
For the sake of this example, we’ll use the macaw-service-artifacts-generator tool that comes in the Macaw SDK. This tool expects a properties file with values for certain properties so that it can generate the service artifacts. Here’s what we’ll use as the properties file for our service:
########################################################################################################################
#
# IMPORTANT NOTE:
#
# Backslashes in a properties file are considered as escape characters. So while specifying property values,
# please take into account the impact of using that character.
# Especially, if you are on Windows OS, paths are usually represented as C:\somepath\someotherpath. While using those paths
# as values to properties here, make sure you either use front-slash (/) character (recommended) and specify it
# as C:/somepath/someotherpath or specify such paths as C:\\somepath\\someotherpath.
#
# For more details please see http://docs.oracle.com/javase/7/docs/api/java/util/Properties.html
#
########################################################################################################################


# The version of the module/project. Example: 1.0.0
module.version=1.1.0

# The type of the source model from which the code will be generated. Valid values are "yang", "json"
source.model.type=json

# The path to the service API descriptor file which represents the service APIs.
# This file will be used to generate the corresponding service artifacts
# Example: /home/me/macaw-services/json/echo-service.json
service.api.descriptor.file=/home/me/macaw-projects/json/issue-tracker.json

# The full path to the directory where the generated artifacts need to be placed
# Example: /home/me/cfx/generated
artifacts.output.dir=/home/me/macaw-projects/quickstarts/

# The build tool that will be used for the generated project.
# Valid values are "ivy" or "maven" or "plain-ant" (without those quotes).
# At this time, we only support "plain-ant".
project.build.tool=plain-ant

# The generated project can be built and deployed/released to release repositories. The organization name
# corresponds to the name of the organization under which this project's artifacts will be released.
# Example: org.myapp
project.dist.organization.name=io.macaw.quickstarts

# The generated project will depend on Macaw service platform/runtime. The dependency version here specifies
# the version of the Macaw platform on which the generated project depends
# Example: 0.9.4
macaw.platform.version=0.9.4-Beta-9


# whether impl part of service needs to be generated afresh
# false(default) -  will check for impl folder, if not present will generate both api and impl else only api is generated
# true -  will generate/overwrite the api and impl
# Example: true/false
service.gen.option.generate.impl.artifacts=false

# The programming language that will be used in the implementation for the generated project.
# Valid values are "java", "python" or "nodejs" (without those quotes).
# default value is "java"
project.impl.language=java
In the properties above, you are specifying the API descriptor file location and the location where you want the service artifacts to be generated. In the context of this chapter, the important property that we need to look into is this one:
# The programming language that will be used in the implementation for the generated project.
# Valid values are "java", "python" or "nodejs" (without those quotes).
# default value is "java"
project.impl.language=java
As noted in those comments, the value of this property specifies the language in which you wish to implement the service. The service artifacts generator tool then creates the necessary language specific files and other necessary support (like the directory hierarchy) for your service.
Python language Macaw service
In this section we will go through some details what is involved in developing a Macaw service, using Python (2.x) as the implementation language.
As we noted above, the first step is to generate the service artifacts. So we will use the python value for the project.impl.language property in the service artifacts generator’s properties:
# The programming language that will be used in the implementation for the generated project.
# Valid values are "java", "python" or "nodejs" (without those quotes).
# default value is "java"
project.impl.language=python
We then run the service artifacts generator tool and generate the artifacts.
Directory structure for Python service
The directory structure for developing a Python service looks as follows. The artifact generator tool and the Eclipse plugin generate these structures.
├── api
│   ├── build.xml
│   ├── issue-tracker-api-sources.jar
│   ├── issue-tracker-api.jar
│   └── json
│       └── issue-tracker.json
├── impl
│   ├── build.xml
│   ├── etc
│   │   └── docker
│   │       └── Dockerfile
│   └── src
│       └── main
│           ├── lib
│           │   ├── gson.jar
│           │   └── issue-tracker-api.jar
│           ├── py
│           │   └── macawservicemain.py
│           └── resources
│               └── service-info.xml
└── tools
    |
    └── macaw-service-generator
        └── service-artifacts-gen.properties
The generated service has a api, impl and tools directories.
The api consists of the service API descriptor of the service, plus the (Java) API jar.
|
NOTE
|
Irrespective of which service implementation language you choose, the Macaw service is backed by a Java API jar for that service to facilitate (internal) interactions between the Macaw platform and the service’s sidecar. As a service developer you won’t be dealing with these JAR files. These will be consumed by various Macaw tools for packaging and publishing the service. |
The impl consists of the service’s implementation specific files. This is the most important directory for service developers. This directory contains language specific directory structure and files for developing the service.
macawservicemain.py
The above snippet shows that this directory consists of src/main/py sub-directory. This directory has a file called macawservicemain.py. This file is the entry point to the service. This macawservicemain.py is a Python module that the Macaw service shim loads at runtime. You can open this file in an editor of your choice and see what it consists of. Essentially, this file has a Python class which exposes all the service specific APIs. These are the very same APIs that the service developer is expected to implement. Let’s see what it looks like for the issue-tracker service.
class Service() :

    def initialize(self, configsAsJson):
        return

    def start(self, contextAsJson):
        return

    def stop(self, contextAsJson):
        return

    def createIssue(self, issue):
        return None

    def createAccount(self, userId, firstName, lastName):
        return

    def getIssue(self, issueId):
        return None
As you can see it has a class called Service which has multiple methods. The methods can be categorized into:
-
Service lifecycle methods
-
initialize
-
start
-
stop
-
-
Service specific API implementation methods
The initialize, start and stop methods are lifecycle methods of the service. These methods are invoked by the Macaw platform when the service is being started or stopped. Each of these methods will be passed a contextrepresented as a JSON object.
initialize method
This method gets called (once) when the service being started. This is the first method to be invoked by the Macaw platform during the service initialization. The method is passed context as a JSON object and that context consists of the following:
-
Service specific configurations : Each service via its service-config.xml can specify one or more service configurations. Service configurations are nothing more than a key of type string and a value of type string. The context that gets passed to the initialize method will have the service config key as a property in the JSON object and the service config’s value will be the value of that JSON property.
-
Sidecar specific configurations: Each service is allowed to interact with its sidecar (for things like invoking on other services). The context JSON that gets passed to the
initializemethod includes the service sidecar details like what IP, port and context the sidecar is available at. This configuration will be available as a JSON ARRAY value for theio.macaw.service.sidecar.webserver.endpointskey. Here’s a sample value for this property:
{
    "io.macaw.service.sidecar.webserver.endpoints" : [
        {
            "host" : "localhost",
            "port" : 12345,
            "protocol" : "http",
            "context" : "macawservice-sidecar"
        }
    ]
}
The above snippet states that the service sidecar is available over HTTP at localhost:12345 at macawservice-sidecarweb-app context. The service can use this information and invoke on the well known endpoints of the sidecar as and when it wants to.
start method
Just like the initialize method, the start method gets called (only after the initialize method) when the service is starting. This too is a lifecycle method and is passed context as JSON. The context for the start method contains the following properties:
-
service-instance-id: This is the id of the service instance, represented as a string. -
service-instance-cluster-id: This is the id of the service instance cluster to which this instance belongs. This is represented as a string -
service-namespace: The namespace string of the service -
service-name: The name of the service -
service-version: The version of the service
Here’s an example of the context that gets passed to the service’s start method:
{
    "service-instance-id" : "A9BF4C9B-20F4-4752-90E2-FE383EE459D3",
    "service-instance-cluster-id" : "70077412-B89E-466E-BC7B-01AF8D676C4D",
    "service-namespace" : "io.macaw.services",
    "service-name" : "issue-tracker",
    "service-version" : "1.1.0"
}stop method
This too is a lifecycle method of the service. This method gets invoked when the service is instructed to stop. This method too gets passed a context as a JSON object.
|
NOTE
|
At this time, the JSON object passed to the stop method is an empty JSON OBJECT and doesn’t have any specific contextual details. |
Service specific methods
The rest of the methods that we saw in the macawservicemain.py are service specific APIs which the developer can go ahead and implement as per their business logic. Python service invocations use JSON as the data format for input/output. Service developers are expected to reutrn a JSON value as the result of their method invocations.
An example of service method implementation is as follows:
    def createIssue(self, issue):
        if issue is None:
            raise ValueError("Issue, that's being created, cannot be null")
        if issue['summary'] is None:
            raise ValueError("Issue, that's being created, should have a summary")

        if issue['type'] is None:
            raise ValueError("Issue type is missing on the issue being created")

        if issue['reporter'] is None:
            raise ValueError("Issue, that's being created, is missing the id of the user who reported it")

        issueId = 1234; # Hardcoded just for the sake of simplicity
        issue['id']= "QUICKSTART-" + str(issueId)
return issue|
NOTE
|
Any of the methods is allowed to raise exceptions just like you would do in regular Python code. |
service-info.xml
Now that we have seen what the macawservicemain.py contains, let’s quickly see what other file(s) are part of the service implementation. In the directory structure snippet, that we saw in the earlier section, you will see that there’s a src/main/resources/service-info.xml file. This file is relevant and used by Macaw services irrespective of what language the service is implemented in. This file contains service specific details, including the namespace, name and version of the service.
Each service can also specify any service specific configurations that they have to make available to the service, during the runtime, through this file. We won’t go into the details of this file, since this file isn’t specific to Python service itself and details of this file are available in a different chapter of the Macaw documentation.
Dockerfile and dependencies on Python modules
Within the impl directory you will see a etc/docker/Dockerfile file. The Dockerfile is provided for each service. It comes with the basic necessary content to containerize the Python service.
Python programs typically use third party Python modules as dependencies. While developing the service locally, a service developer typically installs those Python modules using a package manager relevant to the operating system on which he is developing the service. However, remember that the Macaw service will be published and provisioned within a containerized environment (backed by Docker containers). As such, service developers are also expected to edit this Dockerfile to add steps in that file, that will install the necessary Python modules for the service.
|
NOTE
|
Dockerfile construct is defined by the docker project. Details about what contents go into it and how to add a step to install certain things in the container, are available in the docker project’s documentation and as such aren’t explained here. |
Building the Python service
Building the Python Macaw service is similar to building any other Macaw service. You first build the api and then the impl. In this example, we had generated a service backed by Ant as the build tool. So in order to build the api and the impl projects, we just go into those directories (in that order) and run the following command:
ant clean deploy|
NOTE
|
Remember to set the MACAW_SDK_HOME environment variable to point to the location of the relevant Macaw SDK on your system, before building those projects. |
Once, both the api and the impl projects are built successfully, you can use the macawpublish tool (or your Eclipse plugin) to publish your service. We won’t be going into the details of that in this chapter, since that’s covered separately in a different chapter.
Node.js language Macaw service
As noted previously, irrespective of what language we choose to develop a service, the structure, semantics and usage of the Service API descriptor remains the same. The same applies to the Service artifacts generation process. So we won’t be going into those details again.
In order to start implementing a service in node.js, the first thing we need to do during Service artifacts generationprocess is to use the nodejs value for the project.impl.language property:
# The programming language that will be used in the implementation for the generated project.
# Valid values are "java", "python" or "nodejs" (without those quotes).
# default value is "java"
project.impl.language=nodejsDirectory structure for Nodejs Macaw service
The directory structure for the nodejs service is almost similar to the Python service, with slight differences that are specific to nodejs. Here’s what it looks like for our issue-tracker service that we have been focussing on:
.
├── api
│   ├── build.xml
│   ├── issue-tracker-api-sources.jar
│   ├── issue-tracker-api.jar
│   └── json
│       └── issue-tracker.json
├── impl
│   ├── build.xml
│   ├── etc
│   │   └── docker
│   │       └── Dockerfile
│   └── src
│       └── main
│           ├── lib
│           │   ├── gson.jar
│           │   └── issue-tracker-api.jar
│           ├── node_modules
│           │   └── macawservicemain
│           │       ├── macawservicemain.js
│           │       └── package.json
│           └── resources
│               └── service-info.xml
└── tools
    └── macaw-service-generator
        └── service-artifacts-gen.properties
Like previously, this service too has a api, impl and tools directory. The structure, semantics and the contents of the api folder is the same as that for the Python service.
The impl directory has a src/main/node_modules directory within which there’s a macawservicemain directory which represents the macawservicemain node module. Within this directory, there’s a macawservicemain.js which is the entry point to the nodejs service implementation. Let’s see what this file contains:
function Service() {}

Service.prototype.initialize = function(configAsJson) {

};

Service.prototype.start = function(contextAsJson) {

};

Service.prototype.stop = function(contextAsJson) {

};

Service.prototype.createIssue = function(onCompletion, issue) {
  onCompletion(null);

};

Service.prototype.createAccount = function(onCompletion, userId, firstName, lastName) {
  onCompletion();

};

Service.prototype.getIssue = function(onCompletion, issueId) {
  onCompletion(null);

};

module.exports = Service;
As you can see the macawservicemain module exports the Service class which has multiple methods. These methods can be categorized as:
-
Service lifecycle methods
-
initialize
-
start
-
stop
-
-
Service specific API implementation methods
Details of the service lifecycle methods and the params that gets passed to these methods are explained in sections starting here.
Nodejs is asynchronous in nature. More about the asynchronous nature of the language is explained in the nodejs’ official documentation. The service API specific methods are passed a onCompletion function which the service developers can use to return the result of the API invocation asynchronously, whenever the result is available.
Here’s an example of how the service API method implementation would look like:
service-info.xml
The impl/src/main/resources directory has a service-info.xml. This file contains the details about the service including the namespace, name and version of the service. Each service can have service specific configurations that can be listed in this file, so that those configurations are available to the service at runtime. Please read the service-info.xmlsection for more details.
Dockerfile and nodejs module dependencies
Within the impl directory you will see a etc/docker/Dockerfile file. The Dockerfile is provided for each service. It comes with the basic necessary content to containerize the nodejs service.
Each nodejs service can depend on (third-party) node modules. Service developers, while developing the service, typically install those dependencies as node modules, locally, using operating system specific tools or even nodejs provided tools like npm. At runtime though, these nodejs services run within a container. To make available the node module dependencies needed by this service, the service developer is expected to edit this Dockerfile to add steps in that file, that will install the necessary nodejs modules for the service.
|
NOTE
|
Dockerfile construct is defined by the docker project. Details about what contents go into it and how to add a step to install certain things in the container, are available in the docker project’s documentation and as such aren’t explained here. |
Building the nodejs service
Building the nodejs service is similar to building any Macaw service. As such we won’t go into those details again here. For reference, see the Building the service section for a quick overview.
Service Development Recipes
Up till now the documentation has covered extensively how to get a basic microservice up and running. Let’s take a look at some service development recipes usable for developing non-trivial services.
Recipe 1: Initialize Microservice Start/Stop
Typically when your microservice is started, you as a developer would want to execute code which for example creates database connection pools, initializes caches etc and then tear it down when the micorservice stops. In order to facilitate this, Macaw provides some service lifecycle hooks, where custom code can be plugged in. They are :-
- initialize() – executes when the service initializes.
- start() – executes when the service starts up.
- stop() – executes right before the service stops.
The exact signatures for these methods are as shown below.
public void initialize(final com.cfx.service.api.config.Configuration config) throws com.cfx.service.api.ServiceException;

public void start(com.cfx.service.api.StartContext startContext) throws com.cfx.service.api.ServiceException;

public void stop(com.cfx.service.api.StopContext stopContext) throws com.cfx.service.api.ServiceException;|
NOTE
|
For a concrete example of usage of these methods, please refer to quickstarts/todo-list/impl/src/main/java/com/macaw/quickstart/todo/impl/TodoList.java. |
Recipe 2: Adding Third Party Libraries
A non-trivial service will perform operations which involve usage of third party libraries. These libraries need to be bundled with the service. Macaw platform supports this functionality out-of-the-box.
Any such third party jars must be kept within impl/src/main/lib folder of your service implementation. The service impl build script is pre-configured to pickup any jars in this folder & make it available in the compile time classpath of the project as well as bundle it appropriately in the service archive.
For a concrete example of usage of third party libraries, please look at the todo-list sample service. In this service, we use a third party cassandra database driver to execute queries against the service’s database. This driver and all its dependencies (jars) are kept in the quickstarts/todo-list/impl/src/main/lib folder. The ant build script (impl/build.xml) adds any jars in lib to the classpath for compilation as well as bundles them in the service distribution that it creates.
|
IMPORTANT
|
The macaw-service-api and macaw-service-client libraries, which provide access to Macaw specific interfaces, are automatically made available in the runtime of the services and MUST NOT be included in the impl/src/main/lib folder of your service. Including them here can cause classloading issues during runtime. |
|
NOTE
|
Macaw service runtime currently exposes SLF4J API library/interfaces for use within the service implementations. As such the service developer is not expected to package this library/jar within the service and must not place this jar in the impl/src/main/lib folder. |
Recipe 3: Instantiating Entities (Service API Descriptor)
Any entities defined in the service api descriptor (in yang/json format) need special handling. On running the code-generator on the service api descriptor, it gives us an interface for the entity and a implementation (which is internal & not meant to be instantiated directly).
The reason for this is that these entities are sent across the wire. Not dealing with these entities directly gives us the flexibility to change the serialization/deserialization mechanism without affecting any existing code. For example, take a look at quickstarts/todo-list/api/json/todo-list.json. It defines a domain entity called todo which is used in the rpcs for this service.
"todo" : {
        "description" : "Represents a TODO item",
        "properties" : {
                "id" : {
                        "type" : "string",
                        "description" : "Id of the TODO"
                },
                "summary" : {
                        "type" : "string",
                        "description" : "Summary of the TODO"
                }
        }
}
Running the code-generator on this, generates 2 entities, one is an interface, other is a class :-
- com.macaw.quickstart.todo.Todo interface
- com.macaw.quickstart.todo.internal.impl.Todo class
Whenever we need to create an instance if Todo, we use the com.macaw.quickstart.todo.Todo interface. This is how we instantiate a Todo object in quickstarts/todo-list/impl/src/main/java/com/macaw/quickstart/todo/impl/TodoList.java.
import com.macaw.quickstart.todo.Todo;
import com.macaw.quickstart.todo.DomainEntityInstantiator;

final Todo todo = DomainEntityInstantiator.getInstance().newInstance(Todo.class);
todo.setId(todoId.toString()).setSummary(summary);
As you can see above, we use the DomainEntityInstantiator.getInstance().newInstance() mechanism to create an instance of the desired class. Note that the DomainEntityInstantiator is specific to this service. In fact, this is generated specifically for this service and is bundled in the api jar for the service.
So, if any other service wants to create the Todo object (for example, if the Todo object is sent as the payload of a notification), they need to have the todo api jar in their classpath.
Recipe 4: Supporting Microservice Databases
Macaw platform doesn’t mandate or restrict the use of databases within microservices. Microservice implementations are free to use any database of their choice and interact with it within the implementation of their service.
Macaw platform, however, does allow microservices to have their database schemas be provisioned and managed by the platform. The developer can just interact with this provisioned instance just like any other database instance. The database instance’s lifecycle, however, will be managed by the Macaw platform.
Currently, if a microservice wants the Macaw platform to provision and manage a database instance, then the following database servers are supported by the platform (support for more database servers will be added in future):
- Cassandra 2.2.x
Recipe 5: Database Schema Provisioning
As a developer you can enable provisioning and management of database instance for your microservice. The macaw publish tool that we explained earlier looks for certain files within the implementation of the microservice to instruct the Macaw platform to provision the database instance.
As a developer, you are expected to have a file named ddl.ql and dml.ql under the following folder hierarchy:
  <service-name>
	|
	|--- impl
	|	|
	|	|--- etc
	|	|     |
	|	|     |--- db
	|	|     |	   |
	|	|     |    |--- ddl.ql
	|	|     |	   |--- dml.ql
The ddl.ql is expected to contain the database creation queries, where as the dml.ql is expected to contain any initial/seed data that you need inserted into the database. If there is no initial data you want seeded, you can leave out the dml.ql file.
An example of ddl.ql for Cassandra database would look something like:
CREATE TABLE todo (
 id     UUID,
 summary text,
 PRIMARY KEY ( (id) )
);|
NOTE
|
At this time, Macaw supports Cassandra backends for microservices. In the near future, support for other backends will be added. |
Recipe 6: Accessing Databases
The Macaw platform sends the provisioned database instance details via the com.cfx.service.api.Configurationobject that gets passed to the initialize method of the service implementation. This configuration object has predefined config keys that can be used to get hold of the details of the provisioned database, so that the service implementation can then seamlessly interact with the database within the service implementation.
For Cassandra server, the passed configuration keys are as follows:
db.cassandra.clusterNodes– The value of this config property will be a comma separated list ofhost:portcombinations of the initial nodes belonging to the provisioned Cassandra database instance cluster. Example:10.10.20.20:9092db.cassandra.keyspace– The value of this config property will be the keyspace that has been provisioned, by the Macaw platform for the microservice. Example:calculator-service-aea66ae2-b2f9-11e6-afb9-5bea1c3a4d5ddb.cassandra.username– The value of this property will be the user name to use to connect to the provisioned database instancedb.cassandra.password– The value of this property will be the password to use to connect to the provisioned database instance
The microservice implementation can use these passed configurations to then communicate with the database instance that has been provisioned for the service.
We recommend the Datastax Cassandra driver, but you are free to use any other Cassandra driver for your service as long as it is compatible with the Cassandra version supported by Macaw.
The Macaw platform provisions the database schema, one per service instance cluster. All service instances in the service instance cluster, share the same database schema. The generated database schema name is random.
|
NOTE
|
You can refer to quickstarts/todo-list/impl/src/main/java/com/macaw/quickstart/todo/impl/TodoList.java for sample code which shows how to initialize connections to the provisioned schema, how to access data from it etc. |
Recipe 7: Typed Microservice Invocation
Assume that the microservice you just developed & deployed, needs some information from another microservice & hence needs to invoke a rpc on it. How can we do that? There are 2 ways to do it :-
- Typed invocation : This approach involves, including the target service’s API library in the compile time and runtime classpath of the service which is invoking the target service.
- De-typed invocation : In this approach the service which wants to invoke on any target service, doesn’t require access to the target service’s API library, neither at compile time nor at runtime. The type safety of the objects passed around during invocation of the APIs, is only verified at runtime, by the target service which handles the invocation. As a result, the caller service doesn’t require any access to the target service’s API library for static typing.
Rest of this section deals with typed invocations. The process for typed invocation is as follows :-
- Contact the target service developer and get the api jar for the target service. This is a necessary (manual) step for typed invocations. For example, let’s assume you are developing a service which wants to invoke a method on the calculator service. In this case, you should contact the developer/owner of the calculator service to get the api jar.
- Place this api jar for the target service in the <service-project-root>/impl/src/main/lib folder of your service. This path contains the libraries that are necessary for the service being developed and these libraries will also get packaged into the generated service binary.
- Get hold of the ServiceClientContext. The Macaw service framework can inject the ServiceClientContext in the service impl class. You just need to declare a variable as shown below.
@Inject
private ServiceClientContext serviceClientContext;
- Get the ServiceLocator from the ServiceClientContext.
ServiceLocator serviceLocator = serviceClientContext.getServiceLocator();
- Any Service deployed on the Macaw platform registers with the Service Registry. So, we need to do a lookup for the target service on the registry. To accomplish that, call locateService() method on the locator with the unique identifiers of the target service (it’s name, namespace & a optional version).
CalculatorService calculator = serviceLocator.locateService(serviceClientContext.getInvocationContextSession(), http.macaw.io.quickstart.service.calculator.rev160608.Calculator.class, "io.macaw.services", "calculator");
- Once we have the Service API post the lookup, we invoke the desired rpc on it just like we invoke methods on any other java objects.
|
NOTE
|
We are currently working on a mechanism using which service developers can publish the APIs of the services they develop, so that those can be consumed by interested parties. |
Recipe 8: Detyped Microservice Invocation
Assume that the microservice you just developed & deployed, needs some information from another microservice & hence needs to invoke a rpc on it. How can we do that? There are 2 ways to do it :-
- Typed invocation : This approach involves, including the target service’s API library in the compile time and runtime classpath of the service which is invoking the target service.
- De-typed invocation : In this approach the service which wants to invoke on any target service, doesn’t require access to the target service’s API library, neither at compile time nor at runtime. The type safety of the objects passed around during invocation of the APIs, is only verified at runtime, by the target service which handles the invocation. As a result, the caller service doesn’t require any access to the target service’s API library for static typing.
The rest of this section shows and explains an example of de-typed invocations. We will use the issue-trackerquickstart shipped with the Macaw SDK as a reference for de-typed invocations. Please refer to the issue-trackerquickstart code for a complete example.
The issue-tracker service exposes the create-account API which is expected to create a user account within the issue tracking system. Typically, in microservices world, for a module like user management, you would typically have it as a separate service. We do the same, in our quickstarts too. We have a user management service which specifically deals with user creation and management. Of course, the purpose of that quickstart is meant to be a just basic example of user management. Our issue-tracker service internally uses the the user-management service for management of user accounts of the issue tracker system. So whenever, a create-account API is invoked, the implementation of the issue-tracker service looks up the user-management service and does a de-typed invocation on it to create a user. Following is the relevant snippet of (with inline comments on how its done):
private static final String USER_MANAGEMENT_SERVICE_NAMESPACE = "io.macaw.services";
private static final String USER_MANAGEMENT_SERVICE_NAME = "user-management";

final Session session = this.serviceClientContext.getInvocationContextSession();

// lookup the user management service and invoke on it in a "detyped" way (i.e. we *don't* require the interfaces
// of the user management service, statically in our classpath)
final ServiceInvoker serviceInvoker = this.serviceClientContext.getServiceLocator().locateServiceInvoker(session, USER_MANAGEMENT_SERVICE_NAMESPACE, USER_MANAGEMENT_SERVICE_NAME);

// invoke the API to create the user, on the user management service
final String apiMethodName = "createUser";
final String[] apiMethodArgTypes = new String[]{String.class.getName(), String.class.getName(), String.class.getName()};
final String[] apiMethodArgs = new String[]{userId, firstName, lastName};
try {
    serviceInvoker.invoke(apiMethodName, new JSONMethodDescriptor(apiMethodArgTypes, apiMethodArgs));
} catch (Exception e) {
    throw new RuntimeException("Failed to assert validity of user account of user " + userId, e);
}
Let’s go over the above snippet to understand in more detail on how it’s done. Let’s start with this statement:
final Session session = this.serviceClientContext.getInvocationContextSession();Here we just get hold of the service invocation session, which we will then later use for lookup of services.
|
NOTE
|
A service invocation always has a session associated with it. Furthermore, lookup and invocations on services aren’t allowed without the usage of a valid session |
Once we have that session, the next thing we do in that code is to locate a ServiceInvoker for the user-managementservice. ServiceInvoker`s is an API exposed by the Macaw service framework to allow invoking on services in a de-typed manner. Once we get a `ServiceInvoker, the next step is to call the invoke API that it exposes. The invoke API expects the method name of the target service method, which we want to invoke and an instance of MethodDescriptor interface:
/**
 * Invokes on the service method named <code>methodName</code> and which accepts method parameters of type specified
 * in <code>methodArgTypes</code>. The <code>methodArgumentsProvider</code> will be used to get the method arguments
 * that will be passed on to the invoked method.
 *
 * @param methodName
 *            The name of the method to invoke
 * @param methodDescriptor
 *            Provides method arguments that will be used for the method invocation. The method arguments returned
 *            by the <code>methodArgumentsProvider</code> can either be directly passed on to the invoked method or
 *            could potentially undergo some conversion to relevant type, before being passed on to the invoked
 *            method of the service. Whether or not the conversion is needed, depends on the
 *            {@link MethodDescriptor#getType() type of the MethodDescriptor}
 * @return
 */
Object invoke(String methodName, MethodDescriptor methodDescriptor) throws Exception;
The MethodDescriptor interface itself looks as follows:
public interface MethodDescriptor {

    MethodParamType getParamType();

    String[] getMethodArgTypes();

    Object[] provideMethodArgs();
}
The code in our implementation of issue-tracker is creating a JSONMethodDescriptor, an implementation provided by the Macaw service framework library, that uses JSON format for handling the de-typed invocations. As noted in the code snippet previously, here’s how the invocation looks like, in our issue-tracker service:
// invoke the API to create the user, on the user management service
final String apiMethodName = "createUser";
final String[] apiMethodArgTypes = new String[]{String.class.getName(), String.class.getName(), String.class.getName()};
final String[] apiMethodArgs = new String[]{userId, firstName, lastName};
try {
    serviceInvoker.invoke(apiMethodName, new JSONMethodDescriptor(apiMethodArgTypes, apiMethodArgs));
} catch (Exception e) {
    throw new RuntimeException("Failed to assert validity of user account of user " + userId, e);
}
We pass in the method name of the target service method and the method argument types and the method arguments itself, to the ServiceInvoker’s `invoke method to have the de-typed invocation done.
|
NOTE
|
The ServiceInvoker.invoke returns an java.lang.Object type, which if invoked through the JSONMethodDescriptor is going to be a java.lang.String. The return value will be a valid JSON value type (JSON string, JSON object, JSON array, TRUE, FALSE, JSON number or JSON NULL). In the above example, we aren’t concerned about the return type and hence we don’t see it’s usage there. Please refer to the issue-tracker quickstart to see how the return type gets used, in a different part of the code, which too does a de-typed invocation. |
Recipe 9: Web Applications (Experimental)
MACAW platform also provides a way to deploy a webapp on the platform which invokes deployed microservices.
|
NOTE
|
This functionality is experimental at this time. |
Recipe 10: UI Pair
Any such web application can be deployed on a named application infrastructure installation (Tomcat fronted with HAproxy) within the platform. Such an install is termed as a UI-Pair. In case a user wants to provision a new UI-Pair, it can be done as shown below :-
- The user can create a distinct named UI-pair.
macaw ui-pair create --name my-ui-pair --port 8002
- Then the user should install the ui-pair via the macaw tool.
macaw ui-pair install --name my-ui-pair --tag <tag>
These commands will provision a named UI-pair in the Macaw platform installation on which any desired web application can be deployed.
Recipe 11: Web Application Image Publishing
The command shown below when executed will publish the web application.
./macawpublish webapp --file <<Location of the webapp (war) file>> --name <<webapp name>> --version <<webapp version>> --tag <<specify your tag here>>Recipe 12: Blueprint (Web Application and Services)
A service blueprint can also specify any web application which needs to be deployed as a part of the blueprint. For example, if Macaw were to create a blueprint for a web application which is merely a front-end for the Calculator service, the blueprint can be defined as shown below :-
{
  "tag": "custom-service",
  "category": "Custom Services",
  "dependencies": [],
  "description": "Calculator Service",
  "icon": "dashboard",
  "id": "2d8d4867-65fd-4217-904a-718e7109b4d0",
  "name": "Calculator Service",
  "published": {
    "date": "14-03-2016",
    "organization": "Your Organization",
    "user": "sdk-developer"
  },
  "revision": "1.0",
  "webapps": [
    {
      "id": "calculator-ui-v1.0.0"
      "name": "calculator-ui-v1.0.0",
      "configDescriptors": [],
      "exposePorts": [],
      "volumes": [],
    }
  ],
  "services": [
    {
      "defaultQuantity": 1,
      "id": "calculator",
      "maxQuantity": 2,
      "minQuantity": 0,
      "name": "calculator-v1.0.0"
    }
  ],
  "deployment": {
    "order": [
      "calculator"
    ]
  }
}
The blueprint shown has the calculator service as well as its front-end calculator-UI.
Recipe 13: Notification Publication
Microservices are designed to run in bounded contexts. Each microservice is the master of some domain data. In a microservices installation, it’s quite possible that other microservices are interested in consuming any notifications published by a microservice.
For example, a microservice that is responsible for user management can publish a notification on events like user addition, user deletion, etc. Other microservices interested in user events can subscribe to notifications from the user management microservice.
This is how a microservice can publish notifications in Macaw. In the service specification, the service must declare details of the notifications that it raises/publishes. For example, look at the service specification (in yang format) defined at quickstarts/employee/api/yang/employee.yang.
notification EMPLOYEE_RELIEVED {
    description "A notification which is published when an employee is relieved.";
    leaf email-id {
        type string;
        description "Email of the relieved employee.";
    }
}
The snippet above declares that the employee service raises a notification called EMPLOYEE_RELIEVED. The notification payload includes a string called email-id. This is a simple notification. Now assume that as a part of the notification payload, we want to include a custom object. How can this be done? Look at the same YANG file for another notification declaration as shown below :-
notification NEW_EMPLOYEE_ADDED {
    description "A notification which is published when a new employee is added by the employee service.";
    uses grp-employee; // point to the employee object
}

grouping grp-employee{
    container employee {
        leaf id {
            type int32;
            mandatory false;
            description "Unique identifier for the employee";
        }
        leaf first-name {
            type string;
            mandatory true;
            description "First name of the employee";
        }
        leaf last-name {
            type string;
            mandatory false;
            description "Last name of the employee";
        }
        leaf email {
            type string;
            mandatory true;
            description "Email of the employee(Email id should be unique). Email id will be used to login to the organization portal.";
        }
        ...
   }
}
The snippet above declares that the employee service raises a notification called NEW_EMPLOYEE_ADDED. The notification payload comprises of a employee object, which is a custom object defined by the service.
With these declarations we have expressed to the Macaw platform which type of notifications our employee sample service publishes. This is important so that the platform knows which notifications are available for consumption. Now, within the code of the service, these notifications must be raised. For a example of the same, please look at impl/src/main/java/http/macaw/io/quickstart/service/employee/rev161201/impl/EmployeeServiceImpl.java. Lets look at the addEmployee() method and how we raise the NEW_EMPLOYEE_ADDED notification when this RPC is invoked.
@Inject
private ServiceClientContext serviceClientContext;

@Override
public int addEmployee(http.macaw.io.quickstart.service.employee.rev161201.Employee employee) {
    if (employee == null) {
        throw new IllegalArgumentException("Null employee cannot be added");
    }
    if (employee.getEmail() == null) {
        throw new IllegalArgumentException("Employee with a null email address cannot be added");
    }
    employee.setId(employeeIdCounter.getAndIncrement());
    employeeCache.put(employee.getId(), employee);
    safePublishNotification(EMPLOYEE_ADDED_NOTIFICATION_ID, employee);
    return employee.getId();
}

public void safePublishNotification(final String notificationId, Object payload) {
    try {
        this.serviceClientContext.getNotificationManager().publish(notificationId, payload);
    } catch (Exception e) {
        e.printStackTrace();
    }
}
As shown in the snippet above, on execution of the addEmployee RPC, first the employee object is stored in a in-memory cache and then raise the notification by getting hold of the NotificationManager reference from the ServiceClientContext and then called publish() on it. That code takes care of publishing the notification & it can now be consumed by other services which subscribe to it.
|
NOTE
|
that if the user changes the service spec to add/modify/delete any notification publication declarations; they must regenerate the service via the code-generator. The notification subscription information is kept in the generated impl/src/main/resources/conf/service-info.xml artifact. It must reflect the user’s notification related changes in the notifications block. |
Recipe 14: Notification Subscription & Consumption
In the previous recipe, we explained notification publishing via the example of a employee sample service. In this recipe, we will show you how you can subscribe to those published notifications and also consume them in another microservice.
Subscribing for a notification
In order to subscribe for notifications, a service needs to declare in its service spec which specific notifications it wants to subscribe to. For example, look at the service spec (in yang format) defined at quickstarts/intranet-portal/api/yang/intranet-portal.yang.
import macaw-notification {
  prefix n;
}

container notification-subscriptions {
    n:subscription employee-added {
        n:notification-id  "NEW_EMPLOYEE_ADDED";
        description "Notification subscription when new employee is added.";
        n:service-name "employee";
        n:service-version "1.0.0";
        n:service-namespace "io.macaw.services";
    }

    n:subscription employee-relieved {
        n:notification-id  "EMPLOYEE_RELIEVED";
        description "Notification subscription when employee is relieved.";
        n:service-name "employee";
        n:service-version "1.0.0";
        n:service-namespace "io.macaw.services";
    }
}
As you can see from the above snippet, we declare which notifications we want to subscribe to within a notification-subscriptions construct. For each notification that we want to subscribe to, we add a subscription declaration which specifies :-
- notification-id – id of the notification to subscribe to
- service-name – name of the service
- service-version – version of the service
- service-namespace – namespace of the service
|
NOTE
|
that if you change the service spec to add/modify/delete any notification subscription declarations; you must regenerate the service via the code-generator. The notification subscription information is kept in the generated impl/src/main/resources/conf/service-info.xml artifact. It must reflect your notification related changes in the notifications block. |
Consuming a notification
So now that we have declared in the previous section, which notifications we want to subscribe to; let’s figure how we consume those notifications. Note that Macaw platform will take care of the subscribing (based on the declaration) and making the notification messages available for consumption. The messages are available for consumption in the onNotification() method in the service implementation class. It’s signature is as shown below.
public void onNotification(com.cfx.service.api.notification.Notification notification);Let’s look at the quickstarts/intranet-portal/impl/src/main/java/http/macaw/io/quickstart/service/intranet/portal/rev161201/impl/IntranetPortalImpl.javaclass for an actual example of the same method.
public void onNotification(com.cfx.service.api.notification.Notification notification) {
    switch (notification.getIdentifier().getNotificationId()) {
    case EMPLOYEE_ADDED_NOTIFICATION_ID:
        System.out.println("proccessing notification for newly added employee to the organisation.");
        Employee addedEmployee = (Employee) notification.getContent();
        userDetails.put(addedEmployee.getEmail(), addedEmployee.getPassword());
        break;
    case EMPLOYEE_RELIEVED_NOTIFICATION_ID:
        System.out.println("proccessing notification for employee relieved.");
        String deletedUserEmailId = (String) notification.getContent();
        userDetails.remove(deletedUserEmailId);
        break;
    default:
        throw new IllegalArgumentException("Unknown notification received :" + notification.getIdentifier().getNotificationId());
    }
}
As you can see from the above code, based on the notification id, we can figure out which notification we need to process. The payload of the notification is available via the notification.getContent() method. It can be cast to the correct type to be used further. Remember that this type (in this case, Employee) is defined in the publishing service. Hence you need to have the api jar of the publishing service in your classpath in order to perform the cast. This is why we have the employee-api.jar in the impl/src/main/lib folder of intranet-portal sample service.
Recipe 15: Continued Notifications
In order to subscribe for notifications, a service needs to declare in its service specification which specific notifications it wants to subscribe to. For example, look at the service spec (in YANG format) defined at quickstarts/intranet-portal/api/yang/intranet-portal.yang.
import macaw-notification {
  prefix n;
}

container notification-subscriptions {
    n:subscription employee-added {
        n:notification-id  "NEW_EMPLOYEE_ADDED";
        description "Notification subscription when new employee is added.";
        n:service-name "employee";
        n:service-version "1.0.0";
        n:service-namespace "io.macaw.services";
    }

    n:subscription employee-relieved {
        n:notification-id  "EMPLOYEE_RELIEVED";
        description "Notification subscription when employee is relieved.";
        n:service-name "employee";
        n:service-version "1.0.0";
        n:service-namespace "io.macaw.services";
    }
}
As can be seen from the snippet above, Macaw declares which notifications it wants to subscribe to within a notification-subscriptions construct. For each notification desired to subscribe to, Macaw adds a subscription declaration which specifies :-
- notification-id – id of the notification to subscribe to
- service-name – name of the service
- service-version – version of the service
- service-namespace – namespace of the service
|
NOTE
|
that if user changes the service spec to add/modify/delete any notification subscription declarations; the user must regenerate the service via the code-generator. The notification subscription information is kept in the generated impl/src/main/resources/conf/service-info.xml artifact. It must reflect your notification related changes in the notifications block. |
Consuming a notification
So now that the previous section has been declared, which notifications desired to subscribe to, let’s figure how to consume those notifications. Note that Macaw platform will take care of the subscribing (based on the declaration) and making the notification messages available for consumption. The messages are available for consumption in the onNotification() method in the service implementation class. It’s signature is as shown below.
public void onNotification(com.cfx.service.api.notification.Notification notification);Let’s look at the quickstarts/intranet-portal/impl/src/main/java/http/macaw/io/quickstart/service/intranet/portal/rev161201/impl/IntranetPortalImpl.java class for an actual example of the same method.
public void onNotification(com.cfx.service.api.notification.Notification notification) {
    switch (notification.getIdentifier().getNotificationId()) {
    case EMPLOYEE_ADDED_NOTIFICATION_ID:
        System.out.println("proccessing notification for newly added employee to the organisation.");
        Employee addedEmployee = (Employee) notification.getContent();
        userDetails.put(addedEmployee.getEmail(), addedEmployee.getPassword());
        break;
    case EMPLOYEE_RELIEVED_NOTIFICATION_ID:
        System.out.println("proccessing notification for employee relieved.");
        String deletedUserEmailId = (String) notification.getContent();
        userDetails.remove(deletedUserEmailId);
        break;
    default:
        throw new IllegalArgumentException("Unknown notification received :" + notification.getIdentifier().getNotificationId());
    }
}
As seen from the above code, based on the notification ID, which notifications need to be processed can be figured out. The payload of the notification is available via the notification.getContent() method. It can be cast to the correct type to be used further. Remember that this type (in this case, Employee) is defined in the publishing service. Hence the user needs to have the API jar of the publishing service in your classpath in order to perform the cast. This is why we have the employee-api.jar in the impl/src/main/lib folder of intranet-portal sample service.
Recipe: Creating and deploying a webapp which invokes deployed microservices (Experimental)
MACAW platform also provides a way to deploy a web application on the platform which invokes deployed microservices.
|
NOTE
|
This functionality is experimental at this time. |
Provisioning a ui-pair
Any such web application can be deployed on a named application infrastructure installation (tomcat fronted with haproxy) within the platform. Such an install is termed as a ui-pair. In case a user wants to provision a new ui-pair, it can be done as shown below :-
- The user can create a distinct named ui-pair.
macaw ui-pair create --name my-ui-pair --port 8002
- Then the user should install the ui-pair via the macaw tool.
macaw ui-pair install --name my-ui-pair --tag <tag>
These commands will provision a named UI-Pair in the Macaw platform installation on which any desired web application can be deployed.
Publishing the webapp image
The command shown below when executed will publish the web application.
./macawpublish webapp --file <<Location of the webapp (war) file>> --name <<webapp name>> --version <<webapp version>> --tag <<specify your tag here>>Creation of a blueprint with webapp and services
A service blueprint can also specify any web application which needs to be deployed as a part of the blueprint. For example, if Macaw were to create a blueprint for a web application which is merely a front-end for the Calculator service, the blueprint can be defined as shown below :-
{
  "tag": "custom-service",
  "category": "Custom Services",
  "dependencies": [],
  "description": "Calculator Service",
  "icon": "dashboard",
  "id": "2d8d4867-65fd-4217-904a-718e7109b4d0",
  "name": "Calculator Service",
  "published": {
    "date": "14-03-2016",
    "organization": "Your Organization",
    "user": "sdk-developer"
  },
  "revision": "1.0",
  "webapps": [
    {
      "id": "calculator-ui-v1.0.0"
      "name": "calculator-ui-v1.0.0",
      "configDescriptors": [],
      "exposePorts": [],
      "volumes": [],
    }
  ],
  "services": [
    {
      "defaultQuantity": 1,
      "id": "calculator",
      "maxQuantity": 2,
      "minQuantity": 0,
      "name": "calculator-v1.0.0"
    }
  ],
  "deployment": {
    "order": [
      "calculator"
    ]
  }
}
The blueprint above has the calculator service as well as it’s front-end calculator-UI.
Provisioning the blueprint with webapp and services
Once the blueprint (which contains a web application(s)) is ready, the process for deploying the blueprint is the same as that for a blueprint with only services in it. This can be accomplished via the DevOps Console which is part of the Macaw platform installation. Only difference is that while deploying a blueprint with web application, the user needs to select the target UI-pair on which the web application should be installed.
Documentation for the DevOps Console is hosted here.
Recipe 16: Web Application
Once the blueprint (which contains a web application) is ready, the process for deploying the blueprint is the same as that for a blueprint with only services in it. This can be accomplished via the DevOps Console which is part of the Macaw platform installation. Only difference is that while deploying a blueprint with a web application, the user needs to select the target UI-Pair on which the web application should be installed.
Documentation for the DevOps Console is hosted here.
Recipe 17: Support for stateful microservices
Microservices are typically implemented as stateless processes running in clusters with all underlying state stored in a database. However, there are some usecases which require support for Stateful microservices.
Macaw platform supports implementation of stateful microservices by providing services with transparent access to a cluster-wide cache which can be used to cache & share information across services running in a cluster in a performant manner.
In order to use this functionality, services have to initialize the CacheContext in their start() method as shown below.
    @Inject
    private ServiceClientContext serviceClientContext;

    private CacheContext cacheContext;

    @Override
    public void start(com.cfx.service.api.StartContext startContext) throws ServiceException {
        ...

        this.cacheContext = serviceClientContext.getRuntimeFeature(CacheContext.class);
        try {
            this.cacheContext.initialize();
        } catch (CachingException e) {
            throw new ServiceException("Failed to initialize cache", e);
        }

        ...
    }
Once the service has access to a CacheContext instance, it can store/fetch/delete any objects in/from it. Here are the relevant methods exposed on the CacheContext interface :-
    /**
     * Associates the specified value with the specified key in this cache
     *
     * @param key key with which the specified value is to be associated
     * @param value Serializable value to be associated with the specified key
     * @throws CachingException
     */
    public void set(String key, Object value) throws CachingException;

    /**
     * Returns the value to which the specified key is mapped,
     *
     * @param key the key whose associated value is to be returned
     * @return the value to which the specified key is mapped, or {@code null}
     *         if this map contains no mapping for the key.
     * @throws CachingException
     */
    public Object get(String key) throws CachingException;

    /**
     * Deletes the mapping for a key from this cache if it is present
     *
     * @param key key whose mapping is to be deleted from the cache
     * @throws CachingException
     */
    public void delete(String key) throws CachingException;
When the service shuts down, the CacheContext instance should be cleaned up. This can be done by invoking CacheContext.close() in the service stop() lifecycle method as shown below :-
    @Override
    public void stop(com.cfx.service.api.StopContext stopContext) throws ServiceException {
        ...
        try {
            this.cacheContext.close();
        } catch (IOException e) {
            // Do nothing...
        }
        ...
    }
For example usage of the cluster-wide caching functionality, please look at quickstarts/issue-tracker.
Recipe 18: Creating and deploying a webapp which invokes deployed microservices (Experimental)
Macaw platform also provides a way to deploy a webapp on the platform which invokes deployed microservices.
|
NOTE
|
This functionality is experimental at this time. |
Provisioning a ui-pair
Any such webapp can be deployed on a named application infrastructure installation (tomcat fronted with haproxy) within the platform. Such an install is termed as a ui-pair. In case a user wants to provision a new ui-pair, it can be done as shown below :-
-
The user can create a distinct named ui-pair.
macaw ui-pair create --name my-ui-pair --port 8002
-
Then the user should install the ui-pair via the macaw tool.
macaw ui-pair install --name my-ui-pair --tag <tag>
These commands will provision a named ui-pair in the Macaw platform installation on which any desired webapp can be deployed.
Publishing the webapp image
The command shown below when executed will publish the webapp.
./macawpublish webapp --file <<Location of the webapp (war) file>> --name <<webapp name>> --version <<webapp version>> --tag <<specify your tag here>>Creation of a blueprint with webapp and services
A service blueprint can also specify any webapp which needs to be deployed as a part of the blueprint. For example, if we were to create a blueprint for a webapp which is merely a frontend for the Calculator service, the blueprint can be defined as shown below :-
{
  "tag": "custom-service",
  "category": "Custom Services",
  "dependencies": [],
  "description": "Calculator Service",
  "icon": "dashboard",
  "id": "2d8d4867-65fd-4217-904a-718e7109b4d0",
  "name": "Calculator Service",
  "published": {
    "date": "14-03-2016",
    "organization": "Your Organization",
    "user": "sdk-developer"
  },
  "revision": "1.0",
  "webapps": [
    {
      "id": "calculator-ui-v1.0.0"
      "name": "calculator-ui-v1.0.0",
      "configDescriptors": [],
      "exposePorts": [],
      "volumes": [],
    }
  ],
  "services": [
    {
      "defaultQuantity": 1,
      "id": "calculator",
      "maxQuantity": 2,
      "minQuantity": 0,
      "name": "calculator-v1.0.0"
    }
  ],
  "deployment": {
    "order": [
      "calculator"
    ]
  }
}
Above blueprint has the calculator service as well as it’s frontend calculator-ui.
Provisioning the blueprint with webapp and services
Once the blueprint (which contains a webapp(s)) is ready, the process for deploying the blueprint is the same as that for a blueprint with only services in it. This can be accomplished via the DevOps Console which is part of the Macaw platform installation. Only difference is that while deploying a blueprint with webapp, the user needs to select the target ui-pair on which the webapp should be installed.
Documentation for the DevOps Console is hosted here.
Appendix 1: Yang Support
YANG supports a set of built-in or primitive types. See here.
It’s also possible in YANG to define:-
- derived types which extend primitive types as well as
- define one’s own custom types.
In this document, they will be collectively referred to as Non-primitive types.
In the Macaw microservices eco-system, a non-primitive type is also called a “domain entity”. These domain entities are modeled as YANG typedefs, containers and other similar constructs depending on the domain entity itself. Here is an overview of how a microservice developer may define a domain entity, specifically those which are part of the microservice’s RPC contract.
Container
If the domain entity has more than one attribute that has to be contained within a single (Java) class, then the developer should use a “container”.
// A "container" is used here to represent a "Ticket" class
container ticket {
    description "A ticket consists of a ticket id, the subject and summary of the ticket, the user to whom it is assigned
                and the reporter of the ticket";
    leaf ticket-id {
        description "The id of the ticket";
        type string; // a primitive yang type
    }
    leaf title {
        description "A brief subject/title for the ticket";
        type string;
    }
    leaf summary {
        description "Detailed description of the ticket";
        type string;
    }
    leaf reporter {
        description "Person who reported it";
        type string;
    }
    leaf assignee {
        description "The person to whom it is assigned";
        type string;
    }
}
As can be seen, it’s pretty straightforward to represent a “Ticket” as a container, especially when the attributes are of primitive types.
Typedef
Let’s take this a bit further now. Realistically, a ticket will have a “status” associated with it too. Typically, the status would be (pre-defined) values like “Open”, “Closed”, “In progress” etc… In order to capture this information in the yang model of the ticket, one has to use enumerations. Let’s take a look at how to define an enumeration and then use it within the ticket container.
// An enumeration that captures the status of the ticket
typedef ticket-status {
    description "Status of a ticket";
    type enumeration {
        enum OPEN;
        enum CLOSED;
        enum IN-PROGRESS;
    }
}
// snippet of the "ticket" container that we saw in the earlier example
container ticket {
    ... // other attributes that we looked at in previous example

    leaf status {
        description "Status of the ticket";
        type ticket-status; // we refer to the typedef that we created a few line earlier
    }
...
}
As you noticed, we used “typedef” keyword to create an “enumeration” type with a pre-defined set of values. We then used that enumeration within our ticket container, by referring to the name of the enumeration as the “type” of the status attribute/leaf.
|
NOTE
|
typedef in yang only allows refining/restriction the semantics of primitive types in yang. Unlike what some would expect, typedef cannot be used to create a new higher level type in itself. For that we use a container. |
Leaf-list
Now what if you want to have a attribute in the ticket which is a set of users who are watching the ticket for updates. Typically, you would use a collection or an array for such attributes. In the context of services exposed through yang model, we construct such arrays/collection of primitive types as “leaf-list” type. Let’s see an example.
// continuing with the ticket container, we saw earlier
container ticket {
    ... // previously explained attributes have been removed from this snippet

    leaf-list watchers {
        description "People who are watching this ticket for updates";
        type string;
    }
...
}
The leaf-list translates to an array of primitive type (as specified by the type of the leaf-list). So in the above example, an array of string will be used for the attribute named “watchers” in the ticket container.
|
NOTE
|
The code-generator tool creates arrays for leaf-list types instead of Java collections. |
RPC Methods
Now let’s take a look at how a service method can be depicted in a yang file. Continuing with the ticketing example, let’s say we want to expose the following methods as service apis: – A method to fetch a ticket. The input will be a ticket id and the output will be a ticket instance (if found for that id). – A method to add a ticket. The input will be a ticket instance and the output will be the id of the newly generated ticket. – A method which returns a list of all tickets with a specific status, assigned to a specific user. The inputs to this method will be the status of the ticket and the user id. The output of the method will be a list of tickets (if any match the passed criteria)
RPC Input
Let’s start with the first method which fetches a ticket. Let’s name the method add-method. Here’s how the (snippet of the) method will look like in yang file:
// A RPC method which accepts a string type input
rpc get-ticket {
    description "Fetches a ticket based on the passed ticket id";
    input {
        leaf ticket-id {
            description "The id of the ticket to be fetched";
            type string;
        }
    }
    ... // we'll get to the output part in the next snippet
}
As you’ll notice the above code defined a rpc method named “get-ticket” with an “input” within which there’s a “leaf” named “ticket-id” of type string. This translates to a method which accepts one input of type string in a service method named getTicket.
As noted in the requirement of the method, it’s expected to return a ticket type. How do we do that? Remember that earlier, we defined a “container” ticket for capturing the ticket details. We now have to reuse/refer to that container as the output type of this rpc method. In order to do that we use “grouping” yang keyword, which is explained below.
Grouping
If a domain entity, represented by a “container”, or a list of domain entities (of the same type) are to referred and used as inputs/outputs of RPC calls, we create a “grouping” for such domain entities. Let’s take the example of the “ticket” container which we want to use as input/output in the RPC methods. Let’s see how we create a grouping for it.
grouping grp-ticket {
    description "Representing the ticketing container";
    container ticket {
        .... // the attributes that we defined in previous snippets of the ticket container
    }
}
You will notice that we just “wrapped” the previous container within a grouping named “grp-ticket”. This will allow us to use/refer the ticket in the rest of the yang model like in RPC input/output.
|
NOTE
|
Although, there is no strict restriction/mandate on the name of the “grouping”, we use a “grp-” prefix to allow the reader to easily distinguish them as a grouping of a certain entity. The grouping names are logical and won’t get used in any of the generated code. |
Let’s now see how to use this grouping as the output type of the previously defined rpc method.
// A RPC method which accepts a string type input and returns ticket type output
rpc get-ticket {
    description "Fetches a ticket based on the passed ticket id";
    input {
        leaf ticket-id {
            description "The id of the ticket to be fetched";
            type string;
        }
    }
    output {
        description "The ticket which was requested";
        uses grp-ticket; // we refer to the grouping, that we created earlier, for the ticket
    }
}
You’ll notice that we now have defined the rpc method to be having an output of type ticket. We did this by using the “uses” keyword to refer to the earlier defined ticket grouping.
That completes the definition of the fetch ticket method. Now let’s move on to the next method in our list, the one which creates a new ticket. The input to it will be a ticket type and the output will be the id of the newly created ticket. We’ll continue using our just gained knowledge of grouping in this rpc method definition.
// A RPC method which accepts a ticket type and returns a string
rpc create-ticket {
    description "Creates a new ticket";
    input {
        description "The details of the ticket to be created";
        uses grp-ticket; // we refer to the ticket grouping that we created earlier
    }
    output {
        leaf ticket-id {
            description "The id of the newly created ticket";
            type string;
        }
    }
}
Notice that in this example, we used the “grp-ticket” grouping to expect ticket as the input type. We then used a string type as the output to represent the newly created ticket id that gets returned by the method.
Now let’s move on to the last of the RPC methods that we wanted to expose – the one which takes 2 inputs and returns a list of tickets as output. Before getting to that we have to understand how to represent a list of domain entities. Let’s see that in the next section.
List
Earlier we had seen that we can use leaf-list to represent an array of primitive types. However, there will be cases where complex types like containers need to be returned in a list. In such cases we use the “list” keyword. In our example, we will see how to depict a list of tickets.
// A list of ticket types
list tickets {
    description "List of tickets";
    uses grp-ticket; // we refer to the ticket grouping that we created earlier
}
Notice that we used the “uses” keyword to refer to the ticket grouping that we had created earlier. Remember that the whole purpose of the grouping is to allow reuse of the grouped type (ticket container in this case) in various other places. This is one such place where you want to refer to the ticket type while defining the contents of a list.
|
NOTE
|
The yang RFC allows/supports “keyname” for lists. However, the code-generator tool doesn’t use the “keyname” for anything. It just ignores it. |
Now that we have defined a list of tickets, how do we use it in other places. Again, to reuse/refer to such higher level constructs, we group it within a grouping.
grouping grp-tickets {
    list tickets {
        description "List of tickets";
        uses grp-ticket; // we refer to the ticket grouping that we created earlier
    }
}
We named this as “grp-tickets” (notice the “s” at the end). We can now use/refer this “list of tickets” in other places of our model. One such place will be the output of the RPC method that we have been planning to add. So let’s get to it now
rpc get-assigned-tickets {
    description "Returns tickets that are of specific status and assigned to a particular user";
    input {
        leaf assigned-user-id {
            description "The user to whom the ticket is assigned";
            type string;
        }
        leaf ticket-status {
            description "The status which we are interested in";
            type ticket-status; // we refer to the ticket-status enumeration we created earlier
        }
    }
    output {
        description "Returns a list of tickets with the specified status and assigned to a particular user";
        uses grp-tickets; // we refer to the grouping for the list of tickets that we created a few lines back
    }
}
You’ll see that this specific method uses more than 1 input. The example shows how to declare more than 1 inputs for a rpc method. You’ll also notice how we used/referred to the list of tickets “grouping” that we created earlier.
Referencing External Language
In certain cases, the YANG model itself may not capture the complete data (domain entities). Macaw service extension allows developers to refer to language specific types in certain sections of the yang model.
One such case is to use an already existing language specific type(s) as RPC input or output. Consider an example where your service exposes an RPC which requires, as part of its input/output, to use a Java interface or a class (or any Java type) that is part of some library or is external to the yang model definitions. In such cases, the service (yang) extension can be used to use external-ref keyword which allows language specific sub-statements to refer to language specific types. Here’s an example of such a RPC:
...
import macaw-service-extension {
    prefix s;
}
...

rpc get-tickets-by-criteria {
    description "Returns tickets based on the passed criteria";
    input {
        s:external-ref criteria {
             s:java-class "com.cfx.service.api.search.Criteria";
        }
    }

    output {
        s:external-ref result-set {
            s:java-class "com.cfx.service.api.search.ResultSet";
        }
    }
}
Notice that the above example first imports the macaw-service-extension. The example shows that the RPC named get-tickets-by-criteria takes 1 input which is an external-ref, locally named criteria. Since we are right now focusing on Java language, we see the java-class usage. The value of java-class is the fully qualified name of the Java class/interface that will be considered as the input to the RPC. Similarly, note that the output of this RPC is also an external-ref of (Java) type com.cfx.api.search.ResultSet.
|
NOTE
|
Although at this point we only support Java language specific types via java-class, the extension isn’tlimited to Java language. As and when we add support for other languages, the same external-refextension will be enhanced to allow other language specific types (imagine something like a python-type). |
|
NOTE
|
The setting up of the classpath or the jar which contains the language specific type being used as an external-ref is out of the scope of the YANG model and is left to the developer to set it up accordingly either while generating the artifacts (code) or even when publishing this public api to the clients/consumers. |
Exceptions in RPC declarations
RPCs can be defined to throw Exceptions. Before the rpcs can be declared to throw exceptions of either type, you need to include the snippet below in the yang file for the service.
import macaw-exception {
  prefix e;
}
A custom exception can be used in a rpc declaration as shown below.
e:throws {
    e:exception add-failure-exception;
}
In this case, the code-generator tool will go ahead and generate a AddFailureException class which extends java.lang.Exception. This class will be part of the generated service api jar.
Appendix 2: Json Support
We also can model a service with a Json schema.
Here is the sample Service json schema model.
{
  "service": {
    "namespace": "io.macaw.services",
    "name": "todo-list",
    "version": "1.0.0",
    "description": "A service which keeps track of your \"TODO\"s",
    "domain-entities": {
      "todo": {
        "description": "Represents a TODO item",
        "properties": {
          "id": {
            "type": "string",
            "description": "Id of the TODO"
          },
          "summary": {
            "type": "string",
            "description": "Summary of the TODO"
          }
        }
      }
    },
    "apis": [
      {
        "name": "add-todo",
        "inputs": [
          {
            "name": "summary",
            "description": "The summary of the TODO to add",
            "type": "string",
            "mandatory": true
          }
        ],
        "output": {
          "type": "todo",
          "description": "The newly created TODO"
        }
      },
      {
        "name": "get-todo",
        "inputs": [
          {
            "name": "id",
            "description": "The id of the TODO to get",
            "type": "string",
            "mandatory": true
          }
        ],
        "output": {
          "type": "todo",
          "description": "The TODO corresponding to the id that was passed to this API"
        }
      }
    ],
    "options": {
      "code-gen": {
        "java": {
          "package-name": "com.macaw.quickstart.todo"
        }
      }
    }
  }
}
A service is defined by namespace, name and version with an optional description attribute.
{
  "service": {
    "namespace": "io.macaw.services",
    "name": "todo-list",
    "version": "1.0.0",
    "description": "A service which keeps track of your \"TODO\"s",
    "enumerations": {
        ...
    },
    "domain-entities": {
        ...
    },
    "apis": [
        ...
    ],
    "options": {
      "code-gen": {
        "java": {
          "package-name": "com.macaw.quickstart.todo"
        }
      }
    }
  }
}- namespace – namespace of the service.
- name – name of the service.
- version – version of the service.
|
NOTE
|
The name, namespace, version are mandatory attributes which define the uniqueness of a service in Macaw microservices eco-system. |
- description – This is description of the service.
- enumerations – This consists of all the enumerations supported by the service.
- domain-entities – All non-primitive types are called as domain-entities in Macaw microservices eco-system.
- apis – This is a mandatory attribute. All the apis exposed by the service will be defined here.
- options – This is a mandatory attribute. options attribute holds language specific support of the entity it is defined in (above options reflects the package-name of the service in a java based service code generation).
APIs
All the apis exposed by the service can be setup under apis property.
"apis": [
  {
    "name": "add-todo",
    "inputs": [
      {
        "name": "summary",
        "description": "The summary of the TODO to add",
        "type": "string",
        "mandatory": true
      },
      ...
    ],
    "output": {
      "type": "todo",
      "description": "The newly created TODO"
    }
  },
  ...
]
As shown in the above snippet, each api exposed by the service will be an json object under the apis property. The constituents of an api are :-
- name – name of the API
- inputs – This is an json array, where each entry corresponds to an input param of the API, we will discuss this in detail.
- output – output returned by the API, we will discuss this in detail.
Inputs
inputs is an json array, which consists all the inputs that an API expects. Below snippet shows how inputs can be provided:-
"inputs": [
  {
    "name": "summary",
    "description": "the summary of string type",
    "type": "string"
  },
  {
    "name": "id-list",
    "description": "The list of string id's",
    "type": "list",
    "item": "string"
  }
  ...
]- name – name of the input of an rpc
- description – description of the input
- type – type of the input, which can be primitive type, a collection type like list or an array, an enumeration or can be a domain-entity.
|
NOTE
|
If type is list or array, we expect an item attribute which specifies the collection type property. |
- item – this holds property type if property type is array or a list, else this plays no value.
Primitive Types Supported
Below are the list of primitive types supported
- binary
- boolean
- decimal64
- int16
- int32
- int64
- string
Along with above, collections like list and array, domain entities and enumerations defined in the schema can also be referred as types.
Output
output specifies the value returned by the service API. Below is a sample of an API output:-
"output": {
 "description": "The newly created TODO",
  "type": "todo"
}- description – description of the output
- type – this will represent the output type of an API.
Domain Entities
As stated earlier, domain entities will represent non-primitive types in Macaw micro service platform. let’s take a look at how we define domain-entities.
"domain-entities": {
  "todo": {
    "description": "Represents a todo",
    "properties": {
      "id": {
        "type": "string",
        "description": "Id of the todo"
      },
      "edited-by": {
        "type": "list",
        "item" : "string"
        "description": "list of users edited the todo"
      },
      ...
    }
  },
  ...
}
As shown above, each item in the domain-entities json object will represent an domain entity(here, key corresponds to name of domain entity).
- description – description of the domain entity.
- properties – specifies the properties of the domain entity.
Properties
properties will represent the fields/entries of the domain entity it corresponds to. A property type can be of a primitive type, enumeration or can refer to other domain entity in the schema.
Below is the snippet to define properties :-
"properties": {
  "user": {
    "type": "string",
    "description": "user property"
  },
  "user-list": {
    "type": "list",
    "item": "string",
    "description": "list of users"
  },
  "user-array": {
    "type": "array",
    "item": "string",
    "description": "list of users"
  },
  ...
}
Here, each property corresponds to an domain entity entry.
- description – description of the property.
- type – As explained earlier, this represents the type of property.
|
NOTE
|
If type is list or array, we expect an item attribute which specifies collection type. |
- item – this holds property type if property type is array or a list, else this plays no value.
"enumerations"
All the Enumerations used in the service can be declared under enumerations attribute under the service attribute. Let’s take a look at how to define an enumeration.
// An enum which represents TODO item state
"enumerations": {
    "state": {
      "allowed-values": [
        "private",
        "public",
        "draft"
      ],
      "options": {
        "code-gen" : {
              "java" : {
                 "package-name" : "com.macaw.quickstarts.todo.enumerations"
             }
          }
       }
    },
    ...
}
One or more Enums can be defined under a enumerations property and each enum can specify it’s own package using options attribute.
- state – is the name of the enum.
- allowed-values – a json array which contains all the allowed enum values.
- options – options attribute holds language specific support of enum it is defined in (above options tells enum should be generated to a specified package).
|
NOTE
|
If options is not provided, the enums will use service level options. |
|
NOTE
|
The macaw-sdk/schema/macaw-service-model-schema.json is the schema definition which can be used to validate json service model. |
Exceptions in RPC Declaration
RPCs can be defined to throw Exceptions; existing (supported inherently by Java) or custom.
Existing exceptions for example IllegalArgumentException can be declared to be thrown by an rpc as shown below.
"exceptions": {
    "IllegalArgumentException": {
        "mapped-to": "java.lang.IllegalArgumentException",
        "options": {
            "code-gen": {
                "java": {
                    "package-name": "org.myapp.helloworld"
                }
            }
        }
    }
}
A custom exception can be declared to be thrown in a rpc declaration as shown below.
"exceptions": {
    "add-failure-exception": {
        "options": {
            "code-gen": {
                "java": {
                    "package-name": "org.xyz.service.calculator"
                }
            }
        }
    }
}
In this case, the code-generator will go ahead and generate a AddFailureException class in package org.xyz.service.calculator which extends java.lang.Exception. This class will be part of the generated service api jar.
Publishing User Guide
Macaw Tools
MDR and Docker Registry
MDR (Meta Data Repository) and Docker Registry together play a key role in the Macaw platform. MDR holds the Service Blueprints, Meta Data information, available Docker tags for a specific service. Docker Registry holds the service container images. In Macaw platform these two components go together and provide the end to end functionality of Service Provisioning.
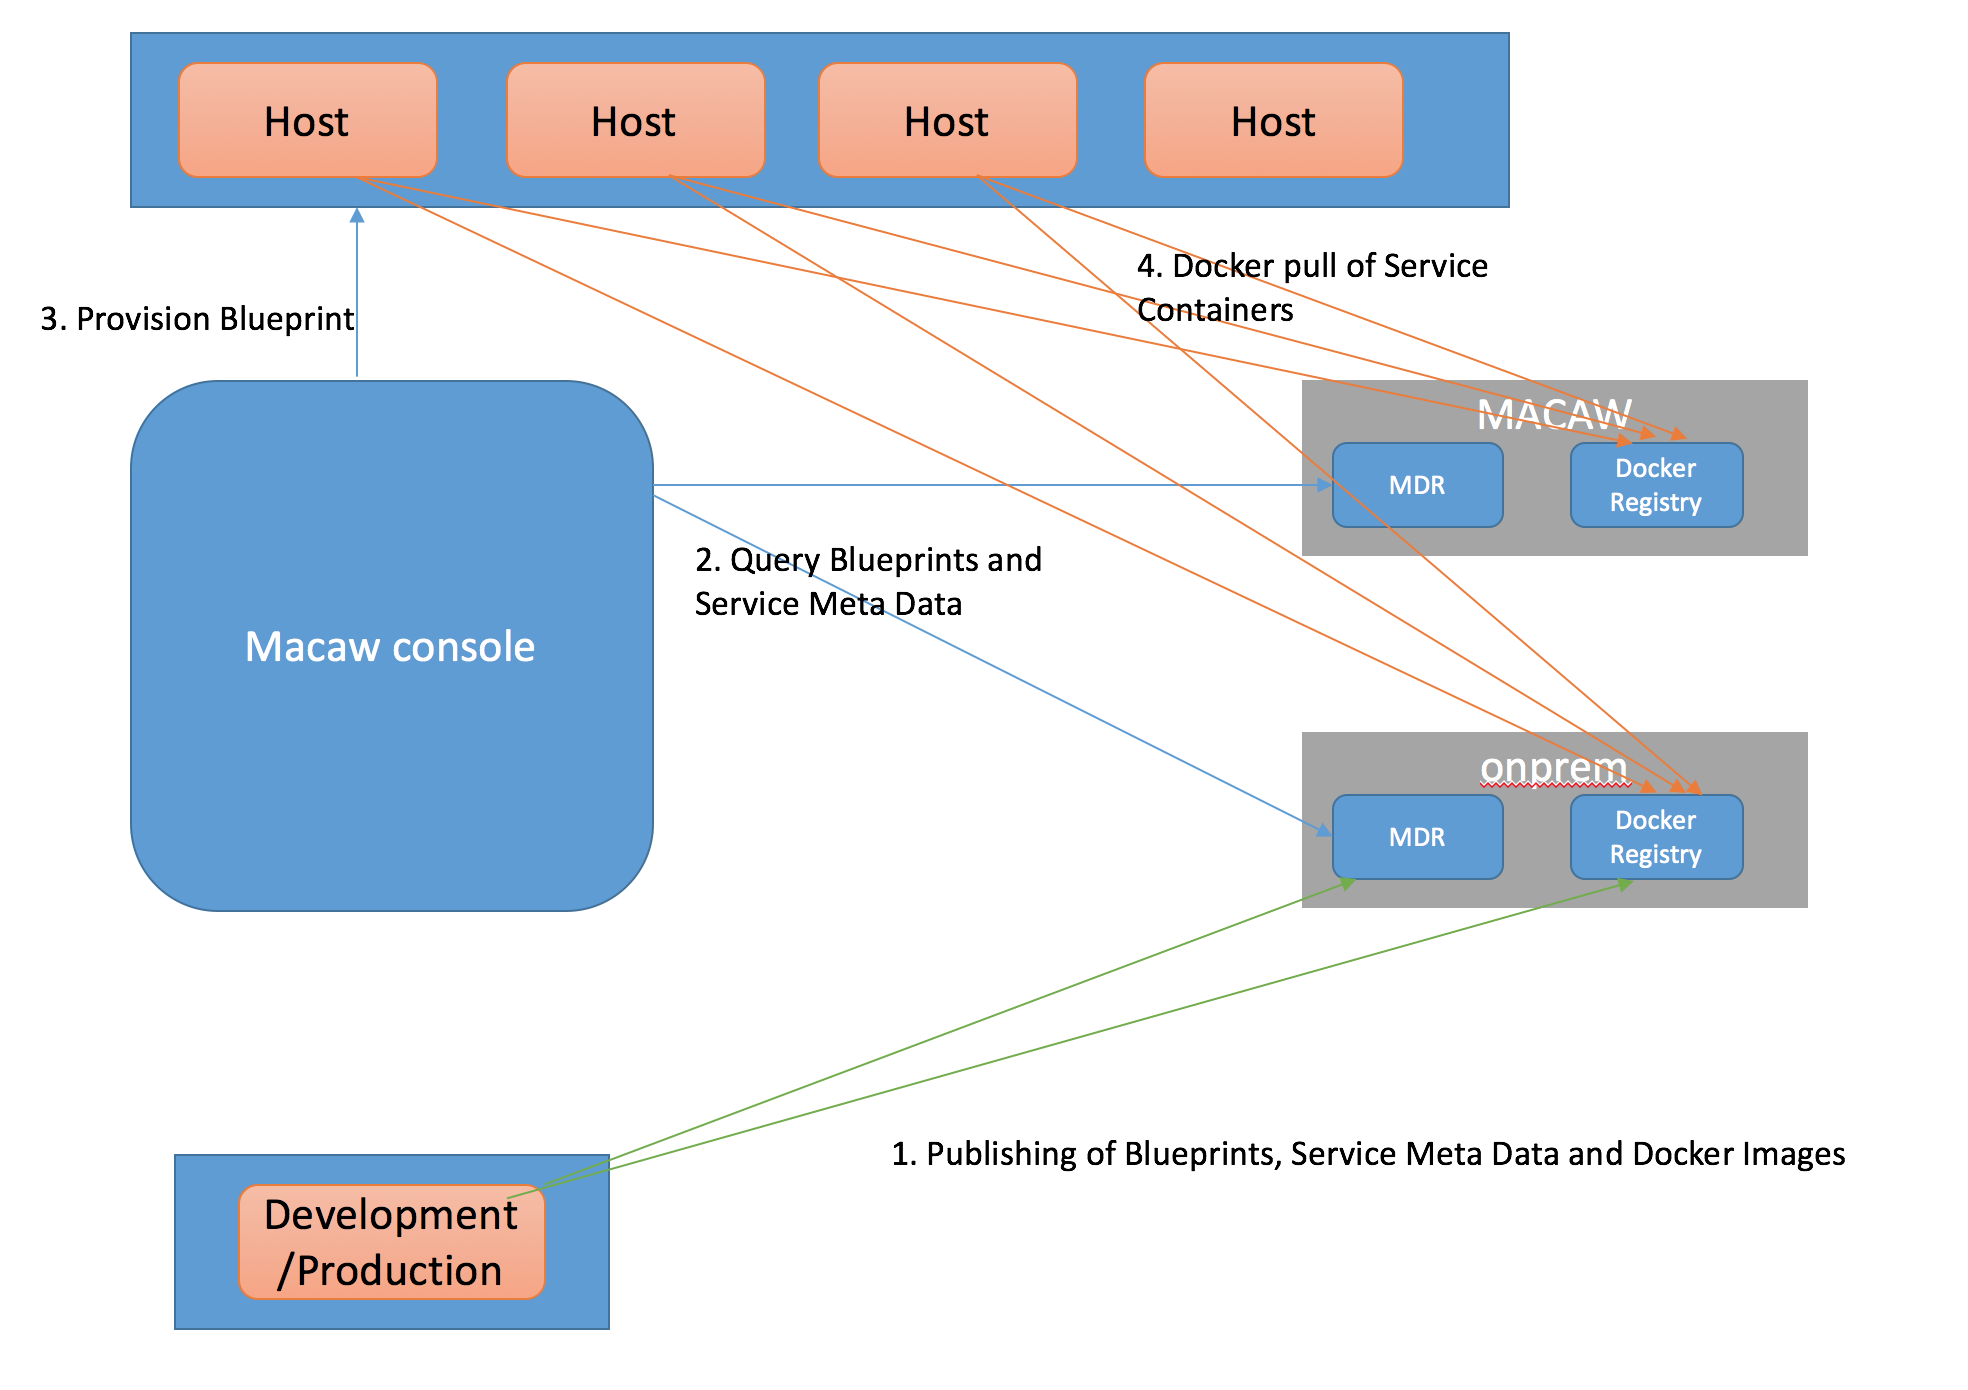
MDR and Docker Registry information is provided as a configuration to Macaw Service Provisioner. Macaw Console interacts with the service provisioner and provides the ability to query a specific MDR/Docker Registry pair for available Blueprints and Services. Below is how a MDR/Docker pair is configured in the Service Provisioner.
"repositories": [
 {
 "name": "Macaw",
 "description": "Macaw MDR and Docker Registry Repository",
 "docker-registry": {
 "name": "Macaw Docker Registry",
 "description": "This is the Macaw docker registry",
 "host": "registry.macaw.io",
 "port": 443,
 "protocol": "https",
 "username": "macawio",
 "password": "rTVOJIqBYihZe4Xz",
 "email": "macaw@www.macaw.io"
 },
 "mdr": {
 "name": "Macaw MDR",
 "description": "This is the Macaw MDR",
 "host": "registry.macaw.io",
 "port": 8639,
 "protocol": "https",
 "token": "cd4111c5-e6eb-4fc4-b848-1ac9f72eda31",
 "version": "v2",
 "repo": "production"
 }
 },
 {
 "name": "onprem MDR/Docker",
 "description": "onprem MDR/Docker",
 "mdr": {
 "protocol": "http",
 "name": "macaw local MDR",
 "token": "9ba77ea5-2186-5282-9b88-93b373a59f31",
 "repo": "dev",
 "host": "platform-190.qa.macaw.io",
 "version": "v2",
 "port": 8637,
 "description": "This is the Locally deployed MDR"
 },
 "docker-registry": {
 "username": "macaw",
 "protocol": "https",
 "name": "macaw local Docker Registry",
 "port": 5000,
 "host": "platform-190.qa.macaw.io",
 "password": "macaw@local",
 "email": "macaw@local.com",
 "description": "This is the Locally deployed docker registry"
 }
 }
 ]
Note: Multiple MDR/Docker Registry pairs can be configured as shown above. The first MDR/Docker Registry should always be
pointing to Macaw MDR/Registry.  This is auto-configured as part of the macaw platform installation. Also the Macaw platform
provides the capability to install an on-prem MDR/Docker Registry and auto-updates the provisioner configuration.
Meta Data Repository
MDR stores the Service Meta Data as deployable blueprints’ information. Macaw console queries the meta data repository server and fetches the available service blueprints that can be deployed. When Macaw platform is installed, the macaw-console is pre-provisioned with the Macaw central MDR information. This provides the ability to query Macaw MDR for any deployable blueprints and be able to deploy services locally on service hosts. For those who are developing microservices using the macaw platform it would be necessary to create custom blueprints and publish them to the MDR. The Macaw MDR is a read-only repository and does not allow publishing. The platform supports the ability to have multiple MDRs and gives the option to the end user to choose which MDR would like to be queried for the available blueprints. Platform provides MDR as one of the tools that can be deployed and configured locally. Once this is done as per the instructions, blueprints and service meta data can be published to the MDR via macawpublish tools (Refer to macawpublish tools documentation).
Below details help in installing a local MDR and configure it.
macaw tools install --tag <> --service macaw-mdr
Once you issue the above command, it would pull the supported MDR for the specific platform version you are running. Tag depends on the platform version you are running. Below is a typical MDR provisioning log.
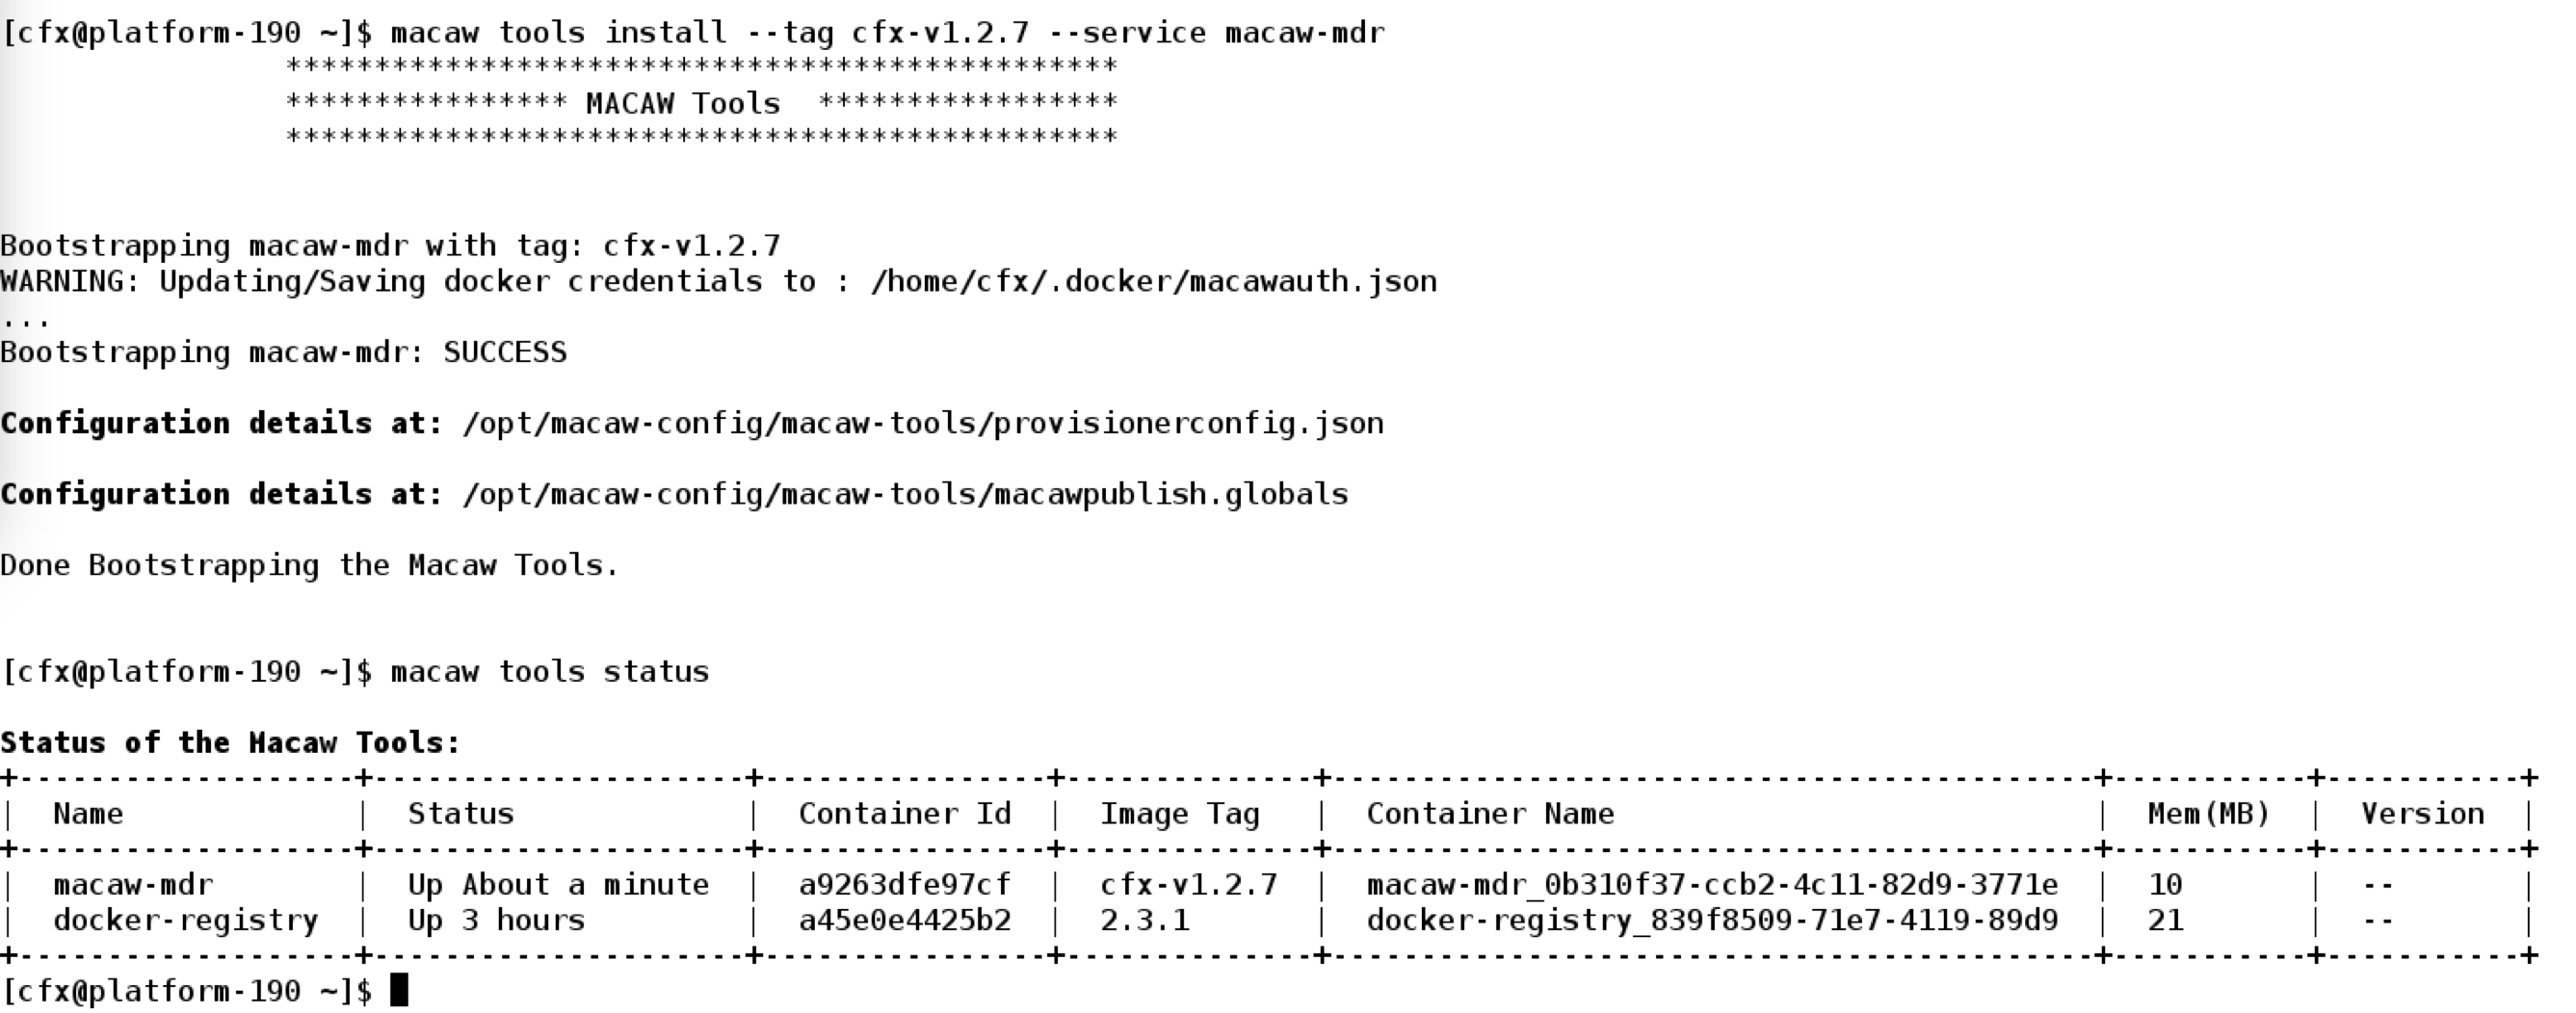
The output of the MDR installation also provides additional configuration details needed for macawpublish tools. The file /opt/macaw-config/macaw-tools/macawpublish.globals provides the configuration required to be able to publish blueprints/service meta data to this MDR. This easy installation of MDR doesn’t provide the SSL endpoint for the MDR. Macaw platform supports SSL and non-SSL between macaw console and MDR.
Note: This specific MDR configuration configuration file would be referred to in the macawpublish
section of the documentation.
Docker Registry
For more details on the Docker Registry, refer to the documentation from Docker.
Macaw platform provides the ability to install a local docker registry with SSL enabled. Be aware that this may not be in line with the production configuration recommended for Docker Registry.
Below is the command which would help in installing a local docker registry using the macaw tool.
macaw tools install --tag 2.3.1 --service docker-registry
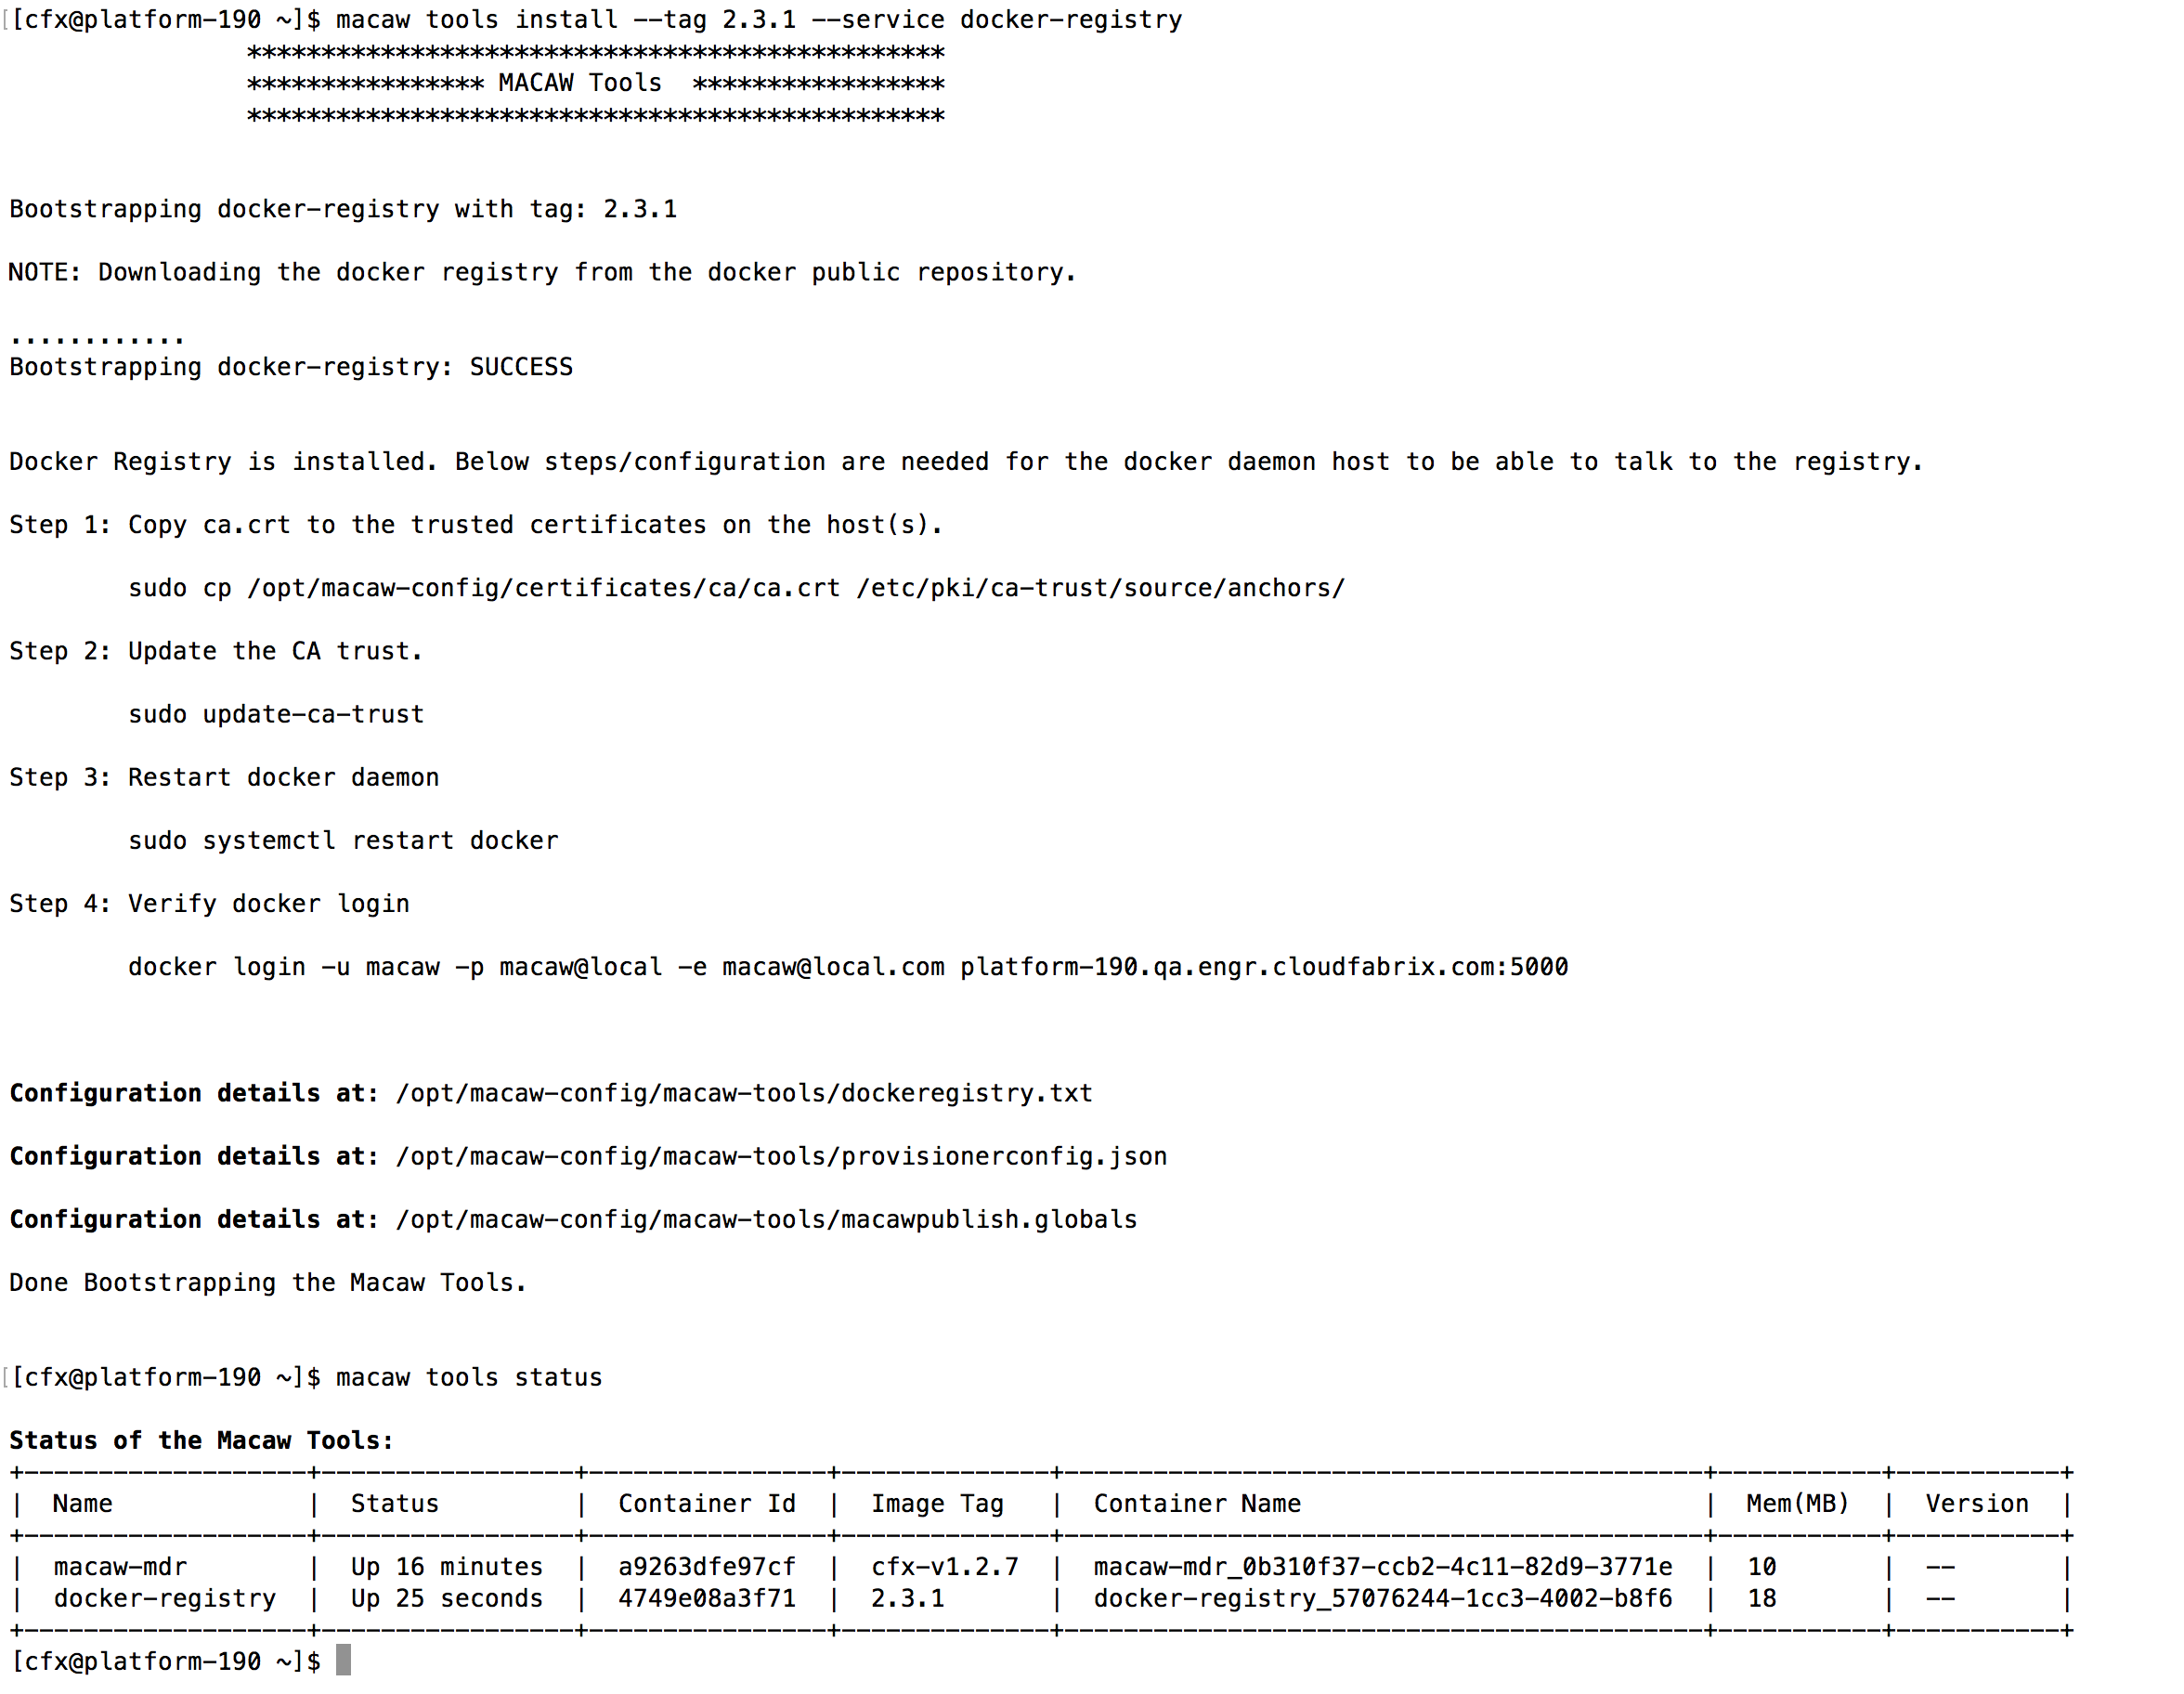
Note: Docker Registry is pulled directly from the Docker. The qualified registry with macaw platform is version 2.3.1. It is highly recommended to use the same version as the tag.
Post-installation the detailed instructions are provided on how to configure/enable service hosts to talk to on-prem Docker Registry. This additional configuration is needed as the Docker Registry is SSL enabled and the above installation has used self-signed certificates. Being self-signed, the certificates are not trusted by the docker and explicitly need to be added to the trust store.
Once both MDR and Docker Registry are installed, the MDR/Docker Pair configuration is automatically added to the Macaw Service Provisioner and would be visible under the repos in the macaw console. View macaw console documentation on how to view/provision Service Blueprints from different MDR/Docker Registry repositories.
macawpublish Tool
Macawpublish is part of the Macaw SDK which provides the Service meta data/Docker Image/Blueprint publishing functionality to the developer. This part of the documentation provides all the details and capabilities of the macaw publish tool.
Directory Structure of the Tool
macawpublish comes default with the Macaw SDK and is located in the directory macaw-sdk/tools/macaw-publish-tools. Below is the directory structure of the Macaw publish tools.
--bin

This directory contains the python based macawpublish script.

--certs

This directory is a placeholder to hold certificates for MDR/Docker Registry.

--schema

This directory contains the Schema definition for a service blue print. When a blueprint is being
published, it is verified against this schema.

--service-blueprints

This is a placeholder for service blueprints. If macawpublish tool is used to auto generate a blueprint,
the generated blueprints are placed in this directory.

--service-lists

This contains files having list of services. The macawpublish tool can accept a file with list of files
and be able to publish service meta data/docker images one by one in the order specified in the file.

--macawpublish.globals

This is the configuration file which provides the MDR/Docker Registry end points information to the
macawpublish script. It is this file that need to be modified to tune to onprem MDR/Docker Registry.
MACAW_SERVICES_HOME & MACAW_SDK_HOME Environment Variables
macawpublish tries to locate service directories with reference to an environment variable “MACAW_SERVICES_HOME”. Lets assume the structure below is what the user has for microservices development.
/Users/foobar/Projects/macaw/microservices
— service1-dir
— service2-dir
— service3-dir
— sdk (This is SDK tar bundle is untar’ed)
For the above structure, MACAW_SERVICES_HOME environment variable can be set to /Users/foobar/Projects/macaw/microservices. From there onwards the user can publish services by simply using its directory name service1-dir.
MACAW_SDK_HOME refers to the directory in which the macaw SDK is residing.
MACAW_SERVICES_HOME refers to the directory where you are developing your microservices

export MACAW_SDK_HOME=/Users/foobar/Projects/macaw/sdk/macaw-sdk
export MACAW_SERVICES_HOME=/Users/foobar/Projects/macaw/microservices
export PATH=$MACAW_SDK_HOME/tools/macaw-publish-tools/bin:$PATH

Note: Copy the above settings to your .bashrc so that they will always be sourced.
From here onwards the following documentation assumes that the user has set the environment properly.
Configuration
Macawpublish relies on a single configuration file macawpublish.globals. This file provides the MDR/Docker Registry endpoints and the associated configuration for each. This part of the documentation helps in understanding the various configuration items. Some of the documentation is also part of the same file in the SDK as comments.
macawpublish.globals Location
The tool looks for this file under multiple locations with below preference.
- If an environment variable, MACAW_MDR_GLOBALS_FILE is set and pointing to a file, it is used.
- Else, it looks for “macawpublish.globals” in the user HOME directory which is typically C:\Users\<userid> or /home/<user id> or /Users/<user id> on Linux/OSX.
- Else, it uses the default file which is shipped with the macaw SDK. Note that the default file doesnt provide any default configuration, other than the documentation.
macawpublish.globals Configuration
[DEFAULT]
codebase=%(MACAW_SERVICES_HOME)s

[mdr]
#MDR Specific global properties. No need to change.
[docker]
#Docker Specific global properties. No need to change.

#Please refer to MDR documentation for more details on how MDR is structured.
#With in MDR, there is a concept of repo. Repo can be any of the following supported values
#production, staging, qa, dev, demo.
#You need to define MDR/Docker properties for a given repo. There is possibility that same MDR can
#be holding multiple repos.

[dev]

#MDR Endpoint details.
mdr.endpoint=https://<FQDN/IP of MDR>:8639/mdr/service/macaw/execModule/mdr/
mdr.token=<RW Token for MDR>
#Repo in MDR.
mdr.repo.name=dev
#These are default settings. Need not be touched. For every that gets published to mdr/docker
#a TAG is created. Labels are assigned to tags for easy filtering. These are supported labels for
#the tag definitions.
mdr.tag.label.allowed=INTERNAL,EXTERNAL,DEMO,PRODUCTION,QA,DEV,STAGING
mdr.tag.label.default=INTERNAL

#Below is optional. If you want to enforce strict SSL, then point to the root ca cert.
#This is for verifying the certiticate checking. This is PEM format of CA key and cert.
# cat ca.key ca.crt | tree ca.pem
#Either fully qualified location can be specified or provide path with reference to
#macaw-sdk/tools/macaw-publish-tools/certs
#In the below the certificate is looked in the above directory.
#mdr.certificate=ca.pem

#Docker Registry Endpoint details.
docker.registry.host=<Docker End Host>
docker.registry.port=<Docker Port>
docker.registry.username=<Username>
docker.registry.password=<Password>
docker.registry.email=<Email. Email is deprecated for latest docker release. You can provide a dummy email to maintain backwards compatibility>

#The below settings can be configured to enable remote publishing of docker images.
#On some developer machines, there is a possibility of docker not being present.
#In this case, the developer can chose a remote linux with docker publish capabilities.
build.server=
build.server.user=
#Key to be used for password-less SSH.
build.server.user.key=
#Provide a specific key file for password less SSH. If any of these are not specified, then default SSH keys are attempted.
build.server.user.key.file=
#To use a fixed password. This is plain text password and discouraged.
build.server.user.password=
Note: When MDR/Docker tools are installed using Macaw tools install <>, the configuration for MDR is auto-generated. The configuration can be copied to $HOME directory on the development machine to be able to interact with the deployed MDR while publishing services.
# cd $MACAW_SDK_HOME/tools/macaw-publish-tools/
# sftp macaw@<Platform IP/FQDN>:/opt/macaw-config/macaw-tools/*.globals .
password: *********

Note: By default, for MDR/Docker Tools, the configuration is placed under /opt/macaw-config/macaw-tools/ on the platform VM.
Certificates for Installed Docker Registry
Macaw platform tools by default use self-signed certificates. The self-signed certificates can be replaced with trusted certificates by following the documentation on how to replace SSL certificates in Macaw platform.
Since the certificates are self-signed, docker hosts will not trust the on-prem docker registry by default. For this reason, we need to add the trusted certificate of the Macaw platform to the docker trusted store on the host from where services will be built/published.
Below are the 2 methods that are known to work as per standard.
Download the ca.crt from the machine where Macaw platform was installed. The default location of the ca.crt is /opt/macaw-config/certificates/ca/ca.crt
Method 1 – Works for CentOS/Redhat Linux Hosts
Docker Registry is installed with self signed private certificate.
Below steps/configuration are needed for the any docker host to be able to talk to this registry.

Step 1: Login to the docker Host(s) and execute the below

        sudo mkdir -p /etc/docker/certs.d/<Platform IP/FQDN>:5000

Step 2: Download ca.crt from the platform host to the docker host(s).

        sudo scp macaw@<Platform IP/FQDN>:/opt/macaw-config/certificates/ca/ca.crt /etc/docker/certs.d/<Platform IP/FQDN>:5000

If you are using the platform host as Remote Docker Build server, you can simply do the below, on the platform Host.

sudo cp /opt/macaw-config/certificates/ca/ca.crt /etc/docker/certs.d/<Platform IP/FQDN>:5000

Step 3: Verify docker login

        docker login -u macaw -p macaw@local -e macaw@local.com <Platform IP/FQDN>:5000
Method 2 – For Mac
Step 1: Download the ca.crt in to the ~/Documents folder.
sftp macaw@<Platform VM IP or FQDN>:/opt/macaw-config/certificates/ca/ca.crt ~/Documents/
Step 2: Connect to the Docker VM using the below command
screen ~/Library/Containers/com.docker.docker/Data/com.docker.driver.amd64-linux/tty
Step 3:
mkdir -p /etc/docker/certs.d/<Platform VM IP or FQDN>:5000cp/Users/<id>/Documents/ca.crt /etc/docker/certs.d/<Platform VM IP or FQDN>:5000/ca.crt
Step 4: Verify docker login

docker login -u macaw -p macaw@local -e macaw@local.com <Platform VM IP or FQDN>:5000
Note: When the Docker is restarted or MAC is restarted, this change is gone and needs to be repeated again. This is a Docker limitation on Mac currently.
Once the above steps are complete, the machine will now be able to talk to the on-prem installed docker registry w/o SSL issues.
Remote Publishing
Macawpublish tool requires the presence of Docker on the local development machine to be able to push service container images to the Docker Registry. This would also require configuration of Docker Daemon on local host w.r.t certificates.
This restriction can be avoided on the local development machine by enabling remote publishing in macawpublish tool. With remote publishing none of the instructions and functionality of the macawpublish tool would change, except that now the service artifacts necessary for the containerization of the service are uploaded to a remote build server and the docker build/tag/publish operations are executed on the remote server. This avoids having Docker install on your local machine.
The remote build server should be configured with proper certificates and access to the on-prem registry installed as part of the macaw tools. Refer to MDR/Docker Section above for details on how to achieve this.
Note: For quick development purpose, you can use your platform instance as a remote build server.
Enabling Remote Publishing
Edit your macawpublish.globals property file and add the below entries.
[dev]
...
...
..
build.server = <IP/FQDN of Remote Server>
build.server.user = <User>
build.server.user.password=<password>
Providing a password in plain text is not considered safe. The user can enable Password-Less SSH by executing the below commands. The macawpublish tool automatically generates a build key and sets password-less SSH for this key.
python macawpublish --repo dev deploy-ssh-keys --user cfx --host 10.95.101.231
The above command automates the process and updates the macawpublish.globals with the key information.
If password-less SSH is already setup between the local machine and the remote build server with user’s default SSH Keys, specify the below properties.
[dev]
...
...
..
build.server = <IP/FQDN of Remote Server>
build.server.user = <User>
In cloud instances like Amazon/Oracle/Azure, password-based authentication may not be allowed. In this case the user may already have a private key to login to the instance. Follow the below configuration for this case.
[dev]
...
...
..
build.server = <IP/FQDN of Remote Server>
build.server.user = <User>
build.server.user.key.file=<Fully Qualified Location of the private key being used to login to the instance as the above user>
If the platform instance where macaw tools are installed is in a cloud like AWS, Azure, refer to the below details on how MDR/Docker Pair interactions work w.r.t public/private address of the platform instance.
When the platform instance is in a public cloud, typically the user would be having a private IP/DNS. and Public IP/DNS. For all the platform configuration via macaw setup etc., the user would be using the private IP/DNS. When it comes to interacting with the platform instance from the external world the user would be interacting via the public IP/DNS. To enable this mixed IP interactions, follow below guidelines in enabling the platform instance as remote docker build server.
After installing the MDR tools, macawpublish.globals is automatically created and this can be used directly as long as the user is communicating only via private IP addresses. If intending to interact with the instance from a local laptop/PC, the user must interact via public IP. In this case, change the macawpublish.globals like below to enable remote docker publishing.
Auto Generated macawpublish.globals
[dev]

mdr.endpoint=http://10.0.0.4:8637/mdr/service/macaw/execModule/mdr/
mdr.token=5f35c8df-813b-5d11-a156-53a5e41b1332
mdr.tag.label.allowed=INTERNAL,EXTERNAL,DEMO,PRODUCTION,QA,DEV,STAGING
mdr.tag.label.default=INTERNAL
mdr.repo.name = dev
#mdr.certificate=<fully qualified location. Ex: %(codebase)s/macaw-skd/macaw-publish-tools/certificates/ca.pem>
#Docker Registry Endpoint details.
docker.registry.host=10.0.0.4
docker.registry.port=5000
docker.registry.username=macaw
docker.registry.password=macaw@local
docker.registry.email=macaw@local.com
[dev]

mdr.endpoint=http://104.211.243.97:8637/mdr/service/macaw/execModule/mdr/
mdr.token=5f35c8df-813b-5d11-a156-53a5e41b1332
mdr.tag.label.allowed=INTERNAL,EXTERNAL,DEMO,PRODUCTION,QA,DEV,STAGING
mdr.tag.label.default=INTERNAL
mdr.repo.name = dev
#mdr.certificate=<fully qualified location. Ex: %(codebase)s/macaw-skd/macaw-publish-tools/certificates/ca.pem>
#Docker Registry Endpoint details.
docker.registry.host=10.0.0.4
docker.registry.port=5000
docker.registry.username=macaw
docker.registry.password=macaw@local
docker.registry.email=macaw@local.com

The user needs to replace the MDR endpoint with the public IP of the instance. Since the user is going to use the platform instance as remote docker build server,
the docker host does not need to be changed.
Once the changes described above to macawpublish.globals are executed, simply enable the remote build using the instructions specified for enabling remote docker build server.
Microservices Publishing
This part of the documentations provides the Docker Image and Blueprint publishing details for a Macaw enabled Microservice. The below steps are typically performed on the development machine where microservices development takes place.
Creating Blueprints
Before publishing an image and metadata for service, publishing the blueprint for the service is important. Without the blueprint, Macaw console will not have the knowledge about the service Docker image or its metadata.
Blueprint can be written manually by following the schema or can be created automatically. This part of the document explains the automated creation of the blueprint using macawpublish tool. Refer to full documentation of Service Blueprints to fine-tune and add more capabilities to the blueprint.
macawpublish create --help

usage: macawpublish create [-h] [--list SERVICE_DIRS_FILE] [--debug]
                           [service-dirs [service-dirs ...]]
positional arguments:
  service-dirs          Service directories - Either name or full path. If
                        only name is provided, then $env(MACAW_SERVICES_HOME) is used to
                        prepend
optional arguments:
  -h, --help            show this help message and exit
  --list SERVICE_DIRS_FILE
                        File which is containing service directories (name or
                        full path). One service directory per line. This
                        enables publishing multiple services in one command.
  --debug               Enable debugs
Creating a blueprint with a single service
macawpublish create service1-dir

Example:

macawpublish create calculator
Creating a blueprint with multiple services
A blueprint is not limited to a single service. It can include multiple services. When multiple services are part of the blueprint, by provisioning the blueprint, the user will be provisioning all the services specified in the blueprint.
macawpublish create service1-dir service2-dir

Example:

macawpublish create calculator todo-list
Publishing Blueprints
To publish the blue print to MDR, execute the below command.
macawpublish blueprint <Location of the Blueprint JSON>
Image/Metadata Publishing
After creating and publishing blueprints, publishing your container images and meta data for Microservices may begin. Below are the simple steps to publish an image and meta data to the MDR/Docker Registry.
Before publishing the service to MDR/Docker registry, make sure to compile the <icroservice so that the necessary artifacts are generated which need to be bundled into the container image. Refer to the SDK documentation on how to compile the Microservice.
macawpublish service <service-dir1> --tag <tag>
or
macawpublish service <service-dir1> <service-dir2> --tag <tag>
or
macawpublish service --list <File containing list of Service Directory names or fully qualified director paths> --tag <tag>
Once the blueprint and image/meta data is published to MDR/Docker pair, the user may provision service(s) through the Macaw Console. Refer to the Macaw Console documentation on how to locate the blueprint and provision services.
Web Applications
This part of the documentation provides Macaw support for auto-deploying of war files.
Publishing Web Applications
In Macaw platform, web applicationss (war files) can be packaged as standard Docker containers and deployed into existing Tomcat instances running as Macaw UI Pairs. Refer to macaw UI pairs documentation on how to create and provision UI Pairs.
macawpublish webapp --file <War File Location> --name <Name of the WebApp> --version <Version of the WebAppn> --tag <Docker/MDR Tag>
Macaw also supports exporting the custom icon from existing web application to the launchpad so that is visible on the Web Server home page and users can click and access the web app. By default Macaw provides a default icon.
To provide a custom icon, use the below command.
macawpublish webapp --file <War File Location> --name <Name of the WebApp> --version <Version of the WebAppn> --tag <Docker/MDR Tag> --icon <Icon Path relative to your web app>

Note: The Icon path should be relative to your web app path. Lets say if you icons are packaged in your app under icons/logos/mylogo.png, you provide "--icon icons/logos/mylogo.png"
Blueprint for Web Applications
Once the web application container is published, to deploy the web application into an existing Macaw UI pair, create a Blueprint and publish the blueprint to the MDR. These steps show how to create a simple web application blueprint.
./macawpublish create-webapp --name <Name of the WebApp> --version <Version of the WebAppn>
Note: Make sure the name and version are the same as what is used for publishing the web application. The name and version together form the Docker container repository.
Once the blueprint is created, publish the blueprint to the MDR.
./macawpublish blueprint <Location of the Blueprint>
Below is an example of 2 steps being done.
$ ./macawpublish create-webapp --name sample --version 1.0.0
2017-01-24 12:38:29,020 [macawpublish] INFO     - MACAW_SERVICES_HOME is pointing to: /Users/ravjanga/Documents/CFXDev/SDK/macaw-sdk-0.9.1-SNAPSHOT/quickstarts
2017-01-24 12:38:29,020 [macawpublish] INFO     - Generating blueprint for sample-1.0.0

Blueprint create successfully and stored at: /Users/ravjanga/Documents/CFXDev/macaw-sdk/tools/macaw-publish-tools/bin/../service-blueprints/macaw-webapp-bp-e233fe20-cab1-5b59-b700-2fc6ebde3754.json
Blueprint can be uploaded to MDR using macawpublish blueprint

$ ./macawpublish blueprint macaw-webapp-bp-e233fe20-cab1-5b59-b700-2fc6ebde3754.json
2017-01-24 12:38:37,418 [macawpublish] INFO     - MACAW_SERVICES_HOME is pointing to: /Users/ravjanga/Documents/CFXDev/SDK/macaw-sdk-0.9.1-SNAPSHOT/quickstarts
2017-01-24 12:38:38,031 [macawpublish] INFO     - Published to MDR successfully. Tag: latest, Artifact: e233fe20-cab1-5b59-b700-2fc6ebde3754, Repo: dev
2017-01-24 12:38:38,032 [macawpublish] INFO     - Blueprint macaw-webapp-bp-e233fe20-cab1-5b59-b700-2fc6ebde3754.json published successfully.
Macaw Console
Macaw DevOps Console is a developer console UI that provides a diverse administrative, life-cycle, deployable, and manageable interface to various users. This is the main interface that allows users to deploy AppDimensions Infrastructure and Shadow services that support AppDimension’s discovery, governance and analytics functionality.
Users can login to Macaw DevOps Console using the following URL :
URL: https://platform.domain.com <Enter>
After selecting ‘Macaw console’, below login page appears
Dashboard
Dashboard is the default landing page, after user login into Macaw Console portal.

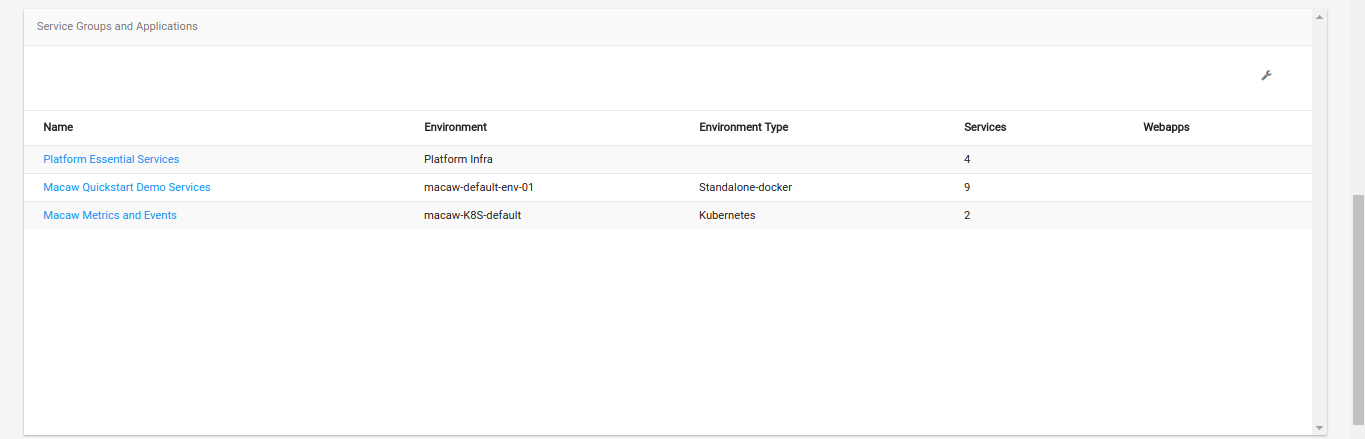
 The following details are presented in Main Dashboard
- Counts – Total Count of all:
- Service Groups
- Platform Essential Service Clusters
- Other Service Clusters
- Web Applications
- Doughnut graphs depicting the status of all Instances under:
- Platform Service Instances
- Other Service Instances
- Web Applications
- List of all Service Groups with Environment name/type, total number of services/webapps present in each group. On selecting the group, ServiceGroup Dashboard is displayed. This dashboard offers the same options, as those shown under ServiceGroupDashboard of ServiceManager -> ServiceGroups & Applications.
- List of all Service Clusters with name, namespace, version, environment name/type, total/available instances of the cluster. On selecting any cluster, ClusterDashboard is displayed. This dashboard offers same options, as those shown under ServiceClusterDashboard of ServiceManager -> ServiceGroups & Applications.
Service Manager
The Service Manager Option of the DevOps Console provides a comprehensive functionality pertaining to Macaw Microservices. Each section displays one unique functionality that can be performed using this UI.
Service Groups & Application
This page lists all the ServiceGroups present and provides various options on the ServiceGroup, its Service Clusters, and Web Applications
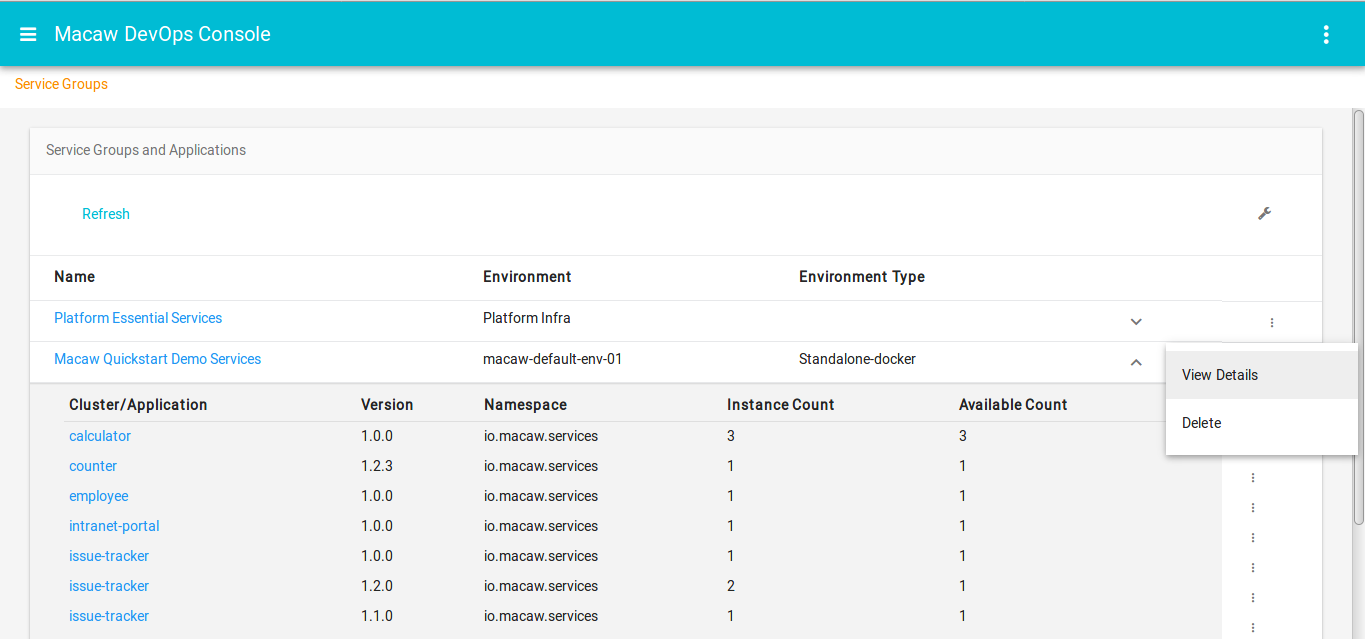 Service Group Options:
- ‘View Details’ presents the Service Group Dashboard
- ‘Delete’ option can be used to deprovision all the instances of all service clusters and web applications in the group.
Service Cluster Options:
- ‘View Details’ of the Service Cluster presents the Cluster dashboard
- ‘BrowseAPI’ navigates to the APIBrowser of selected service cluster
- ‘Expand Cluster’ can be used to add new instances to the cluster, with Environment-type ‘Standalone-docker’.
- ‘Projects’ option navigates to the projects page, which specifies the list of projects, that can access this ServiceCluster. ‘Add’ link can be used to add more projects to this list.
- ‘Show Metrics’ displays the metrics of Memory and RPC Requests made.
- ‘Rolling Update’ can be used for a kubernetes cluster, to upgrade the current instance(s)
- ‘Scale Up’ of a kubernetes cluster, adds new instance to the cluster
- ‘Scale Down’ of a kubernetes cluster, deprovisions an instance from the cluster
Web Application Options:
- View Details option gives the dashboard of the application
Service Group Dashboard:

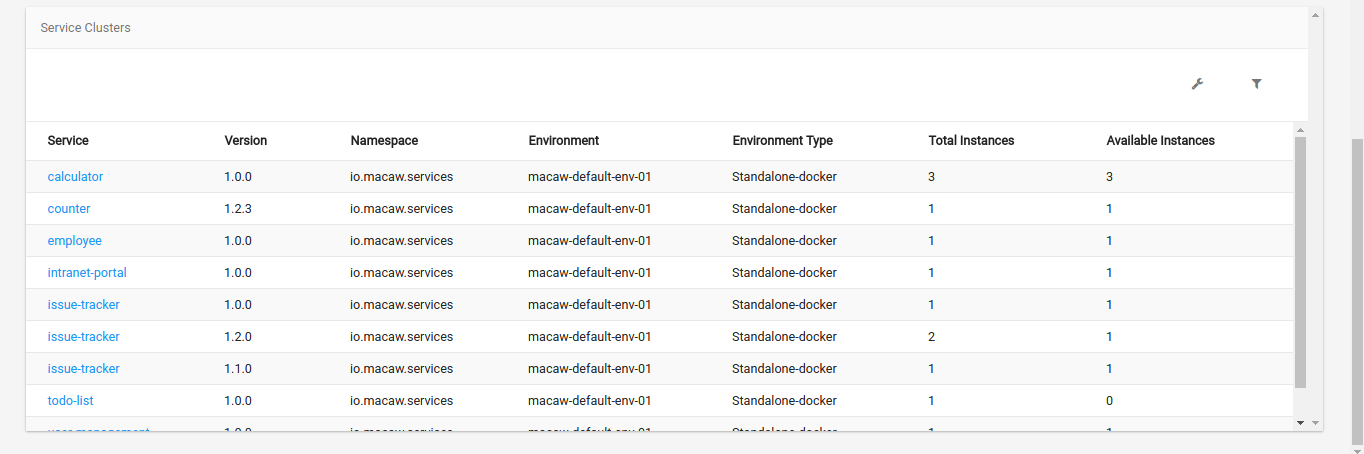 Service Group Dashboard provides the following details
- Total number of Service Clusters and Web Applications present in the group
- Doughnut chart of Service Instances and Web Applications.Note:-Doughnut charts depict the current states (‘Available’, ‘Paused’, ‘UnReachable’, ‘UnAvailable’) of all instances present in the group
- The list of all ServiceClusters/WebApplications, along with other details like Namespace, Version, Environment, EnvironmentType, Total instances in the cluster, Total available instances in the cluster
Delete option in the menu of the Group can be used, to delete all the instances of all listed clusters. Selecting any service cluster, presents the Cluster Dashboard.
Service Cluster Dashboard:
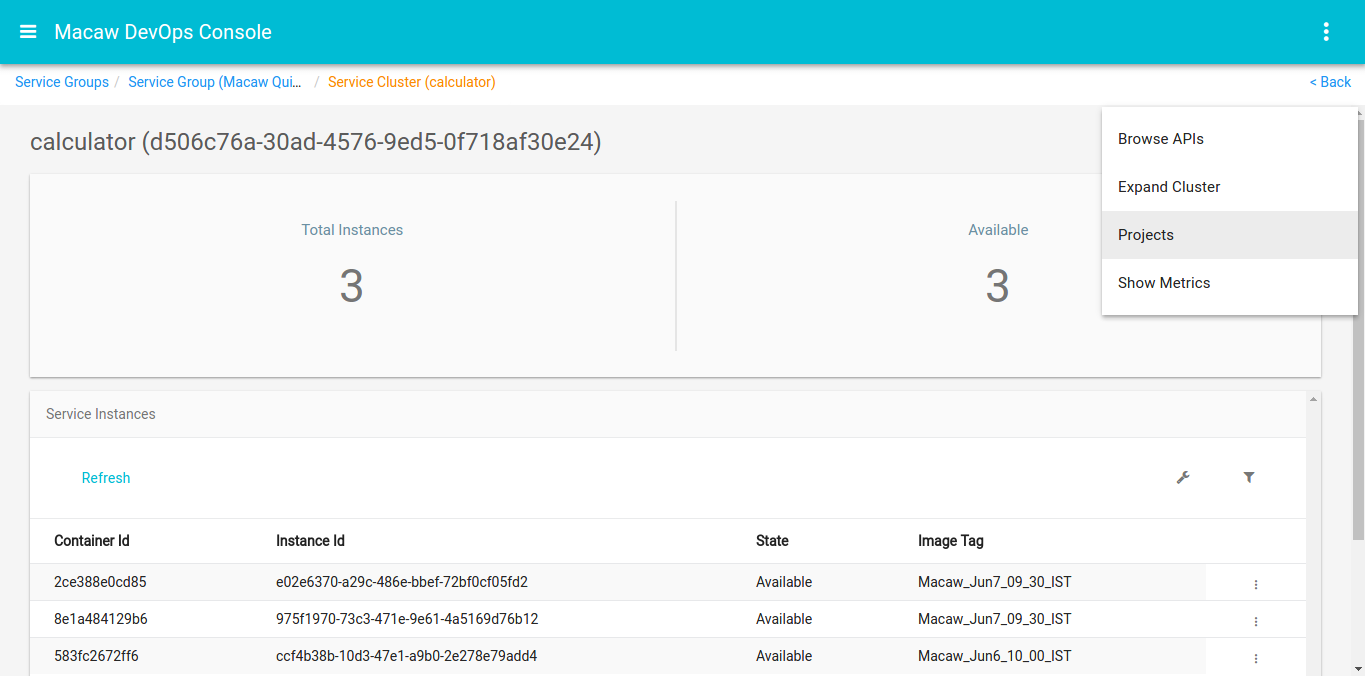 Cluster Dashboard provides the following details
- Total number of instances present in the cluster, total available instances in the cluster.
- Service Instance information like Container Id, Instance Id, State of the Instance, Image Tag used for provisioning the instance
At cluster level, the options provided are BrowseAPIs, ExpandCluster, Projects, ShowMetrics, Rolling Update, Scale Up, Scale Down.
Instance level options:
- View Details gives more details of the Instance like Name, Namespace, Version, Host where the instance is deployed, Registered time, Repository selected during deployment etc

- Pause/Resume an Instance
- Deprovision a Standalone-docker cluster instance
- ‘View Docker Info'(for Standalone-docker) / ‘View Info'(for Kubernetes) of the instance
- View ESLogs
- Show Metrics of the instance
- Launch ADPM with selected instance as default value for agent. This option is enabled if it is configured during deployment.
ShowMetrics at Cluster level
 Duration and Instance can be changed to get the metrics for required time period and instance.
Instance level ‘show metrics’, gives metrics of the selected instance
Docker-info of a standalone-docker instance
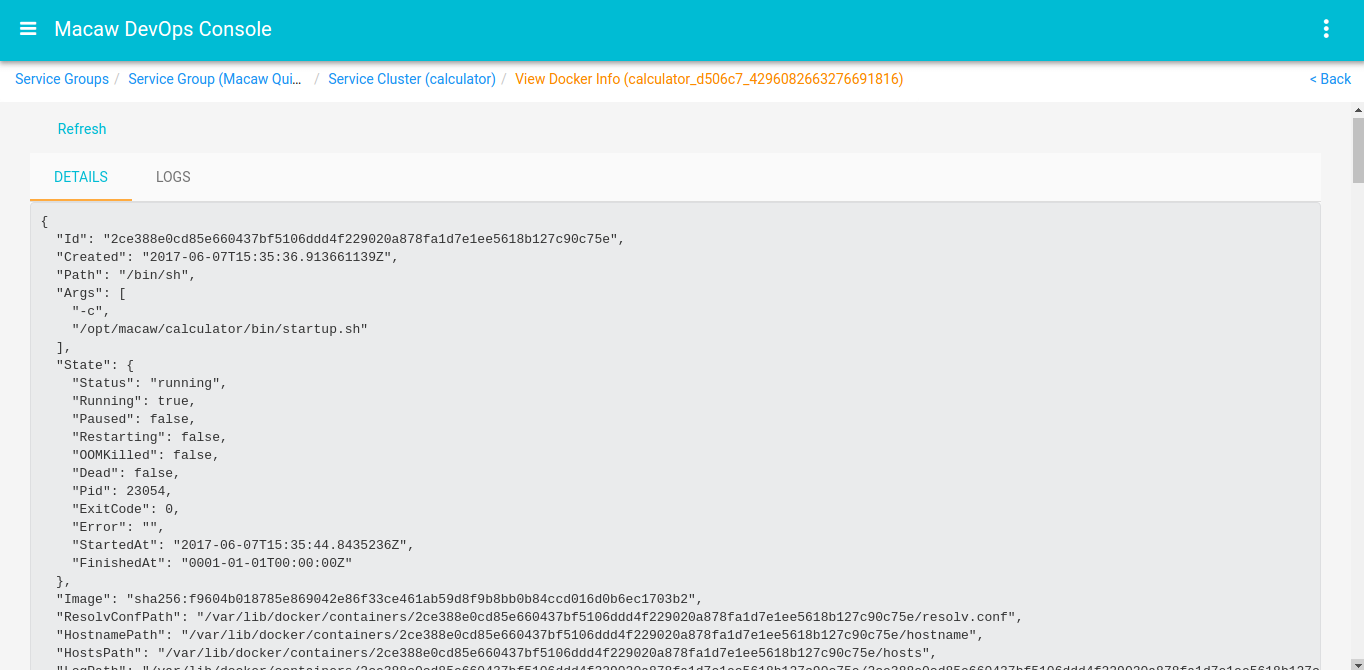 ‘Details’ tab gives the ‘docker inspect’ of the instance container. ‘Logs’ tab gives the ‘docker logs’.
Expand Cluster form of docker standalone clusters
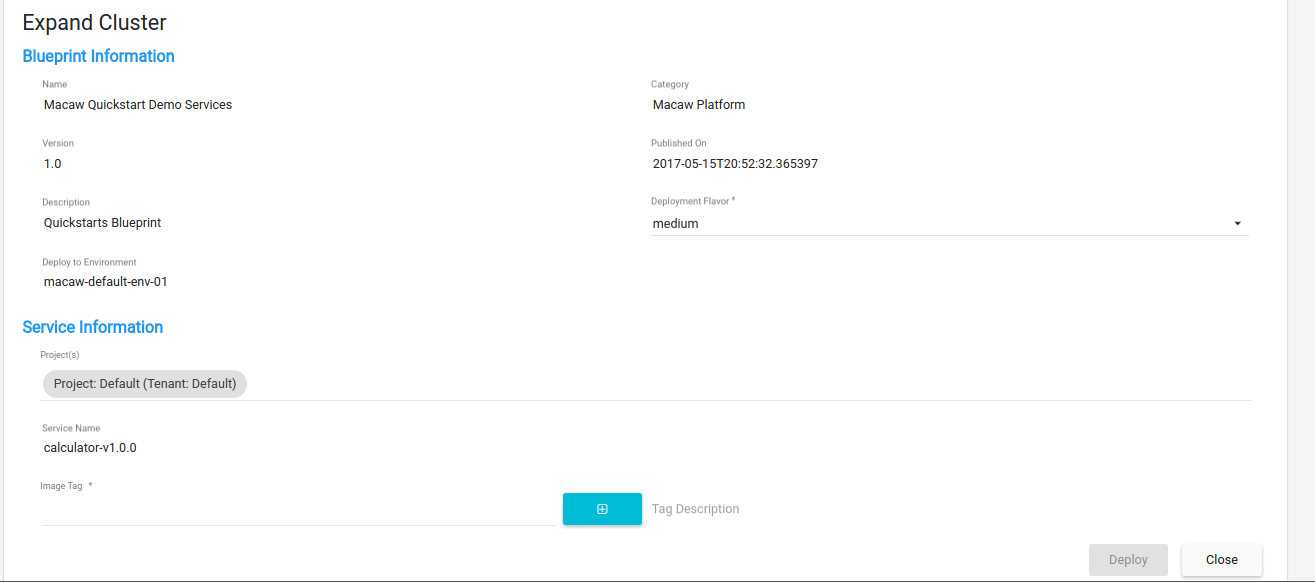 Options are given to select Deployment Flavor & Image tag while Expanding cluster.
Scale Up form of Kubernetes cluster
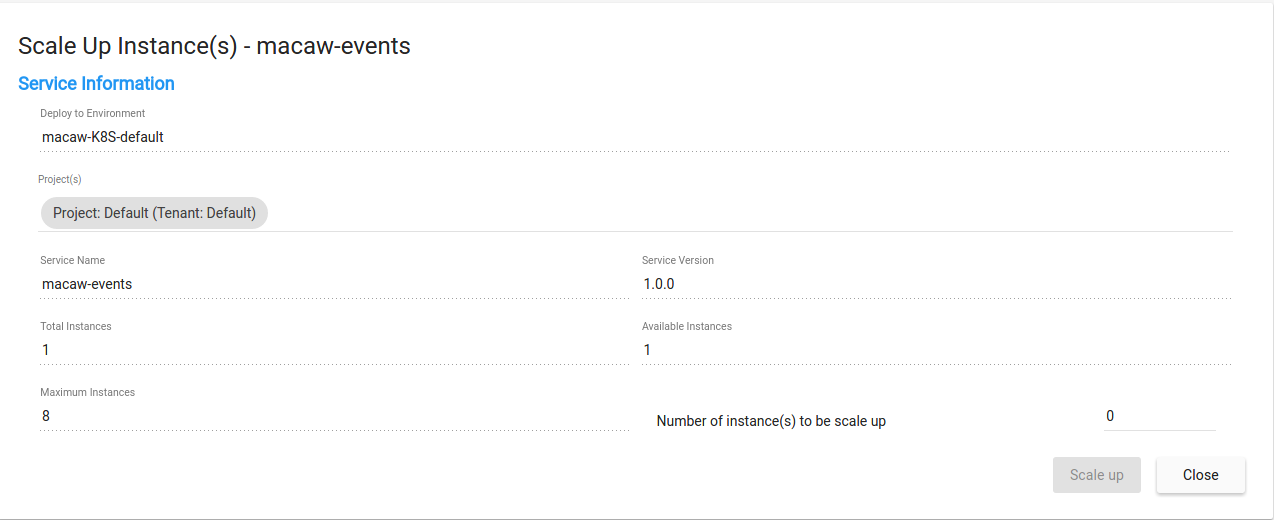 Number of instances to be added to the Kubernetes cluster, can be selected here. Cluster is allowed to have a total of 8 instances
ScaleDown form of Kubernetes Cluster
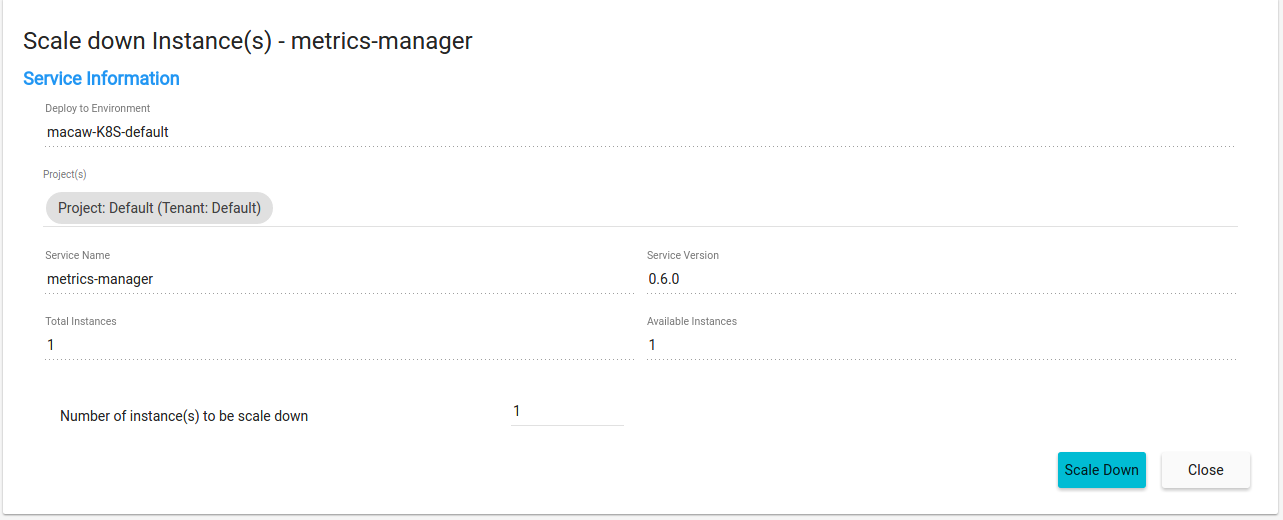 Number of instances to be scaled down can be selected.
Service Clusters
This page provides the overall cluster view of all Service Clusters
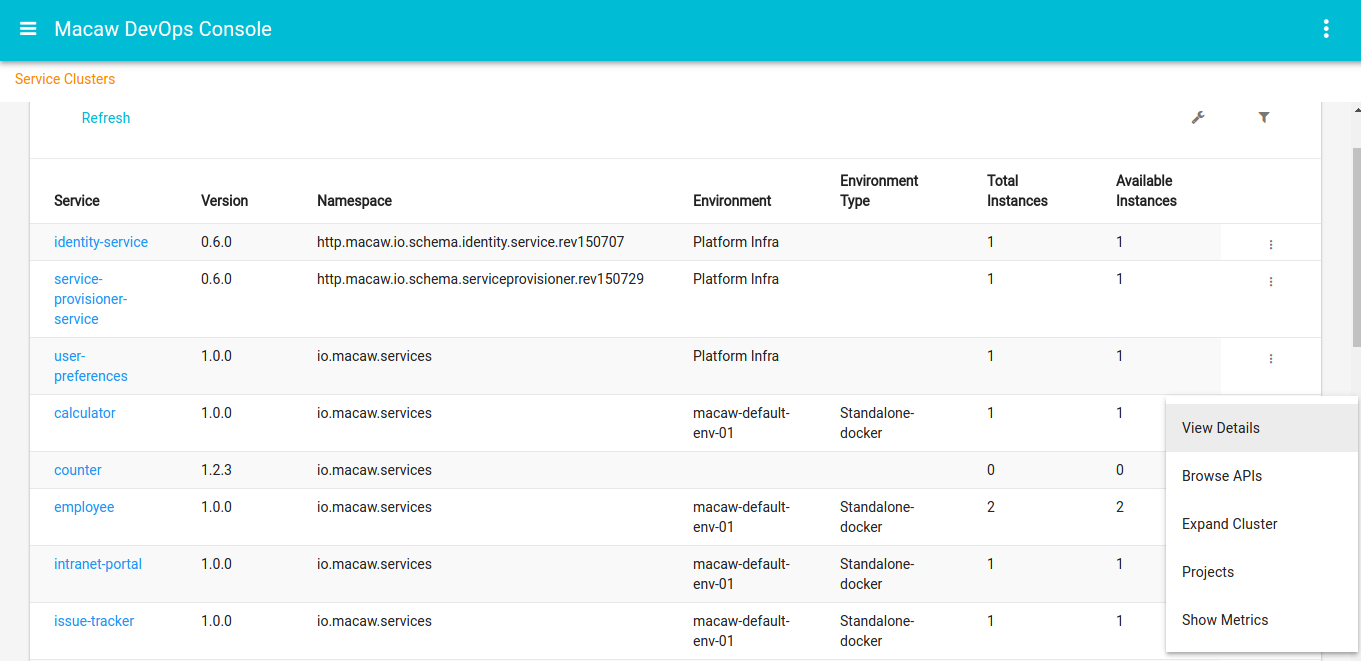 The menu of any ServiceCluster is same, as the cluster level menu seen in the ServiceGroups & Applications page
Service Catalog
Service Catalog provides the blueprints that wrap various microservices. These microservices are internally mapped to docker containers and are published via blueprints. Blueprints are categorized based on the underlying functionality of services or set-of-services. These blueprints are presented in two views (a) Card layout (b) List layout.
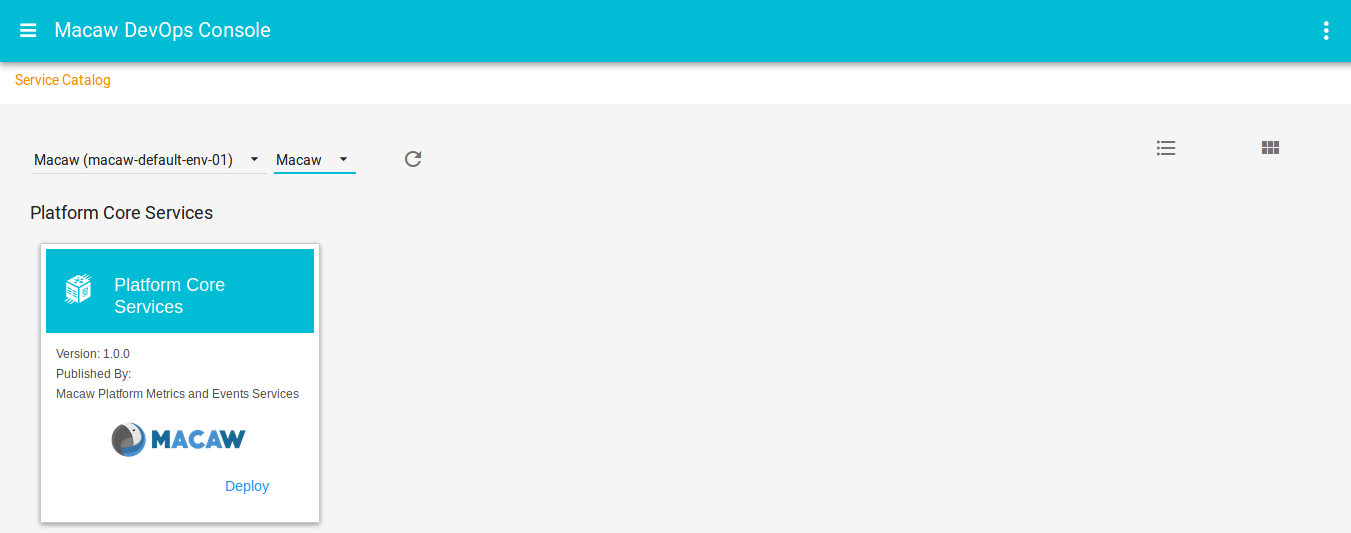
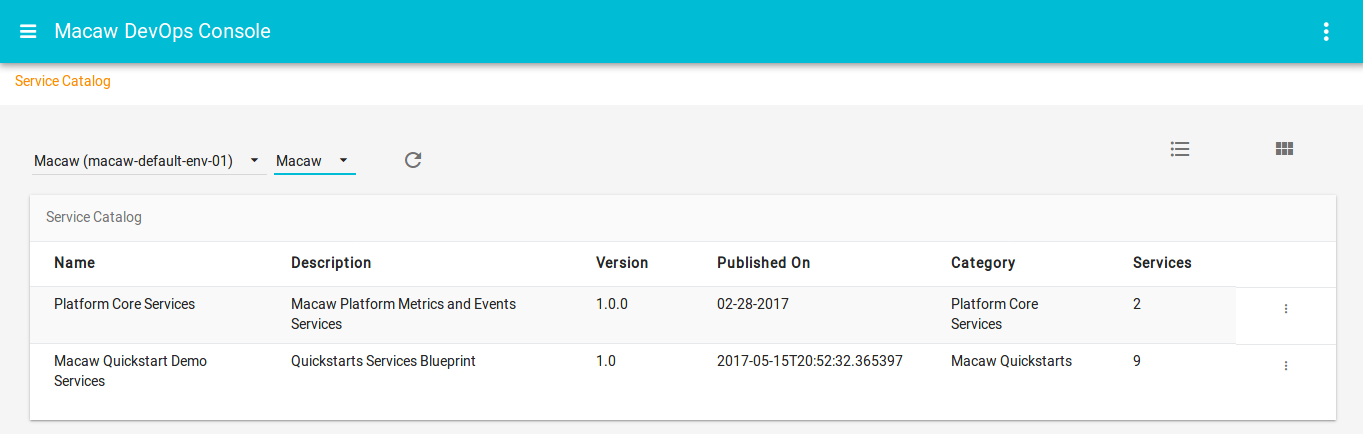 The repository and the blueprint tag have to be selected.
Using the catalog card layout section or list layout section, services can be deployed onto per-configured environments. To deploy service(s) from any blueprint, the below required information need to be provided.
- Service Information
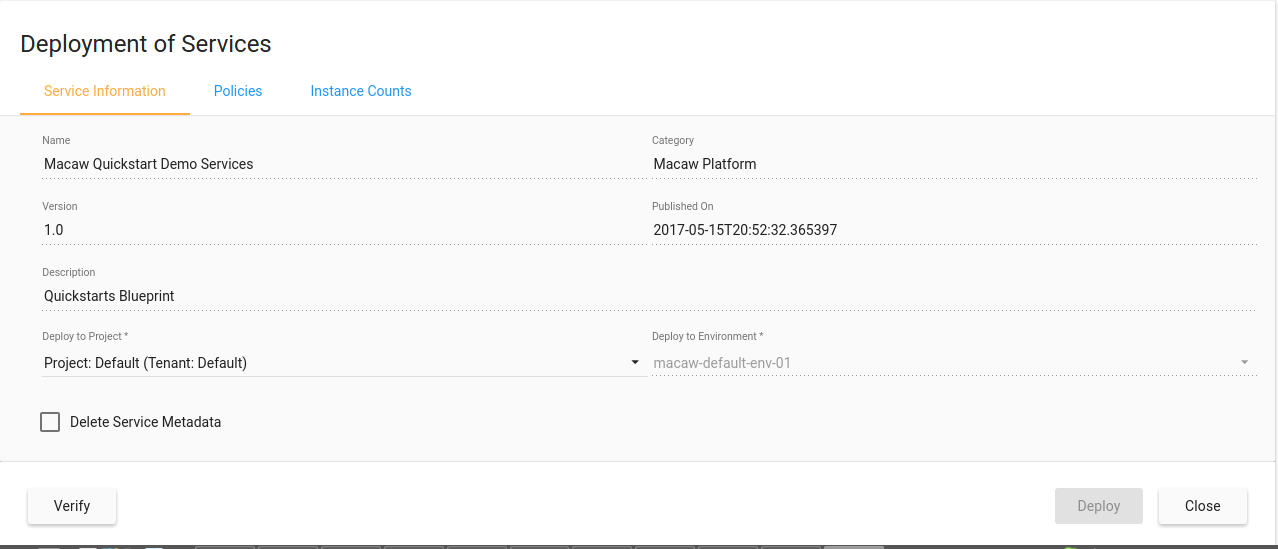
- Select the project which requires access to the service(s)
- Select ‘Delete Service Metadata’, if any metadata of service(s)(which were previously deployed) has to be cleared
- Policies
- Select ‘HA Deployment Policy’
- Select Deployment flavor. Each flavor is tied to its respective resource-profile(defined in the blueprint json file)
- Select the required ‘Environment Add on Features’ that have to be applied to the service(s)
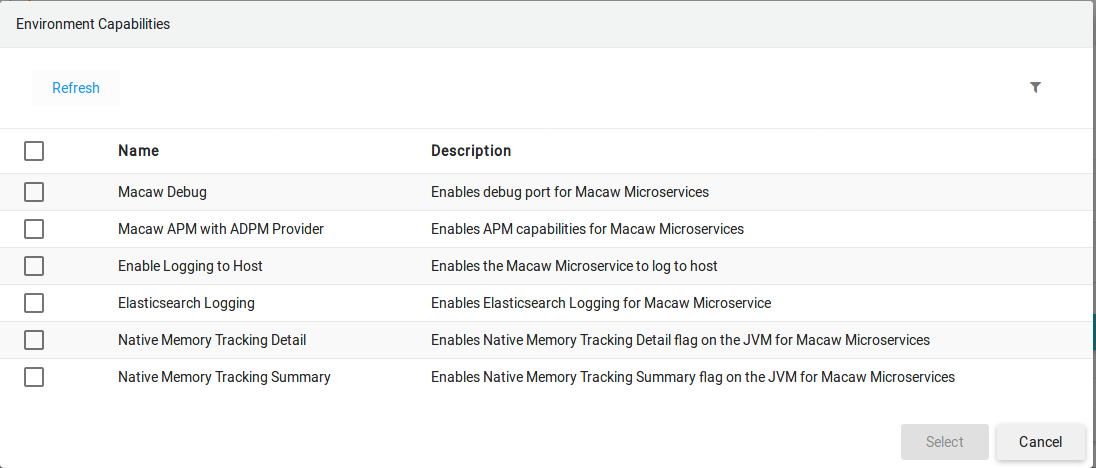
- Macaw Debug: to enable debugging on the service
- APM: When this option is enabled, the instance(s) of the service(s) are tracked for performance management. They Performace Manager can be opened from <host-url>/adpm or using Launch ADPM option of the service instance.
- Host Logging: When enabled, the docker logs of the service(s) are written to be host
- Eslogs:When enabled, the ESLogs are provided under the ‘Vew ESLogs’ of the instance(s).
- Native Memory Tracking Detail/Summary: To enable Native Memory Tracking flag on JVM
- Instance Counts
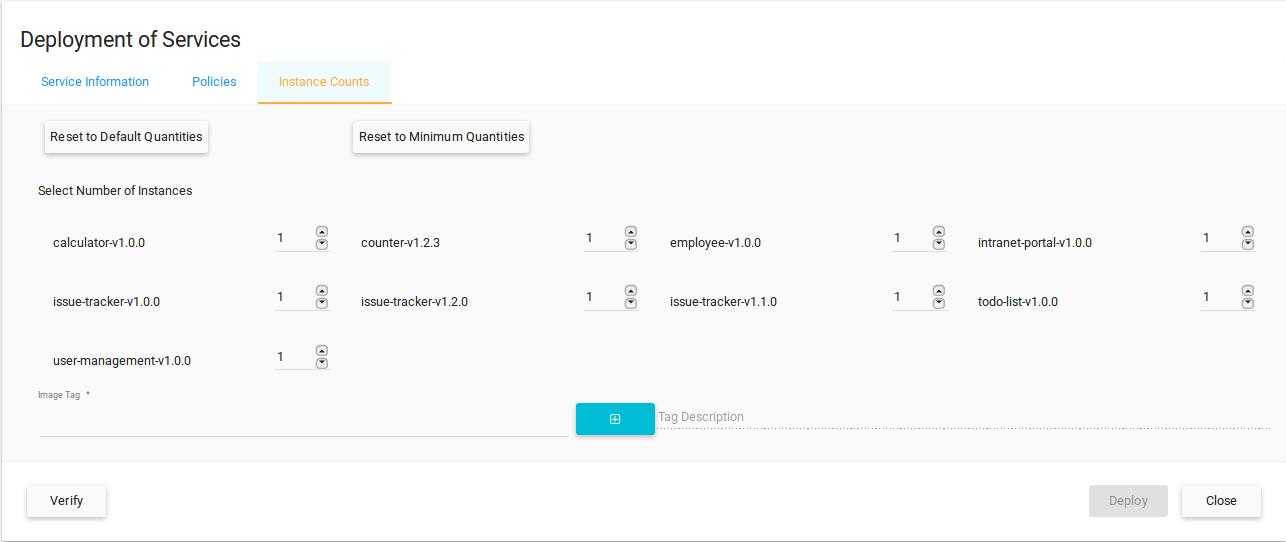
- Select the number of instance(s) required for each Service Cluster
- Select the image tag to be used to deploy the service(s)
- Reset to Default/Reset to Minimum Quantities can be used to reset the number of instances
- For Web Application, ui-pair has to be selected
- ‘Verify’ option can be used to check if the fields are properly populated
Deployment Status
Deployment Status provides the following details of all the deployments done
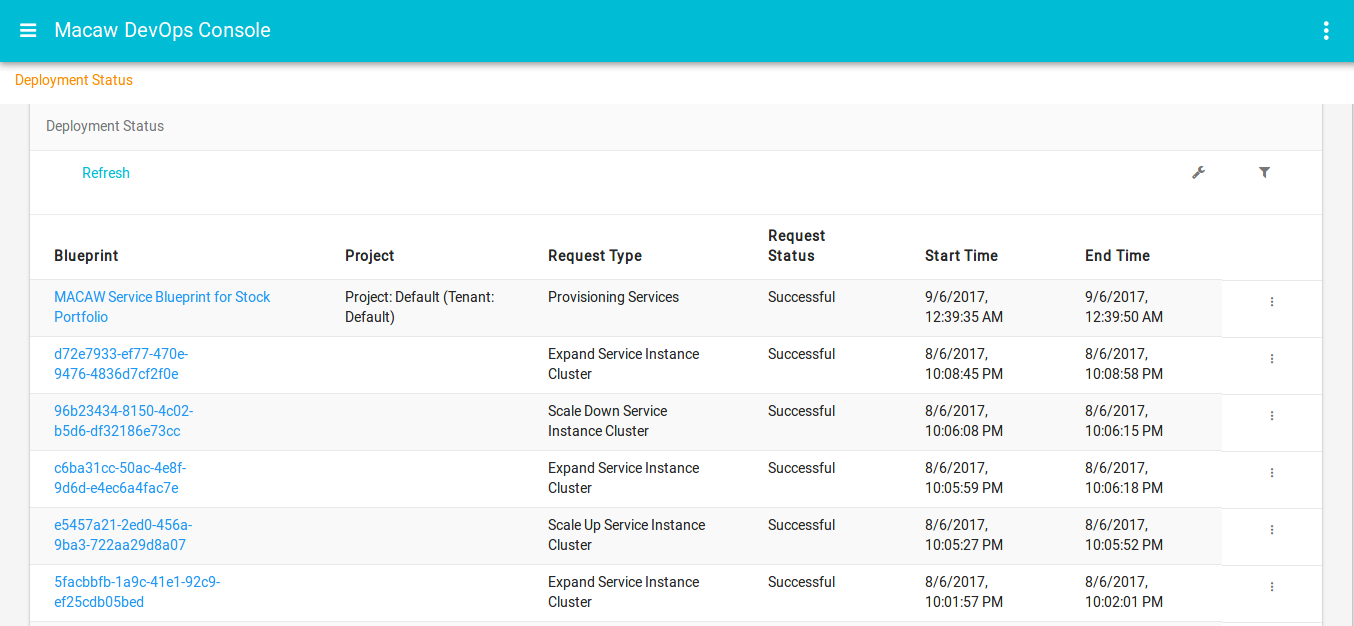
- Blueprint used in the request
- ‘Project’ for provisioning/deprovisioning requests shows, the project which is selected during deployment of service(s)
- Request Type can be ‘Provisioning Services’, ‘Deprovisioning Services’, ‘Expand Service Instance Cluster’, ‘Scale Up Service Instance Cluster’, ‘Scale Down Service Instance Cluster’ depending on the deployment request
- ‘Successful’, ‘In Progress’ or ‘Failed’ status is given under Request Status
- Start Time/End Times of the request
‘View Details’ presents more details about each request, depending on the request type
Sample Provisioning request details
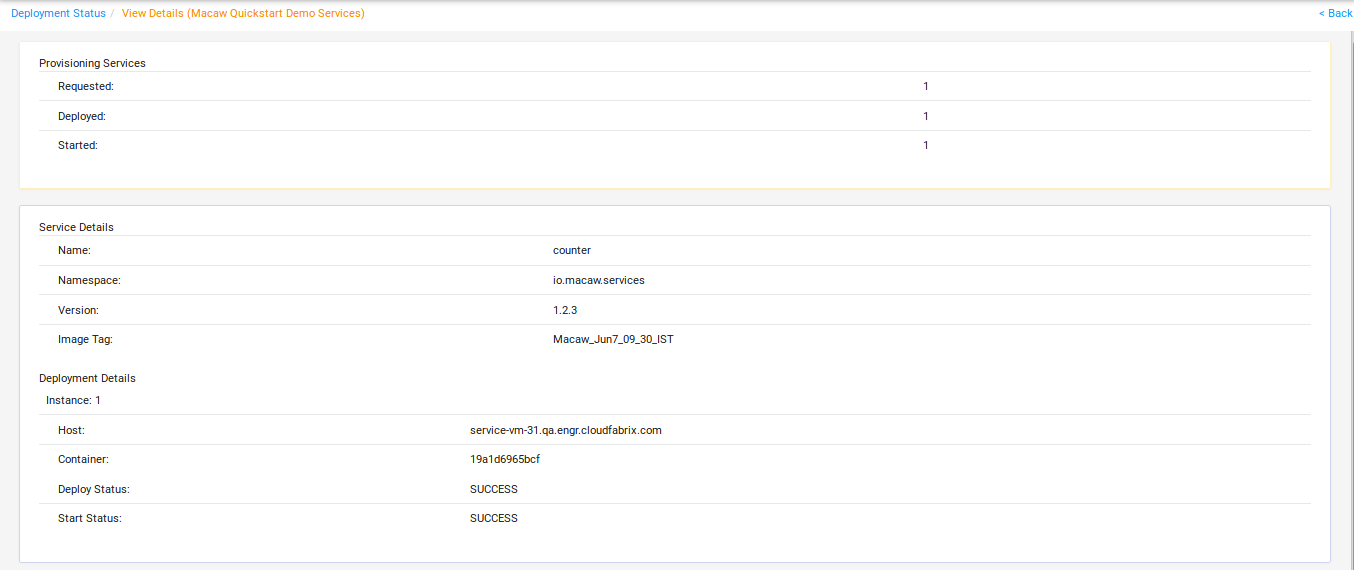
Sample Deprovisioning request details
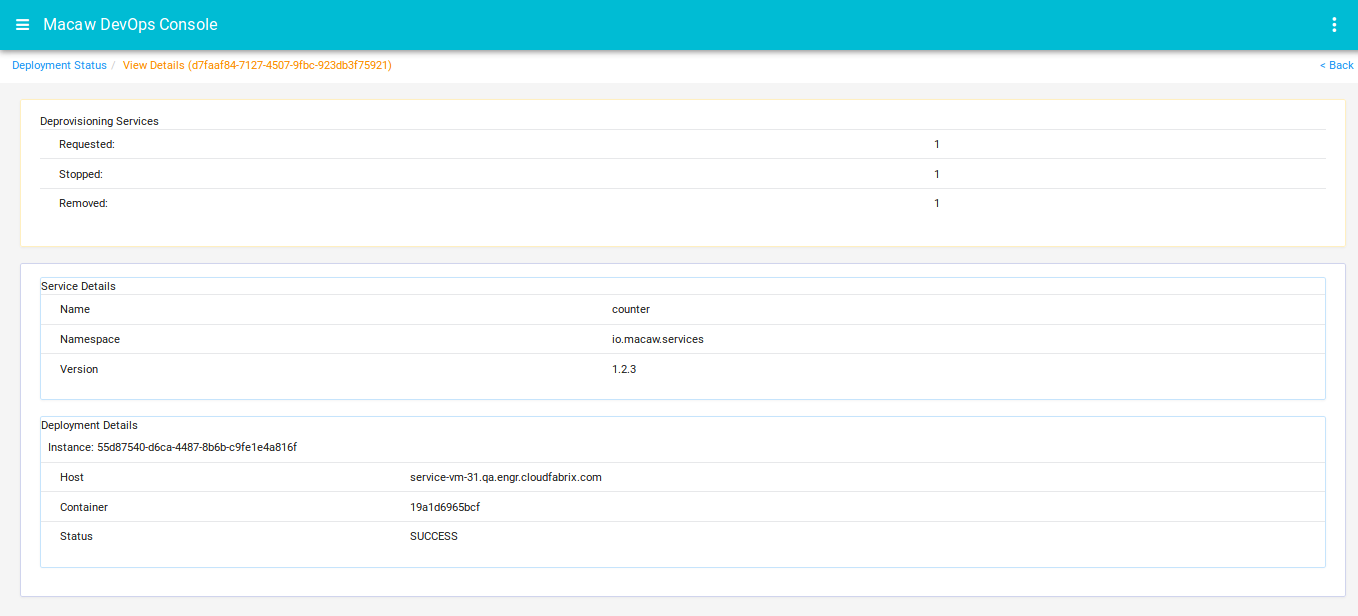
API Browser
API Browser provides the functionality to Post RPCs of various Service Clusters, in different tabs
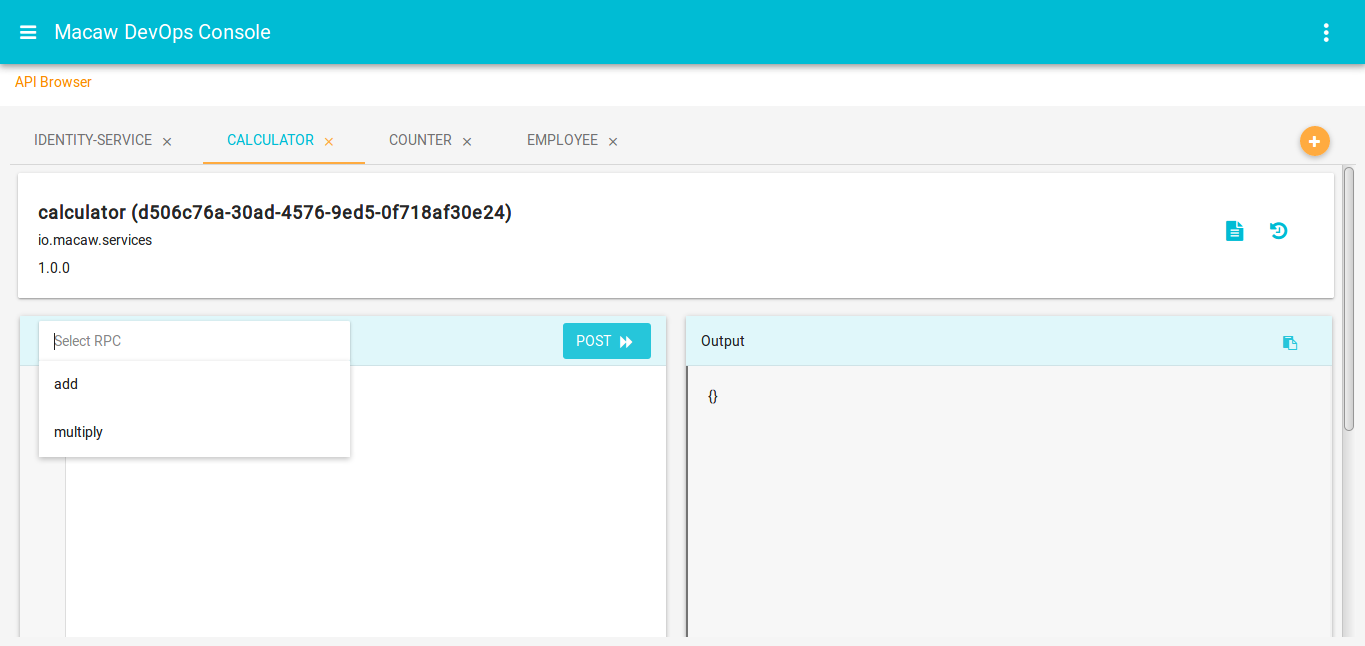 New services can be added to the tab, by using ‘Add new service tab’ option on the right side
Each service tab in browser, provides the below functionality
- Displays name, namespace, version, clusterId of the Service Cluster
- RPC selector to select the required RPC from the dropdown
- Once an RPC is selected, ‘RPC Info’ option is enabled. It provides
- description of the RPC
- input parameters along with their data types
- end point url
- ‘Format Input’ icon can be used to format the json input
- Json validation is done for the given input. If input given is not in proper json format, cross mark appears on the line of wrong input
- RPC output is displayed along with its Duration. It shows the time taken by API Browser to post RPC and give the output, along with the actual API Response time
- ‘Copy to Clipboard’ option is provided for the output field
- ‘Service History’ option on the right side, provides details of the RPCs executed.
- Unique combinations of RPCs executed and the input given to them, are entered in the History
- The time of last RPC call with a particular input, is displayed. If an RPC is executed more than once, with same input, then the time is updated for that respective entry
- Red/Green colors in the history indicate, whether the RPC request was successful or failure
- Each entry in the history can be removed separately or ‘Clear History’ can be used to remove all the entries from history of the current Service Cluster
- Search field can be used to search entries, with RPC names or RPC input given
- Service Documentation can be referred for the following details
- List of RPCs with description and input parameters
- List of Notifications that get published by the Service, along with their description and inputs
- List of Objects used by the service, their description and json structure
RPC Info option
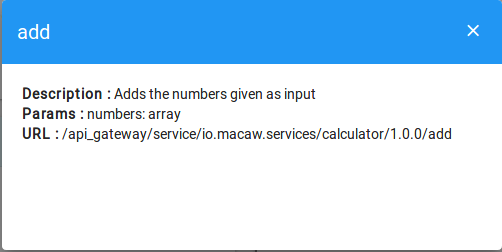
RPC History
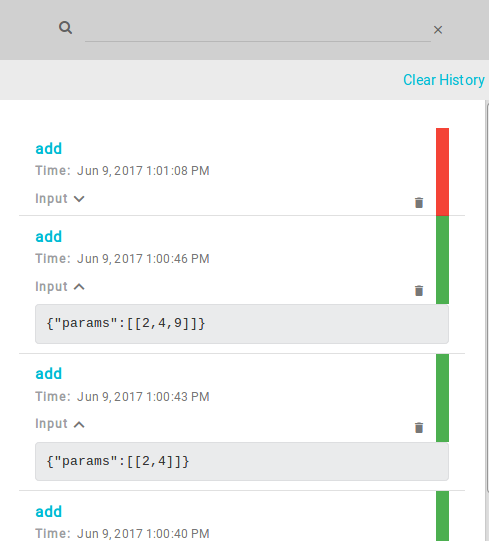
Service Documentation
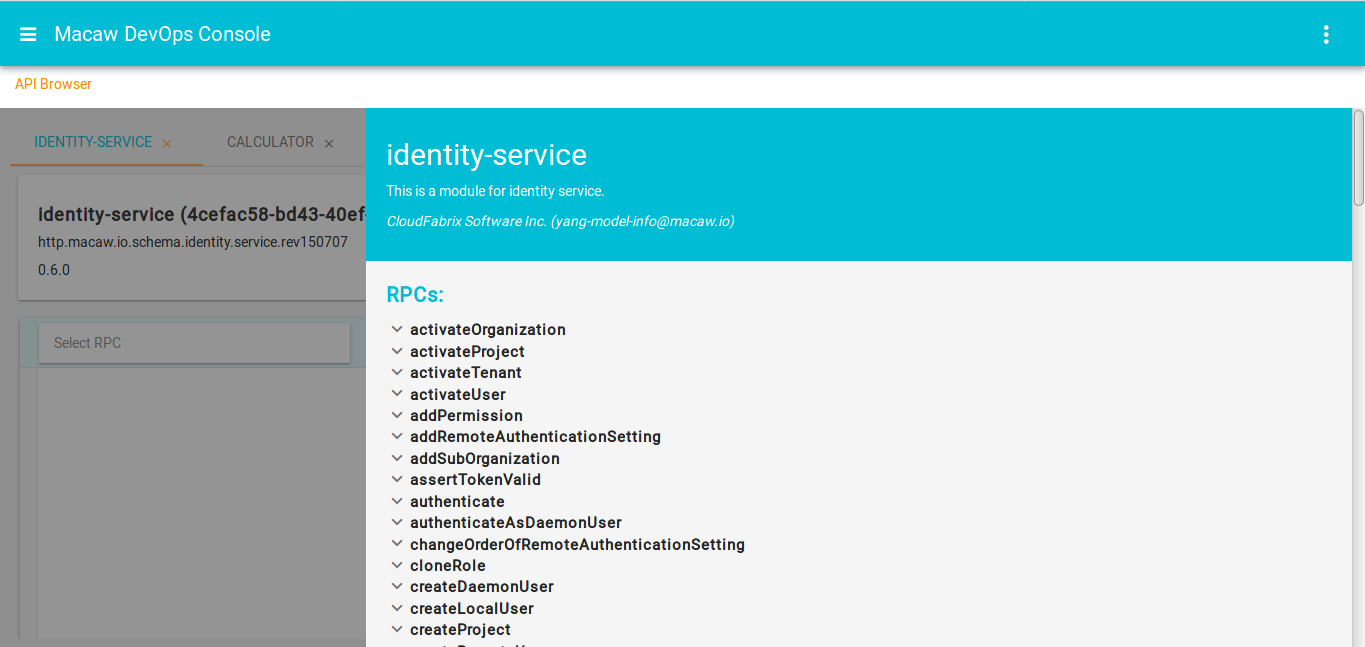
Environments
This page displays Provisioning Environments that were configured in the platform
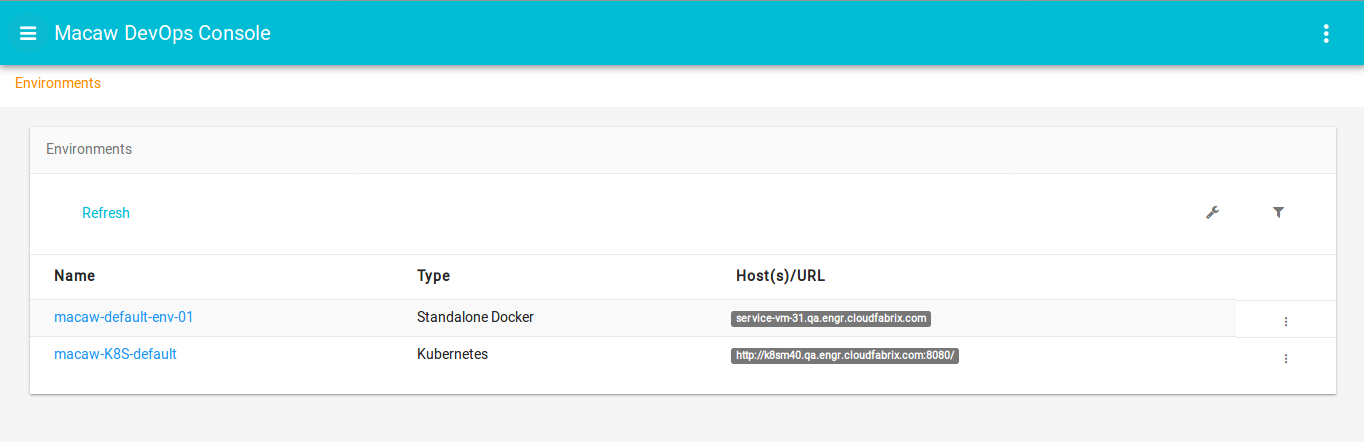 Each Standalone-docker environment displays the host(s), that are used for provisioning macaw microservices. Kubernetes environment gives the Kubernetes master URL. ‘View Details’ presents the ‘Environment Dashboard’ for the selected environment.
Environment Dashboard
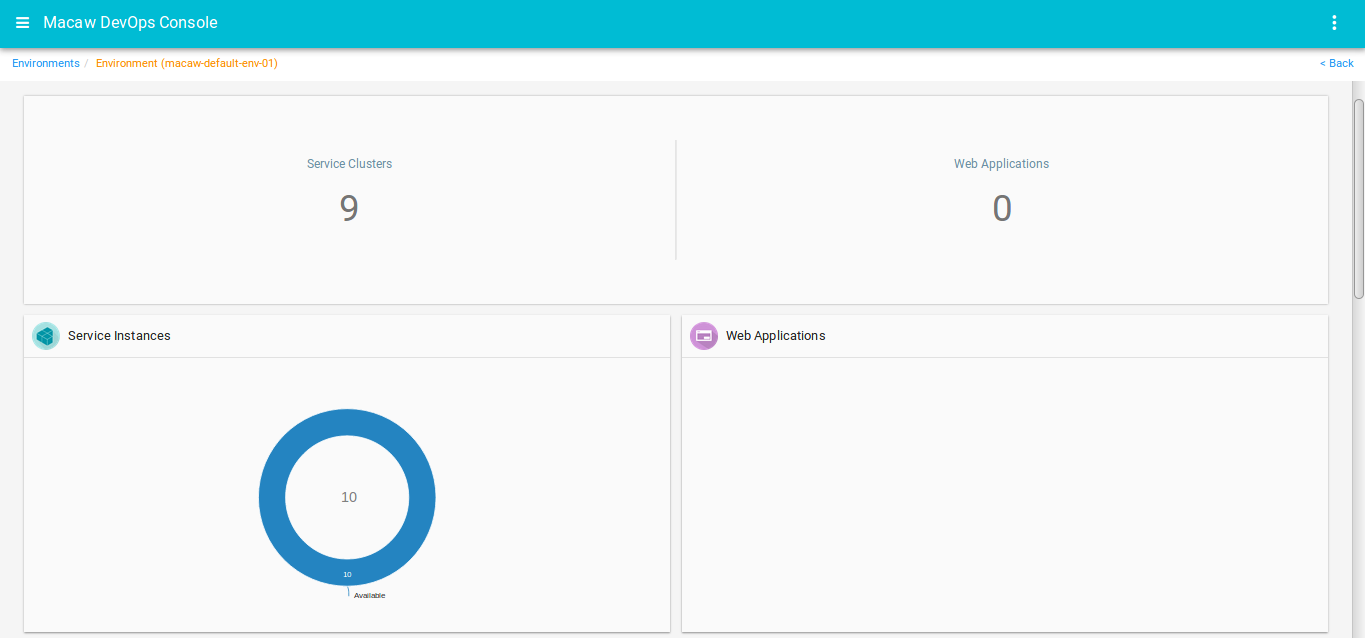

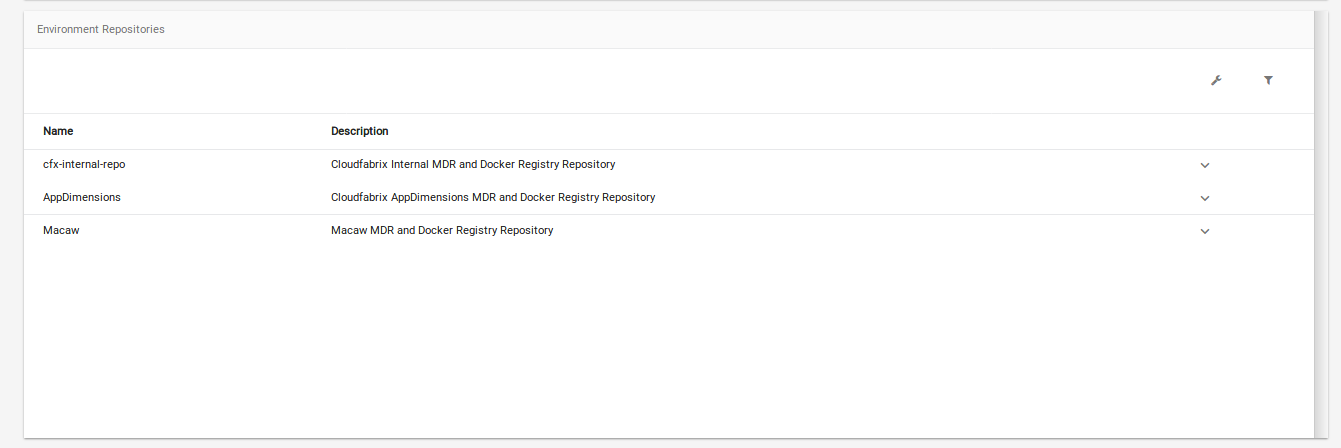 It contains the following information
- Total Service Clusters/Web Applications deployed in the selected environment
- Doughnut Chart(s) of Service Instances/Web Applications(if any) depicting their states
- List of all Service Clusters and WebApplications along with other information like Name, Namespace, Version, Environment, Total/Available Instances. On Selecting any cluster, the respective Cluster Dashboard is displayed, along with the actions that can be peformed in ClusterDashboards.
- List of all Environment Repositories, that are configured in the platform for current environment.
Service Registry Metrics
Metrics graphs on Service Registry are provided, for the selected duration on
- Memory – jvmMaxMemory, jvmTotalMemory, jvmFreeMemory
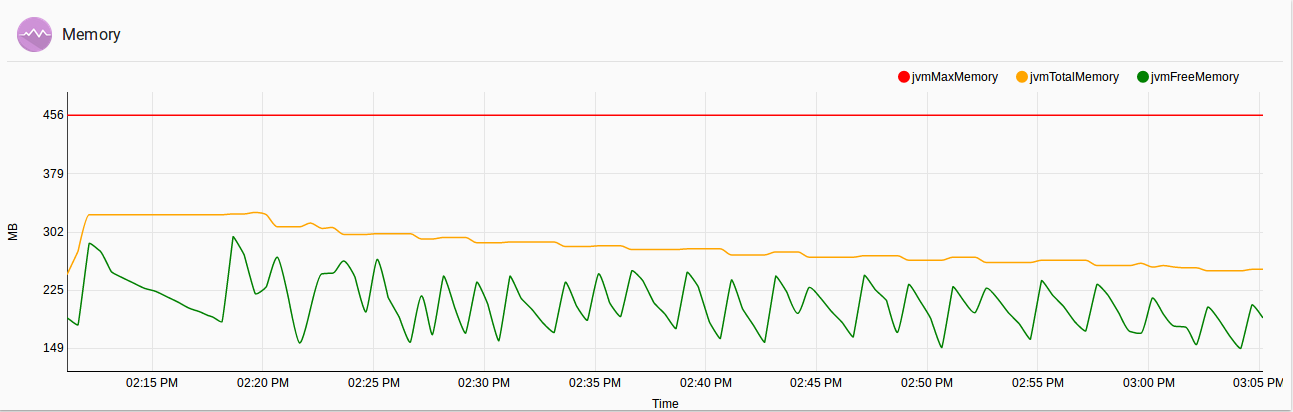
- Requests – Successful Service Registration Requests Counter, Total Service Registration Requests Counter
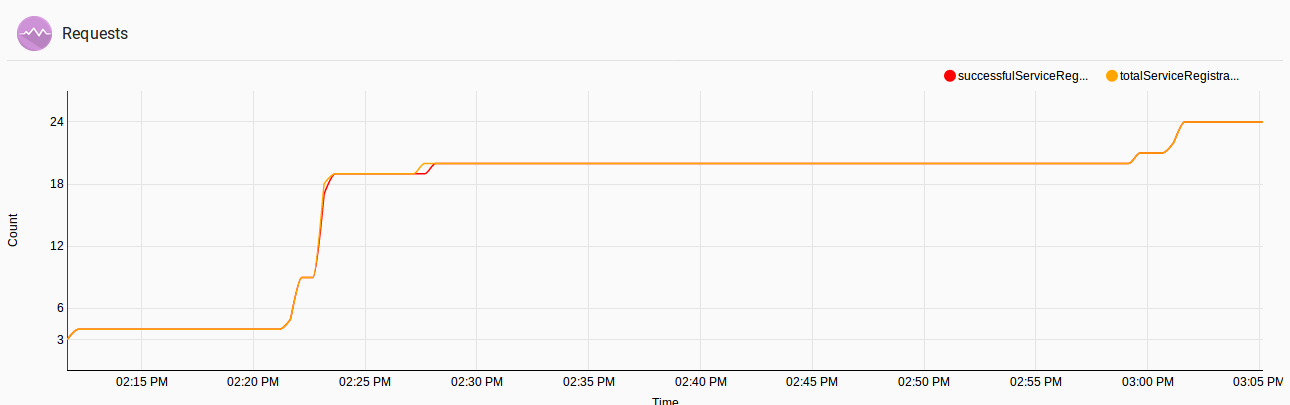
- Total ServiceAPI Queries Received Counter
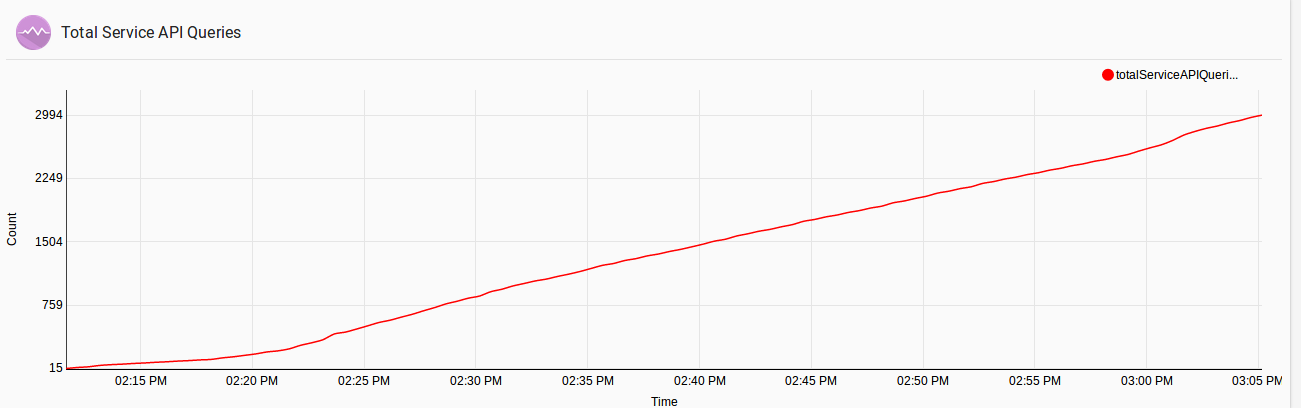
Administration
Administration UI provides various administrative functionalities to Platform Administrators as shown in the following picture:
Tenants
Details of all tenants are displayed in the ‘Tenants’ section. The following actions can be performed on tenants:

- Add a new tenant using ‘Add’ link
- Activate/Deactivate the tenant
- View Summary of the tenant
- Update the details of tenant
- Navigate to TenantAdministrators page
- Navigate to RootOrganization page
- Delete non-default tenants
Organizations
Every tenant has a Root Organization

Following actions can be performed on sub-organizations
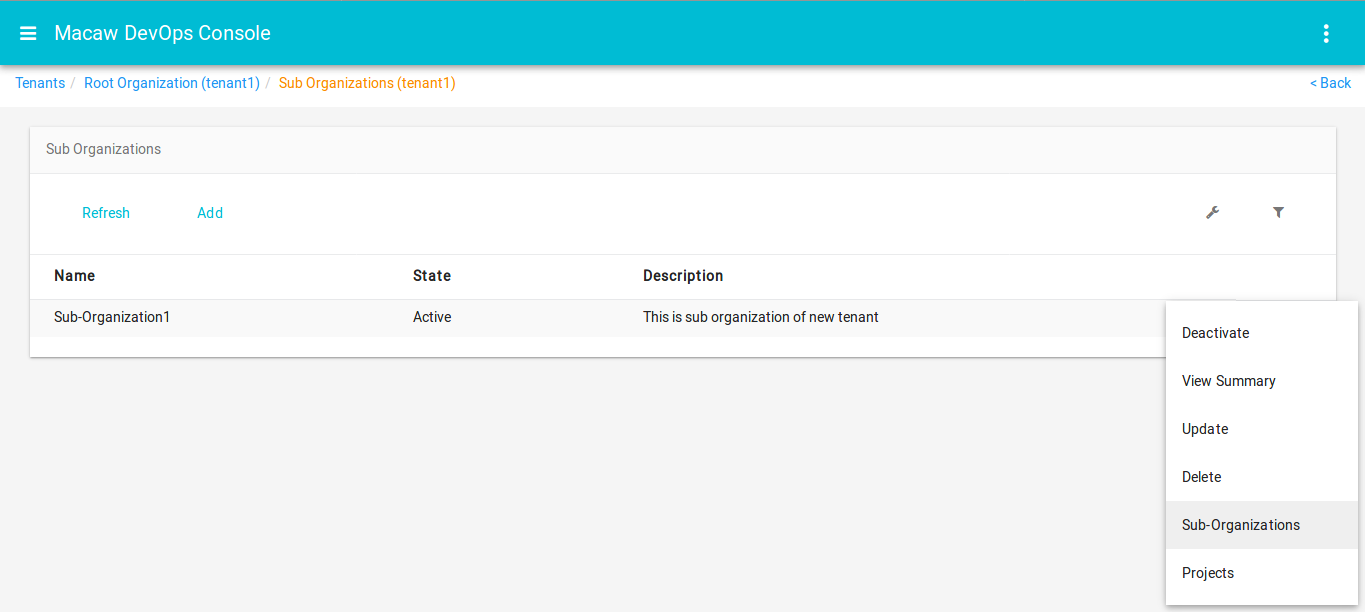
- New sub-organizations can be added under the Root Organization of non-default tenants. Under each sub-organization, more sub-organizations can be added.
- Activate/Deactivate the sub-organization
- View Summary
- Update the sub-organization
- Delete sub-organization. A sub-organization can’t be deleted if it has sub-organizations under it.
- Navigate to Projects page of this organization.
Projects:
Each Organization has a default project. Following actions can be performed on Projects
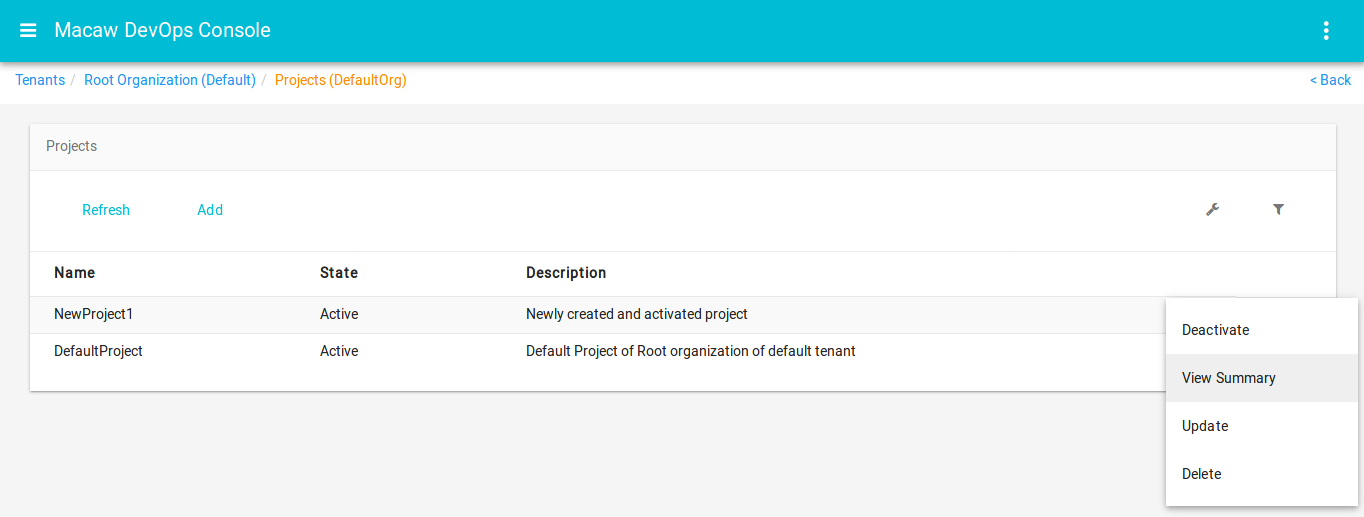
- Add a new project from the ‘Add’ link
- Activate/Deactivate non-default projects
- View Summary of the project
- Update the Project
- Delete non-default projects
TenantAdministrators
Details of all the tenant administrators of a tenant, are displayed in this page.Following actions can be performed on tenant administrators
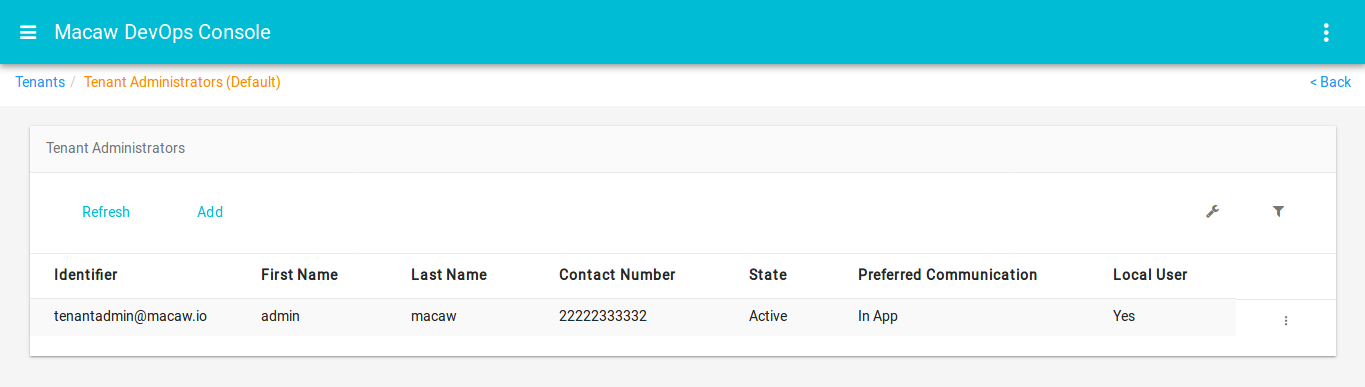
- Add a new tenant admin from the ‘Add’ link
- Activate/Deactivate the user
- View Summary
- Update the details of admin
- Reset the current password of admin
- Delete the tenant admin
Platform Administrators
 Following actions can be performed on Platform Administrators
- Add a new PlatformAdmin
- Activate/Deactivate other users
- View Summary of the user
- Update the user
- Reset Password of the user
- Delete other users
Service Events
Events are captured whenever any RPC of a service is executed. ServiceEvents presents the metrics of these events, along with the details of failed/slow Invocations.

Configuration:
The Configuration section contains the list of all the services with name, namespace, version. Under each service,
- There is the configuration to get the details of failed/slow Invocations of the service RPCs.
- View Events/Metrics of all the executed RPCs of service.
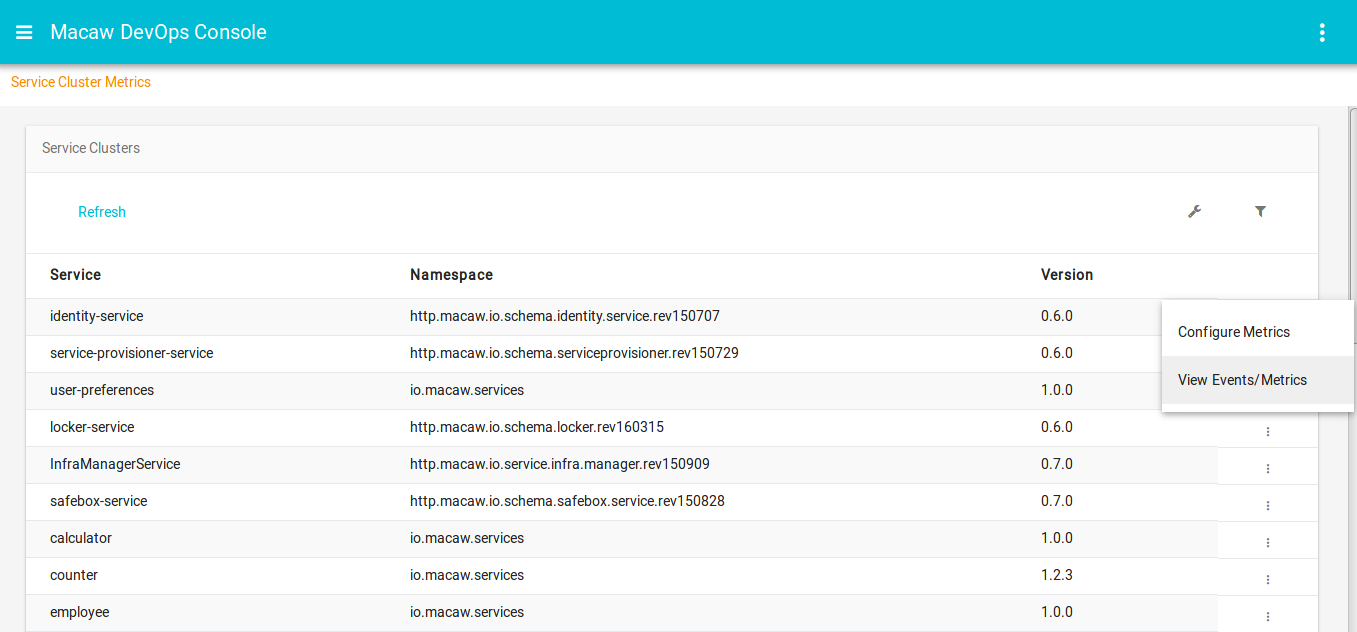
Configure Metrics:
 ‘AddConfig’ link can be used to add configuration for any RPC of the service
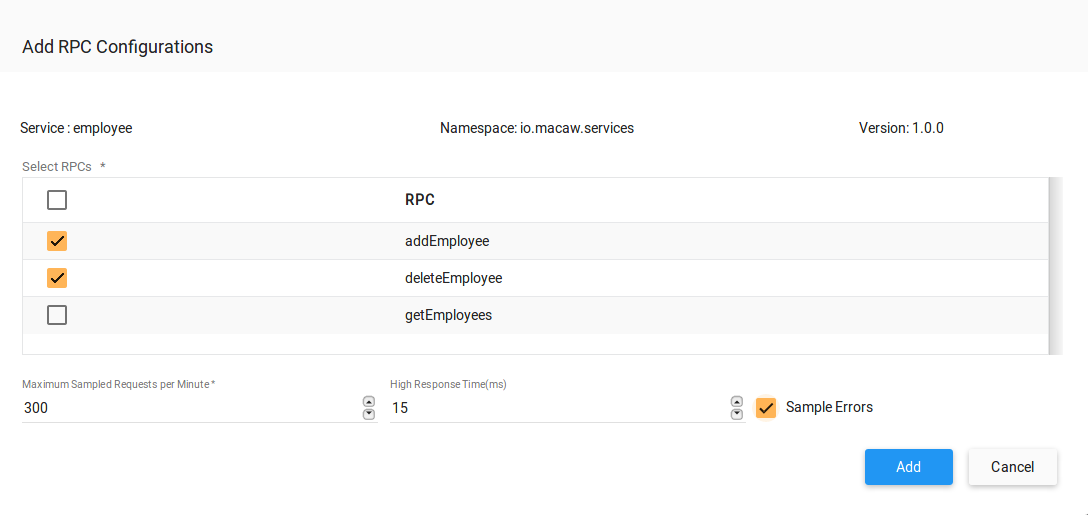 Add RPC configuration form inputs:
- Select RPCs from the list, for which the configuration has to be done.
- ‘High Response Time’ field is used to get the details of slow invocations. If the RPC takes more time to execute than the value give here, then it is considered as Slow Invocation and its details are captured.
- ‘Sample Errors’ field is used ,to enable capturing the details of failed invocations. If the RPC execution fails, then the details of this invocation are captured.
- ‘Maximum Sampled Requests per Minute’ represents, maximum number of failed/slow invocations of the RPC(per minute), for which details have to be captured. If there are more invocations that are slow/failed, than the number specified here, then the details of remaining invocations are discarded.
Added configurations can be deleted/modified.
View Events/Metrics:
‘VewEvents/Metrics’ presents all the invocations of any RPC of the service, along with the metrics of each RPC.
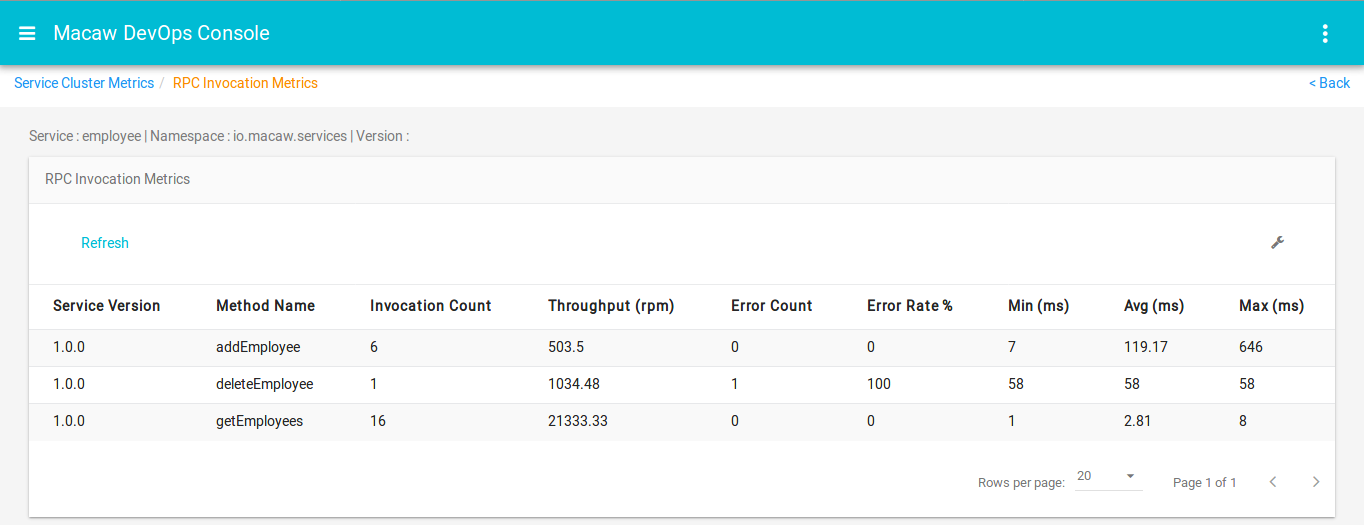 Summary of fields:
- ServiceVersion: The version of the service used
- MethodName: RPC of the current service,which is executed
- InvocationCount: Number of times, this RPC is called
- Throughput(rpm): Takes into account, the total time taken by all invocations and the total count of invocations, to give the estimation of , how many invocations can be completed in a minute.
- ErrorCount: Total number of failed Invocations
- ErrorRate %: Percentage of failed Invocations, among the total invocations of the RPC
- Min(ms): Minimum server time taken to complete the RPC request, among all the invocations
- Avg(ms): Average of the server times of all invocations
- Max(ms): Maximum server time taken among all the invocations
Event Metrics:
Invocation Metrics gives the list of RPCs executed of all the services, along with the metrics, invocation details of failed/slow Invocations.

Failed Invocations:
If an RPC execution fails, the details of the failed invocation are listed under ‘Failed Invocations’. These details are captured, only if the RPC is configured to get the details of failed invocations.
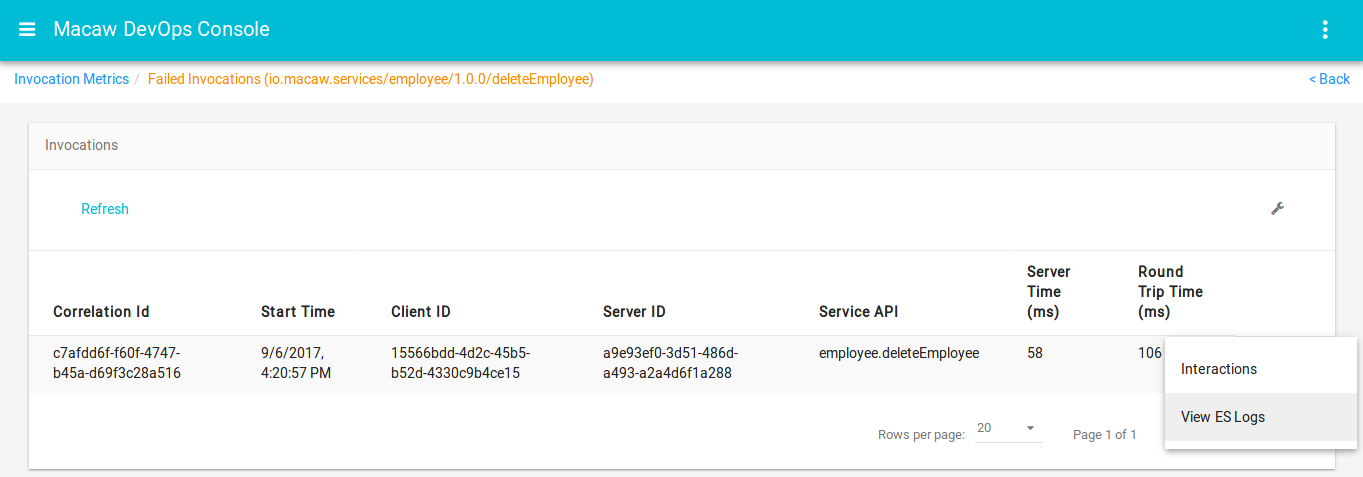 Summary of fields:
- Correlation Id: Id of the correlation, which has the current invocation of the RPC
- StartTime: Time at which the invocation started
- Client ID: Client instance ID which called this RPC
- Server ID: ID of the instance(in the service cluster) which executed this method
- Service API: Service and RPC names
- ServerTime(ms): Time taken by server to complete the current failed invocation
- RoundTripTime(ms):Complete time taken in the client-server interaction
Interactions of failed invocations
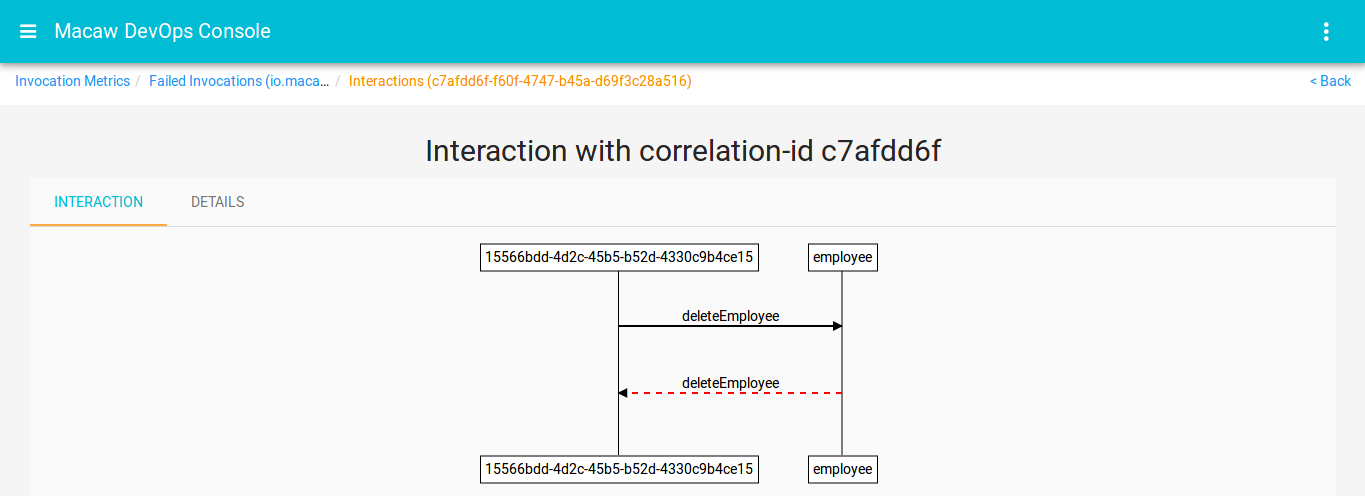
The above sequence diagram shows all the invocations which are involved in the current correlation:
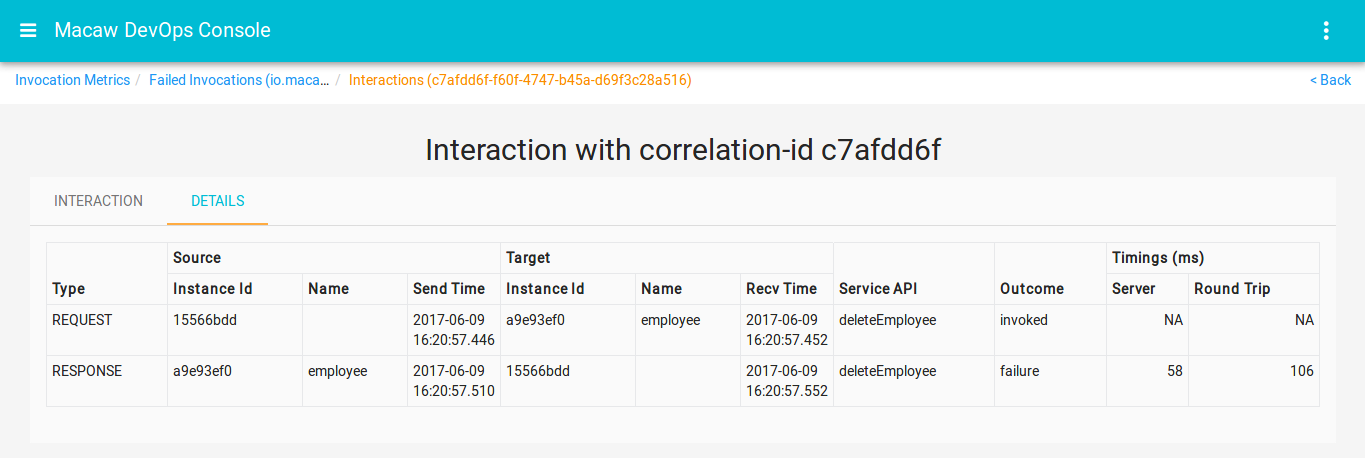 InteractionDetails of the correlation, contain the following fields
- Type of event(REQUEST/RESPONSE/NOTIFICATION)
- Instance Ids, Names of client, server instances
- SendTime,ReceiveTimes of the event
- Outcome of Request event and notifications, is ‘invoked’. Outcome of Response event shows failure.
- Total time taken at server side, roundtrip time to complete the RPC request
View ESLogs of failed invocations
ESLogs related to the current failed invocation are shown here
Slow Invocations
Depending on the configuration made for an RPC for slow invocations, the details of successful but slow invocations are captured here.Fields of this report are similar to the fields of failed invocations.
Interactions & Details of slow invocations
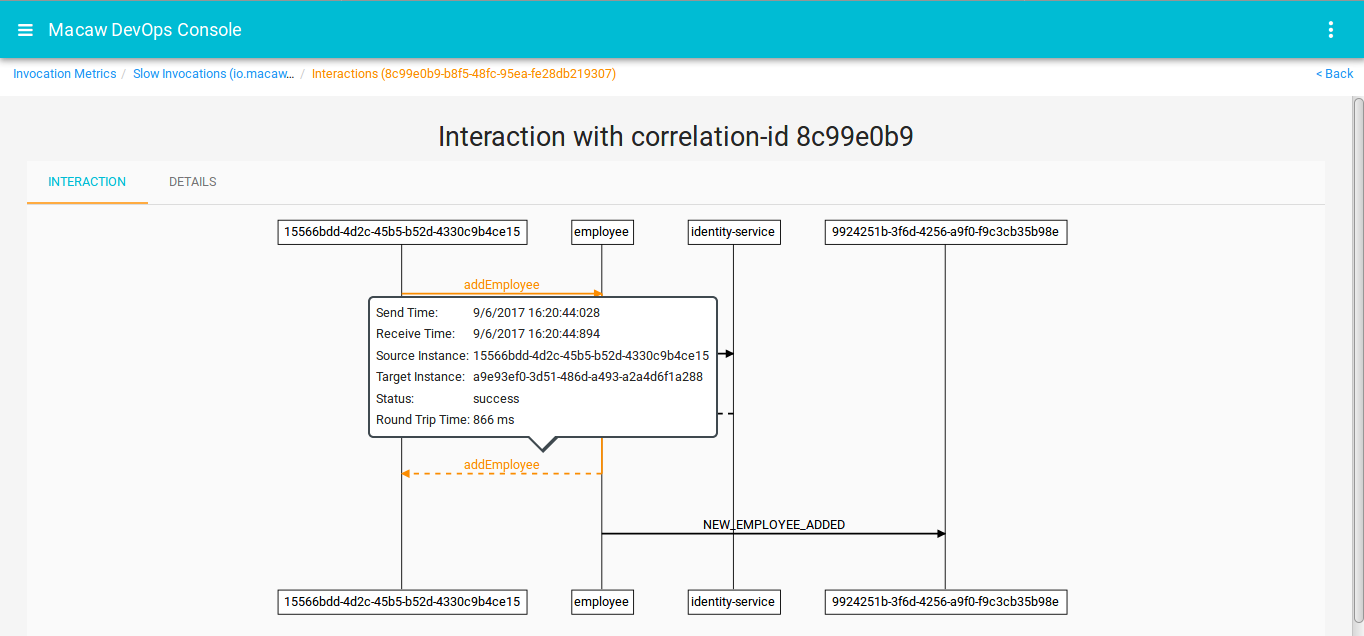
ESLogs of slow invocations
ESLogs related to the current slow invocation are shown here.
View Summary
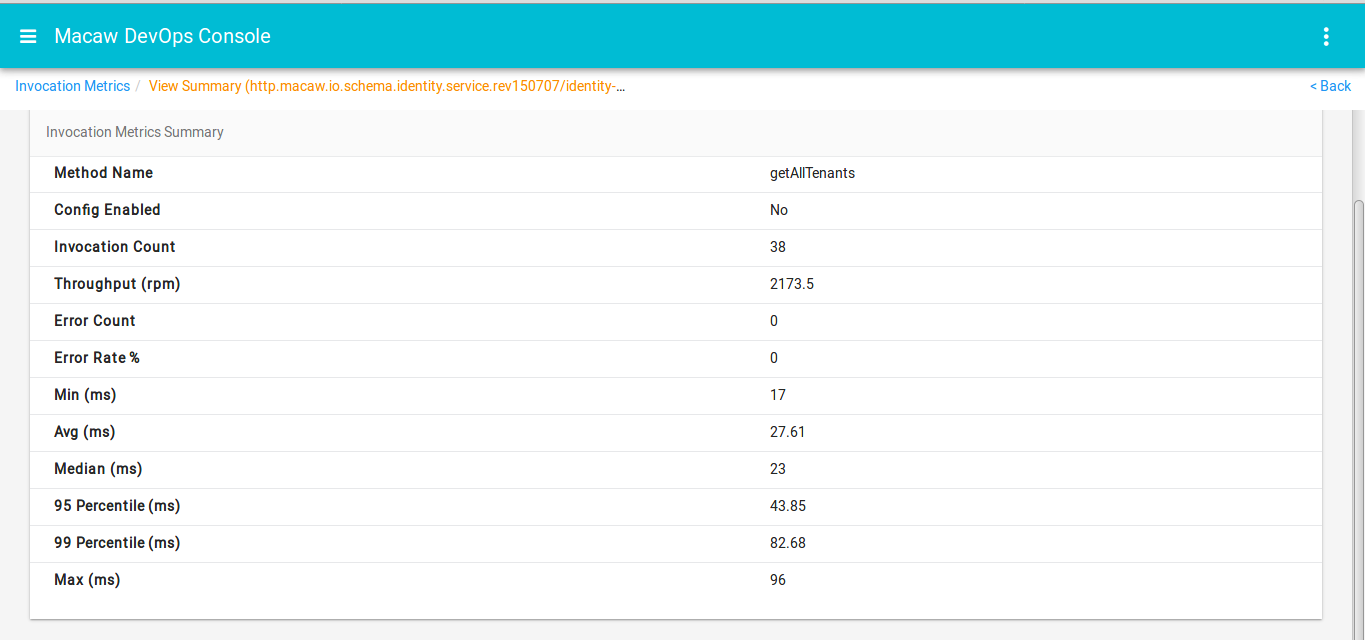 View Summary gives the metrics of RPC invocations. Median, 95 Percentile, 99 Percentile values are calculated using server times of all invocations of the RPC.
Development Environment
This part of the document provides detailed instructions on how to enable A local development environment on a laptop/PC and assumes that platform installation is already done and running.
A Developer using the Macaw SDK must have the following software installed in order to get started developing microservices.
- Oracle JDK, versions 8 and above
- JAVA_HOME env variable should be setup to point to this JDK installation.
- Apache Ant 1.9.x (and above) with Ant-contrib.
- Python 2.7.X
- Docker version 1.11.x and above (Optiona)
Note: Refer to each OS section for more details on how to setup/install each of the above requirement.
The Java-based microservices projects generated by the code-generator tool are Eclipse-based and can be imported into a Eclipse installation. There is no Eclipse version dependency in the project. It should work for all recent Eclipse versions; Eclipse Mars or a later version is recommended. However even if you are a IntelliJ or Netbeans user, the project can be imported into a favorite IDE with almost no extra effort.
Windows PC/Laptop
Follow the steps indexed here to install the necessary software dependencies for enabling macaw SDK development on a Windows PC/Laptop. The steps also guide through the compiling/publishing/provisioning of an example service which comes as part of the SDK.
Installation and Setup – Necessary Software Packages
Python Installation – 2.7.x
Download Python from the below we site and follow through the regular installation steps. This would install Python 2.7.x on the local machine. The default path of the Python installation is C:\Python27.
Download Link: https://www.python.org/ftp/python/2.7.13/python-2.7.13.msi
Ant Installation – 1.9.X
Download the ant ZIP from the below location. Right click on the ZIP and extract to C:\.
This would create the folder C:\apache-ant-1.9.7
Download Link: http://archive.apache.org/dist/ant/binaries/apache-ant-1.9.7-bin.zip
JDK Installation – 1.8.0.121
Download the JDK from the Oracle download site. Accept the license agreement and download the software. For Windows 64 bit, it is necessary to download, Windows x64 version of the JDK.
Download Link: http://www.oracle.com/technetwork/java/javase/downloads/jdk8-downloads-2133151.html
For regular installation, the installer would install JDK in the below directory.
C:\Program Files\Java\jdk1.8.0_121
Setting up the environment
- Open a Windows Power Shell Window with Admin Permissions. By default power shell opens in non admin mode. Right click on the Power Shell icon and click on “Run As Administrator”
- Execute the below 3 commands to set the environment. Once it is done, please close the Current Power Shell Window and Open a new Window.
[Environment]::SetEnvironmentVariable("Path", "$env:Path;C:\Python27\;C:\Python27\Scripts\;C:\apache-ant-1.9.7\bin;C:\Program Files\Java\jdk1.8.0_121\bin", "Machine")

[Environment]::SetEnvironmentVariable("ANT_HOME", "C:\apache-ant-1.9.7", "Machine")

[Environment]::SetEnvironmentVariable("JAVA_HOME", "C:\Program Files\Java\jdk1.8.0_121", "Machine")
Note: If any different versions of Python, JDK, ANT are installed, please change the paths accordingly.
- Verify the installation with below commands. Open a new Power Shell Window with Admin Permissions like before, to do the below verification. Path/Environment changes will not be applicable to the current running power shell window.
PS C:\WINDOWS\system32> ant -version
Apache Ant(TM) version 1.9.7 compiled on April 9 2016
PS C:\WINDOWS\system32>
PS C:\WINDOWS\system32> java -version
java version "1.8.0_121"
Java(TM) SE Runtime Environment (build 1.8.0_121-b13)
Java HotSpot(TM) 64-Bit Server VM (build 25.121-b13, mixed mode)
PS C:\WINDOWS\system32>
PS C:\WINDOWS\system32> python --version
Python 2.7.13
PS C:\WINDOWS\system32>
- Install Python modules – Open Power Shell window with Admin Permissions and run the below command.
python -m pip install requests==2.11.1 paramiko==2.0.0 jsonschema==2.5.1 tabulate==0.7.7
Macaw Environment Setup
SDK Download and Setup
- SDK Download – Download the macaw SDK (ZIP Version). The email invitation/guidelines would have the download link.
- Unzip the SDK into the project directory. For example: C:\Users\foobar\Documents\foobar\. The SDK would be unzipped and show a folder structure C:\Users\foobar\Documents\foobar\macaw-sdk-<version>
- Macaw SDK would be requiring 2 environment variables to be able locate and identify the SDK run time libraries and to locate the microservices . Execute the below commands in a power shell window opened with admin permissions. Adjust the paths accordingly to the directory paths.
[Environment]::SetEnvironmentVariable("MACAW_SDK_HOME", "$ENV:HOMEDRIVE$ENV:HOMEPATH\Documents\foobar\macaw-sdk-<version>", "User")
[Environment]::SetEnvironmentVariable("MACAW_SERVICES_HOME", "$ENV:HOMEDRIVE$ENV:HOMEPATH\Documents\foobar", "User")
From here onwards, $ENV:MACAW_SERVICE_HOME would be the location under which macawtool would try to locate the services based on the name of the service folder. Note that this is not a strict limitation. If the structure below is followed, service artifacts can be easily published by the macaw tool, by just specifying the service directory name. If this procedure is not followed, then absolute path to the service must be specified. For details, read the Macaw Tool documentation provided at the end.
$ENV:MACAW_SERVICE_HOME/service1/api

$ENV:MACAW_SERVICE_HOME/service1/impl

$ENV:MACAW_SERVICE_HOME/service2/api

$ENV:MACAW_SERVICE_HOME/service2/impl
Note: Instead of HOMEDRIVE, HOMEPATH variables, you can provide the full path to your SDK and microservices directory.
Macaw Tool Setup – For Publishing
The below steps can only be performed, with a working platform instance or access to an existing platform installation.
- macaw publish tool is already bundled with the SDK. It is located at $ENV:MACAW_SDK_HOME\tools\macaw-publish-tools\bin. It is python script and can be executed using the python interpreter.
- macaw publish tool relies on a configuration file called “macawpublish.globals“. The tool looks for this file under multiple locations with below preference.
- If an environment variable, MACAW_MDR_GLOBALS_FILE is set and pointing to a file, it is used.
- Else, it looks for “macawpublish.globals” in the user home directory which is typically C:\Users\<userid>.
- Else, it uses the default file which is shipped with the macaw SDK. Note that the default file doesnt provide any default configuration, other than the documentation.
- Assuming that the complete setup of MDR/Docker Pair as part of the installation, follow the below instructions.
- Download/Create the “macawpublish.globals” from the platform VM Instance to the HOME directory C:\Users\<userid>.
- On the platform VM, find the “macawpublish.globals” at the location
/opt/macaw-config/macaw-tools/macawpublish.globals
- On the platform VM, find the “macawpublish.globals” at the location
- Once copied the “macawpublish.globals”, verify the connectivity to MDR/Docker Pair, using the below command.
cd $ENV:MACAW_SDK_HOME\tools\macaw-publish-tools\bin

python macawpublish verify
With this the PC/Laptop setup is finished for development environment. Refer to the below sections on how develop, publish and deploy microservices . To test the end to end environment, follow the next section which lists steps on compiling SDK bundled example services, publishing and deploying them.
Macaw Tool Documentation for Publishing Blueprints and Docker Images
Testing the End to End Environment Using Example Services in the SDK
Compiling
- Open a Power Shell Window with Admin permissions.
- Go to the below directory which has the example services bundled. Calculator service is used for this documentation purpose. Repeat the similar steps for other example services as well.
cd $ENV:MACAW_SDK_HOME\quickstarts
cd calculator\api
ant clean deploy
cd ..\impl\
ant clean deploy
Generating Blueprint and Publishing
Now generate a blueprint for calculator service and publish to MDR. The blueprint publishing doesn’t have to repeated unless there is a change in the blueprint. Likely it would be a 1 time publish, but for any changes, re-publish is necessary.
PS C:\macaw-sdk\quickstarts\calculator\impl> cd $ENV:MACAW_SDK_HOME\tools\macaw-publish-tools\bin
PS C:\macaw-sdk\tools\macaw-publish-tools\bin>
PS C:\macaw-sdk\tools\macaw-publish-tools\bin> python macawpublish create $ENV:MACAW_SDK_HOME\quickstarts\calculator

2017-01-24 15:36:40,957 [macawpublish] INFO - MACAW_SERVICES_HOME is pointing to: C:\macaw-sdk\quickstarts
2017-01-24 15:36:40,957 [macawpublish] INFO - Service Definitions: ['C:\\macaw-sdk\\quickstarts\\calculator']
2017-01-24 15:36:40,957 [macawpublish] INFO - START: processing service definition - calculator

Blueprint create successfully and stored at: C:\macaw-sdk\tools\macaw-publish-tools\bin\..\service-blueprints\macaw-service-bp-da777d9e-9d8d-5ef5-a9c7-e58d3ebe875f.json

Blueprint can be uploaded to MDR using macawpublish blueprint <Blueprint File>


PS C:\macaw-sdk\tools\macaw-publish-tools\bin> python macawpublish blueprint macaw-service-bp-da777d9e-9d8d-5ef5-a9c7-e58d3ebe875f.json

2017-01-24 15:37:05,144 [macawpublish] INFO - MACAW_SERVICES_HOME is pointing to: C:\macaw-sdk\quickstarts
2017-01-24 15:37:05,878 [macawpublish] INFO - Published to MDR successfully. Tag: latest, Artifact: da777d9e-9d8d-5ef5-a9c7-e58d3ebe875f, Repo: dev
2017-01-24 15:37:05,878 [macawpublish] INFO - Blueprint macaw-service-bp-da777d9e-9d8d-5ef5-a9c7-e58d3ebe875f.json published successfully.

PS C:\macaw-sdk\tools\macaw-publish-tools\bin>
Publishing Docker Image and Meta Data
Now publish the docker image and meta data for the calculator service. This is a step that will be repeated multiple times in service development.
PS C:\macaw-sdk\tools\macaw-publish-tools\bin> python .\macawpublish service --tag calc-demo $ENV:MACAW_SDK_HOME\quickstarts\calculator

2017-01-24 15:48:46,338 [macawpublish] INFO - MACAW_SERVICES_HOME is pointing to: C:\macaw-sdk\quickstarts
2017-01-24 15:48:47,200 [macawpublish] WARNING - Tag definition already exists in MDR
2017-01-24 15:48:47,200 [macawpublish] INFO - Service Definitions: ['C:\\macaw-sdk\\quickstarts\\calculator']
2017-01-24 15:48:47,200 [macawpublish] INFO - START: processing service definition - calculator
2017-01-24 15:48:47,200 [macawpublish] INFO - Service docker build directory: C:\macaw-sdk\quickstarts\calculator\impl\dist
2017-01-24 15:48:47,230 [macawpublish] INFO - Remote Build Server (ec2-35-154-114-253.ap-south-1.compute.amazonaws.com) defined. Enabling Remote docker build.
2017-01-24 15:48:47,246 [macawpublish] INFO - Creating (takes couple of seconds to few mins) compressed archive of the docker build artifacts: C:\macaw-sdk\quic
kstarts\calculator\impl\dist\calculator-v1.0.0_dockerbuild_artifacts.tar.gz
2017-01-24 15:48:50,964 [macawpublish] INFO - Launched SSH session to Remote Build Server: ec2-35-154-114-253.ap-south-1.compute.amazonaws.com
Login Succeeded
2017-01-24 15:48:52,198 [macawpublish] INFO - Uploading (takes couple of seconds to few mins) file C:\macaw-sdk\quickstarts\calculator\impl\dist\calculator-v1.0.0_dockerbuild_artifacts.tar.gz via sftp to /tmp/1485301732199_calculator-v1.0.0_dockerbuild_artifacts.tar.gz
2017-01-24 15:50:07,555 [macawpublish] INFO - File uploaded successfully: C:\macaw-sdk\quickstarts\calculator\impl\dist\calculator-v1.0.0_dockerbuild_artifacts.tar.gz
Sending build context to Docker daemon 22.91 MB
Step 1/5 : FROM centos:centos7
 ---> 67591570dd29
Step 2/5 : MAINTAINER macaw.io
 ---> Using cache
 ---> dbd9d2c445fc
Step 3/5 : RUN ln -s /opt/java/bin/java /usr/bin/java && mkdir -p /opt/macaw/calculator
 ---> Using cache
 ---> 75db0a690a56
Step 4/5 : ADD calculator-impl.tar.gz /opt/macaw/calculator
 ---> Using cache
 ---> ca0b464f00cb
Step 5/5 : CMD /opt/macaw/calculator/bin/startup.sh
 ---> Using cache
 ---> 62815e89e505
Successfully built 62815e89e505
2017-01-24 15:50:09,430 [macawpublish] INFO - Docker build successful. Now removing artifact tar.gz file.
2017-01-24 15:50:12,461 [macawpublish] INFO - Docker tagging successful. Now publishing...
The push refers to a repository [172.31.27.188:5000/calculator-v1.0.0]
1cfcbdaa5360: Layer already exists
ce2805f96555: Layer already exists
34e7b85d83e4: Layer already exists
calc-demo: digest: sha256:ae641155533daf96f0a4e56e44b4a03b697e162eb34aa293780a88ca8ed13f3c size: 948
2017-01-24 15:50:13,977 [macawpublish] INFO - Docker Publishing Successful
2017-01-24 15:50:13,993 [macawpublish] INFO - Generating service meta data for publishing to MDR
2017-01-24 15:50:14,007 [macawpublish] INFO - macaw service-info.xml file: C:\macaw-sdk\quickstarts\calculator\impl\src\main\resources\conf\service-info.xml
2017-01-24 15:50:15,055 [macawpublish] INFO - Published to MDR successfully. Tag: calc-demo, Artifact: calculator-v1.0.0, Repo: dev
2017-01-24 15:50:15,055 [macawpublish] INFO - SUCCESS: processed service definition - calculator


Service Repository Status Errors (if any)
------- ----------- ------- ---------------
calculator calculator-v1.0.0:calc-demo success

PS C:\macaw-sdk\tools\macaw-publish-tools\bin>
Login to Macaw Console and Deploy the Calculator Service
- Open the browser and go to https://<your Platform IP or FQDN>
- Login using the credentials. Default credentials are “admin@www.macaw.io” and “admin”
- Browse to the catalogue section and select “onprem MDR/Docker”.
- Locate the blueprint for the calculator service uploaded and click on deploy.
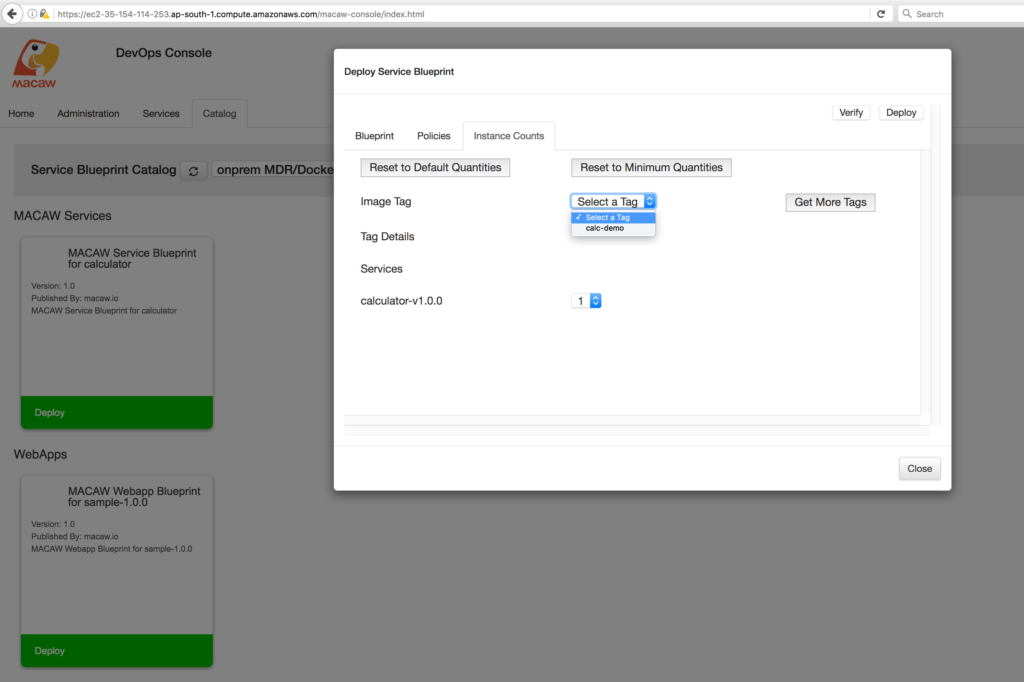
Accessing the Service API
- Go to the Services Section and click on the refresh icon, calculator service as deployed.
- Click on the calculator service and it would reflect the screen below.
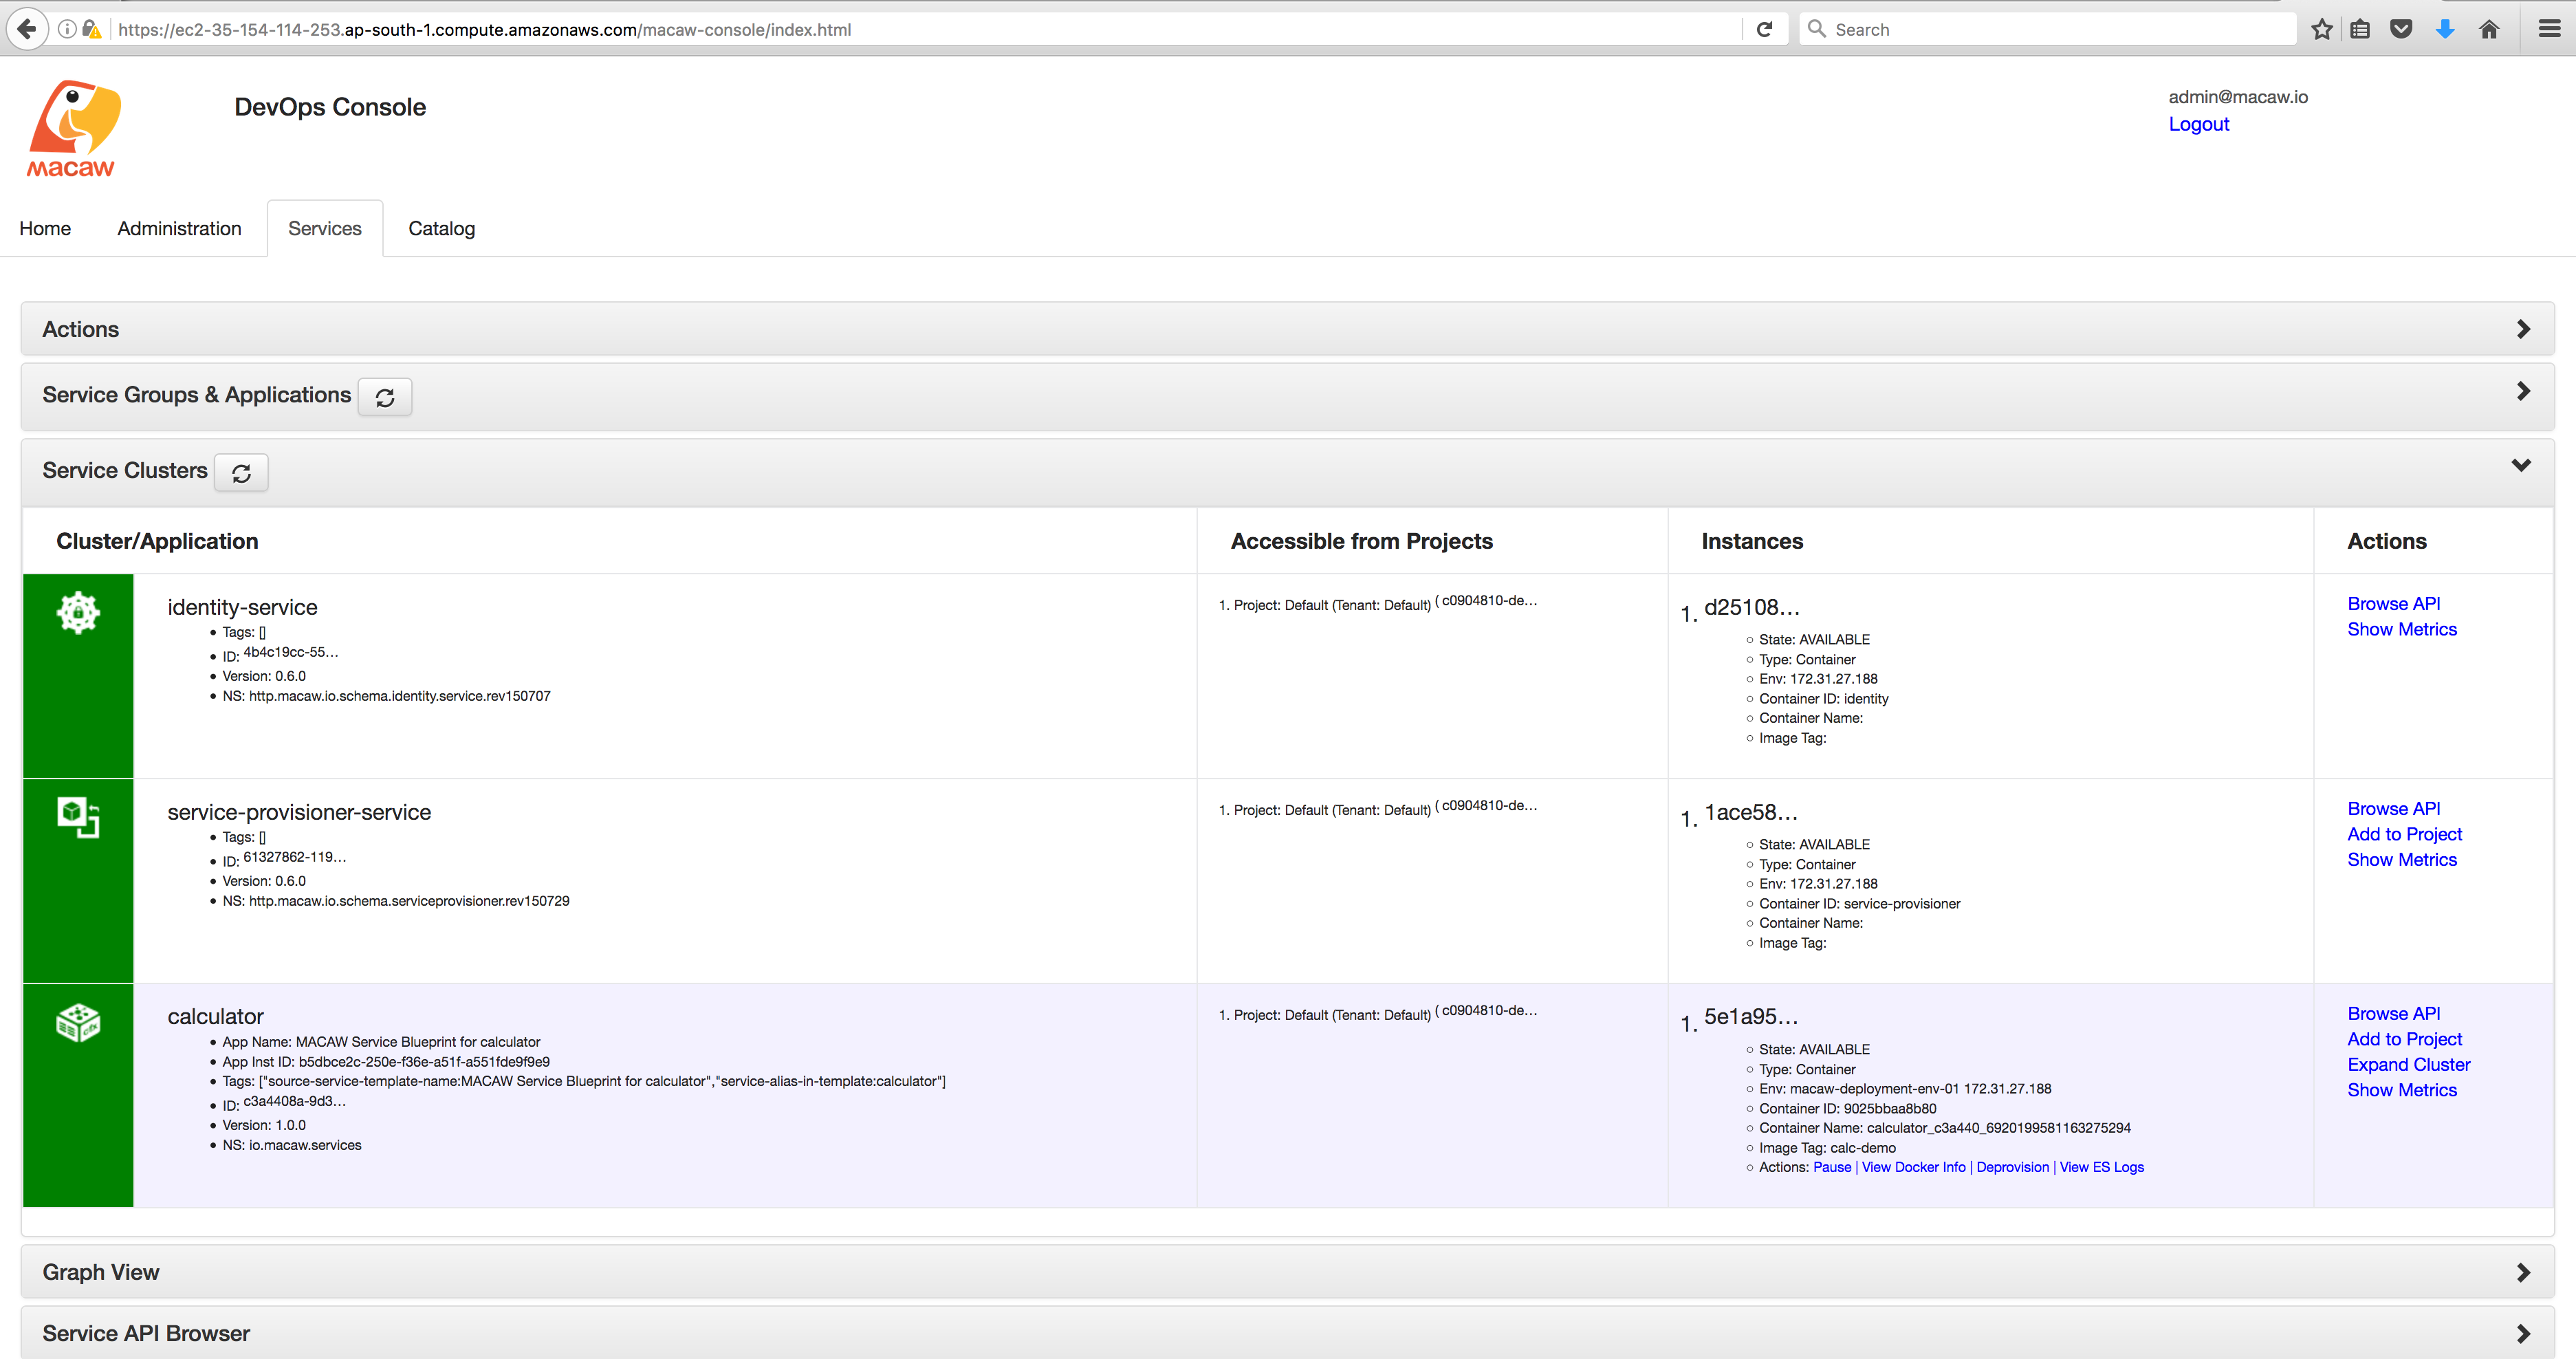
- Click on the Browse API and see below the API Browser, where requests can be sent to the service and see the response.
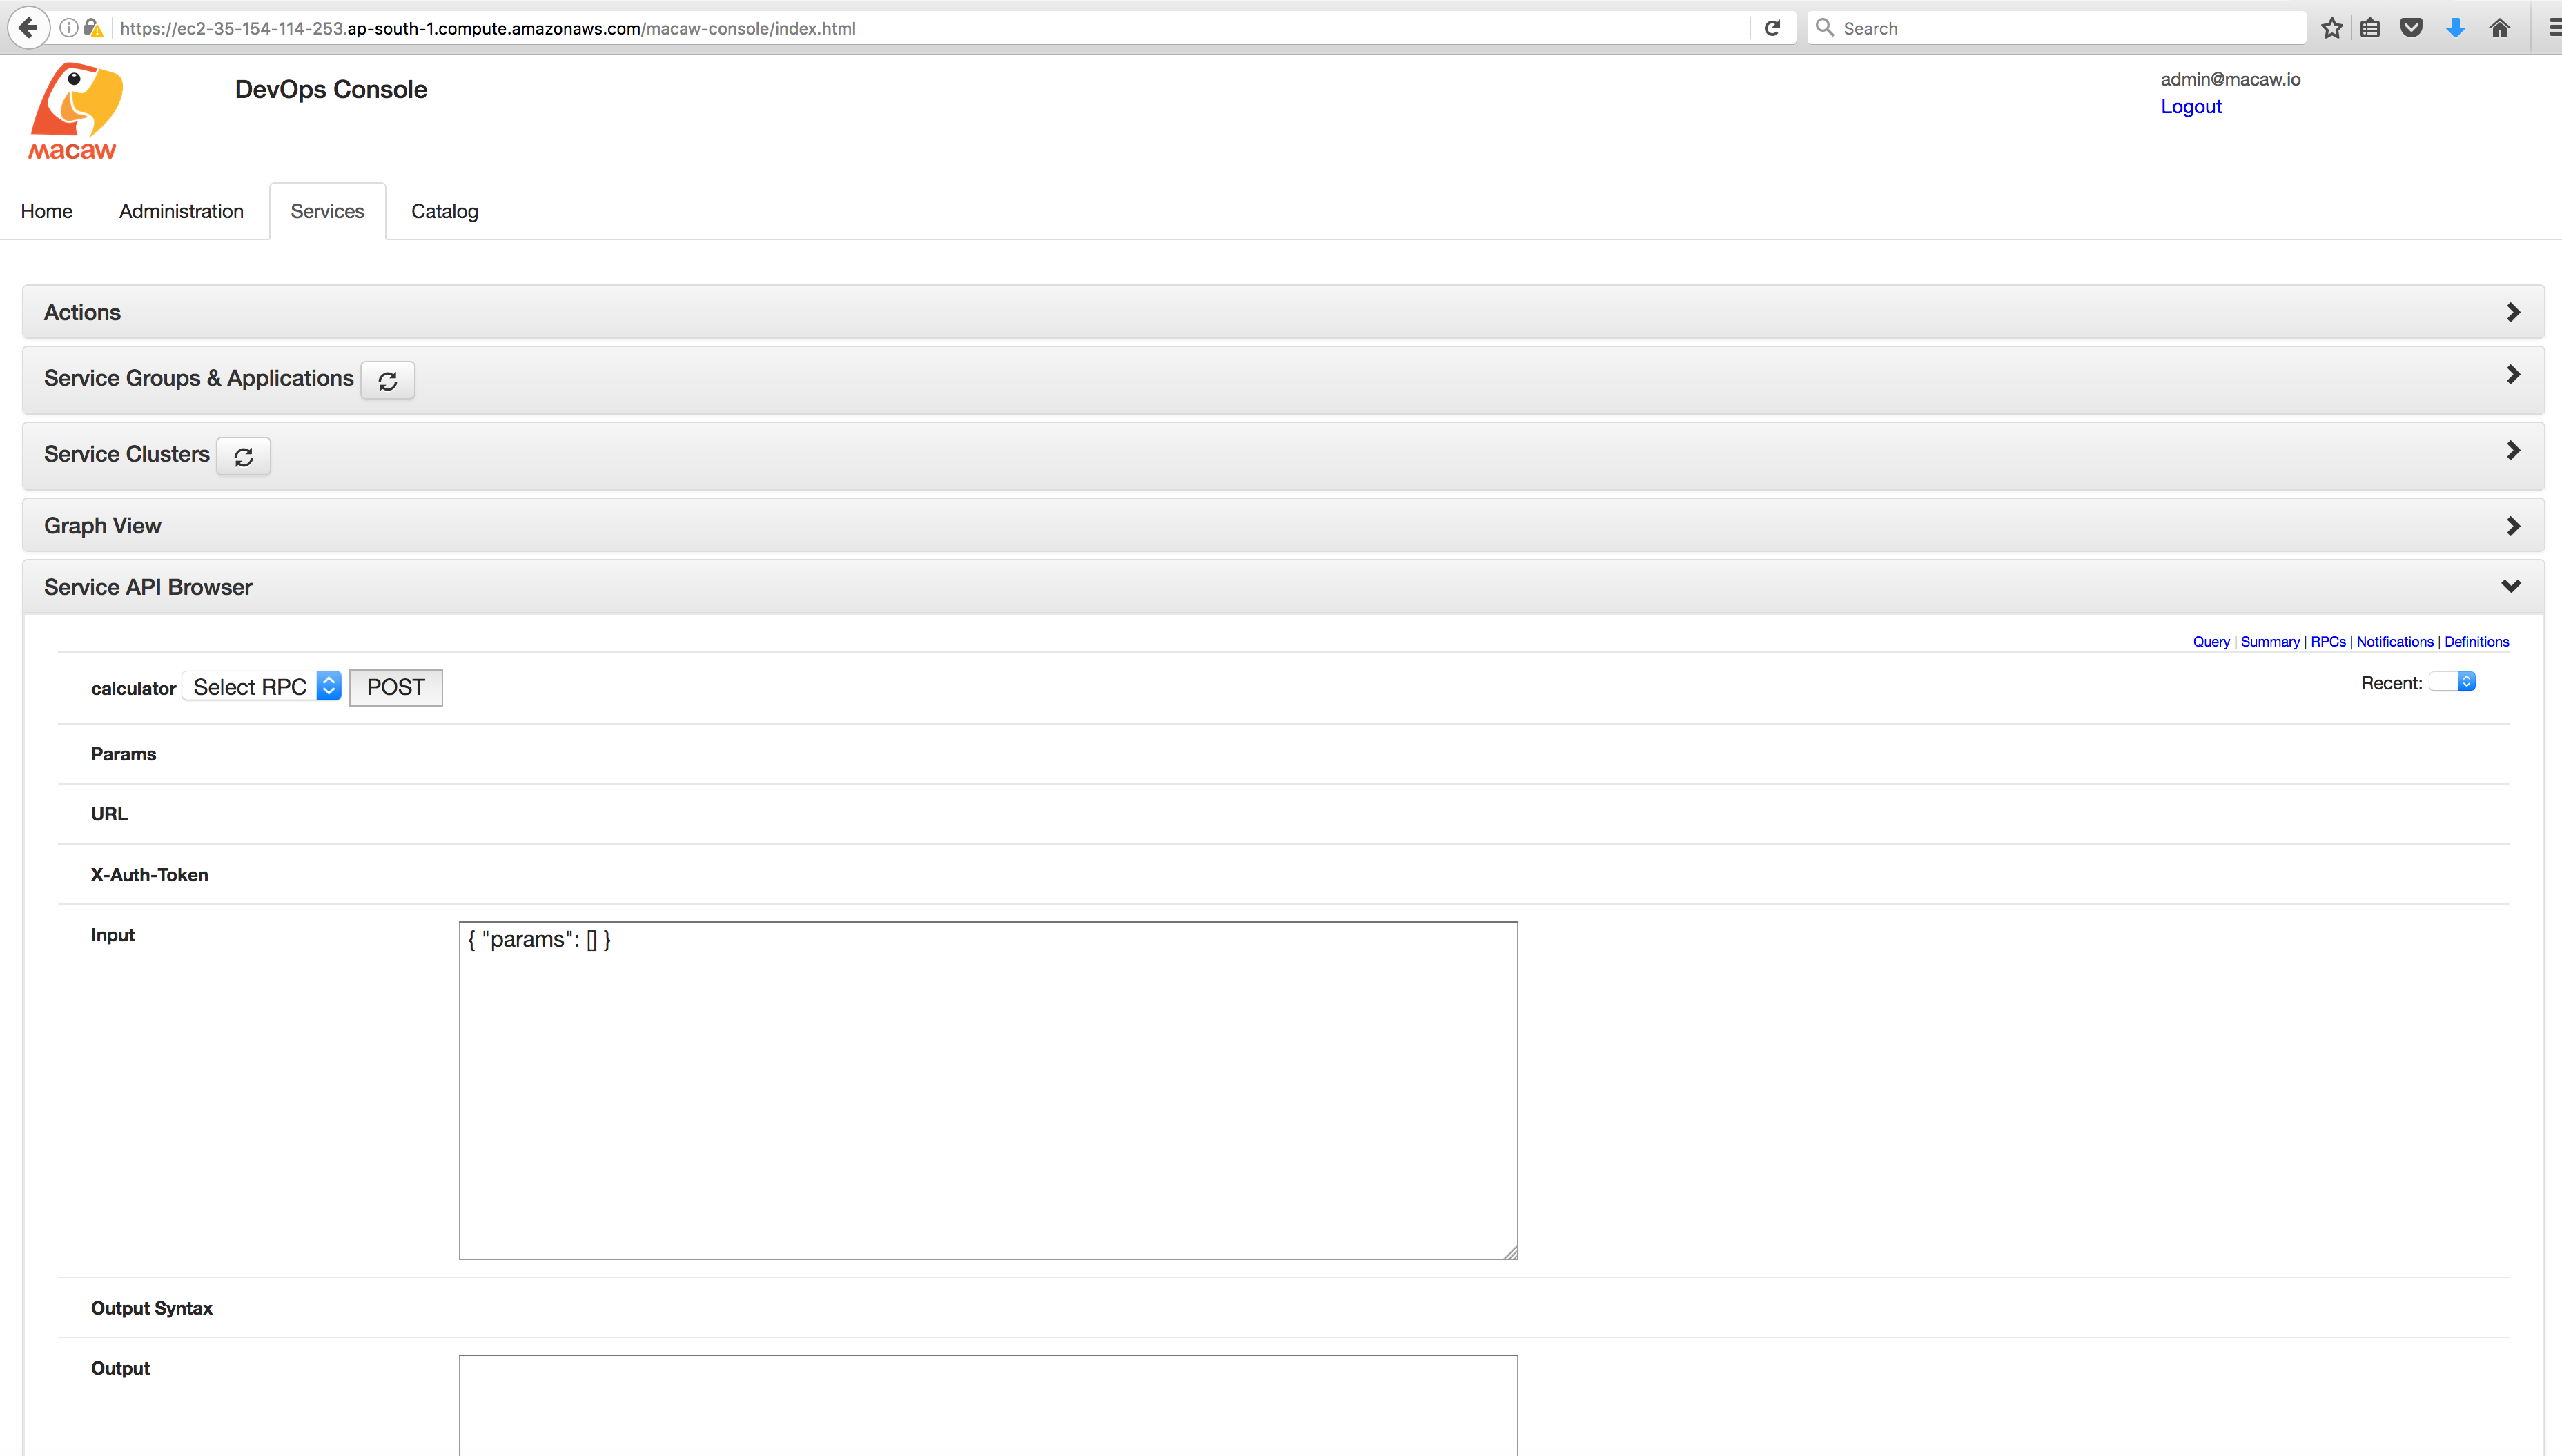
- Select an RPC method from the “Select RPC” drop down box.
- Issue the input that is expected by the calculator service and hit “POST”
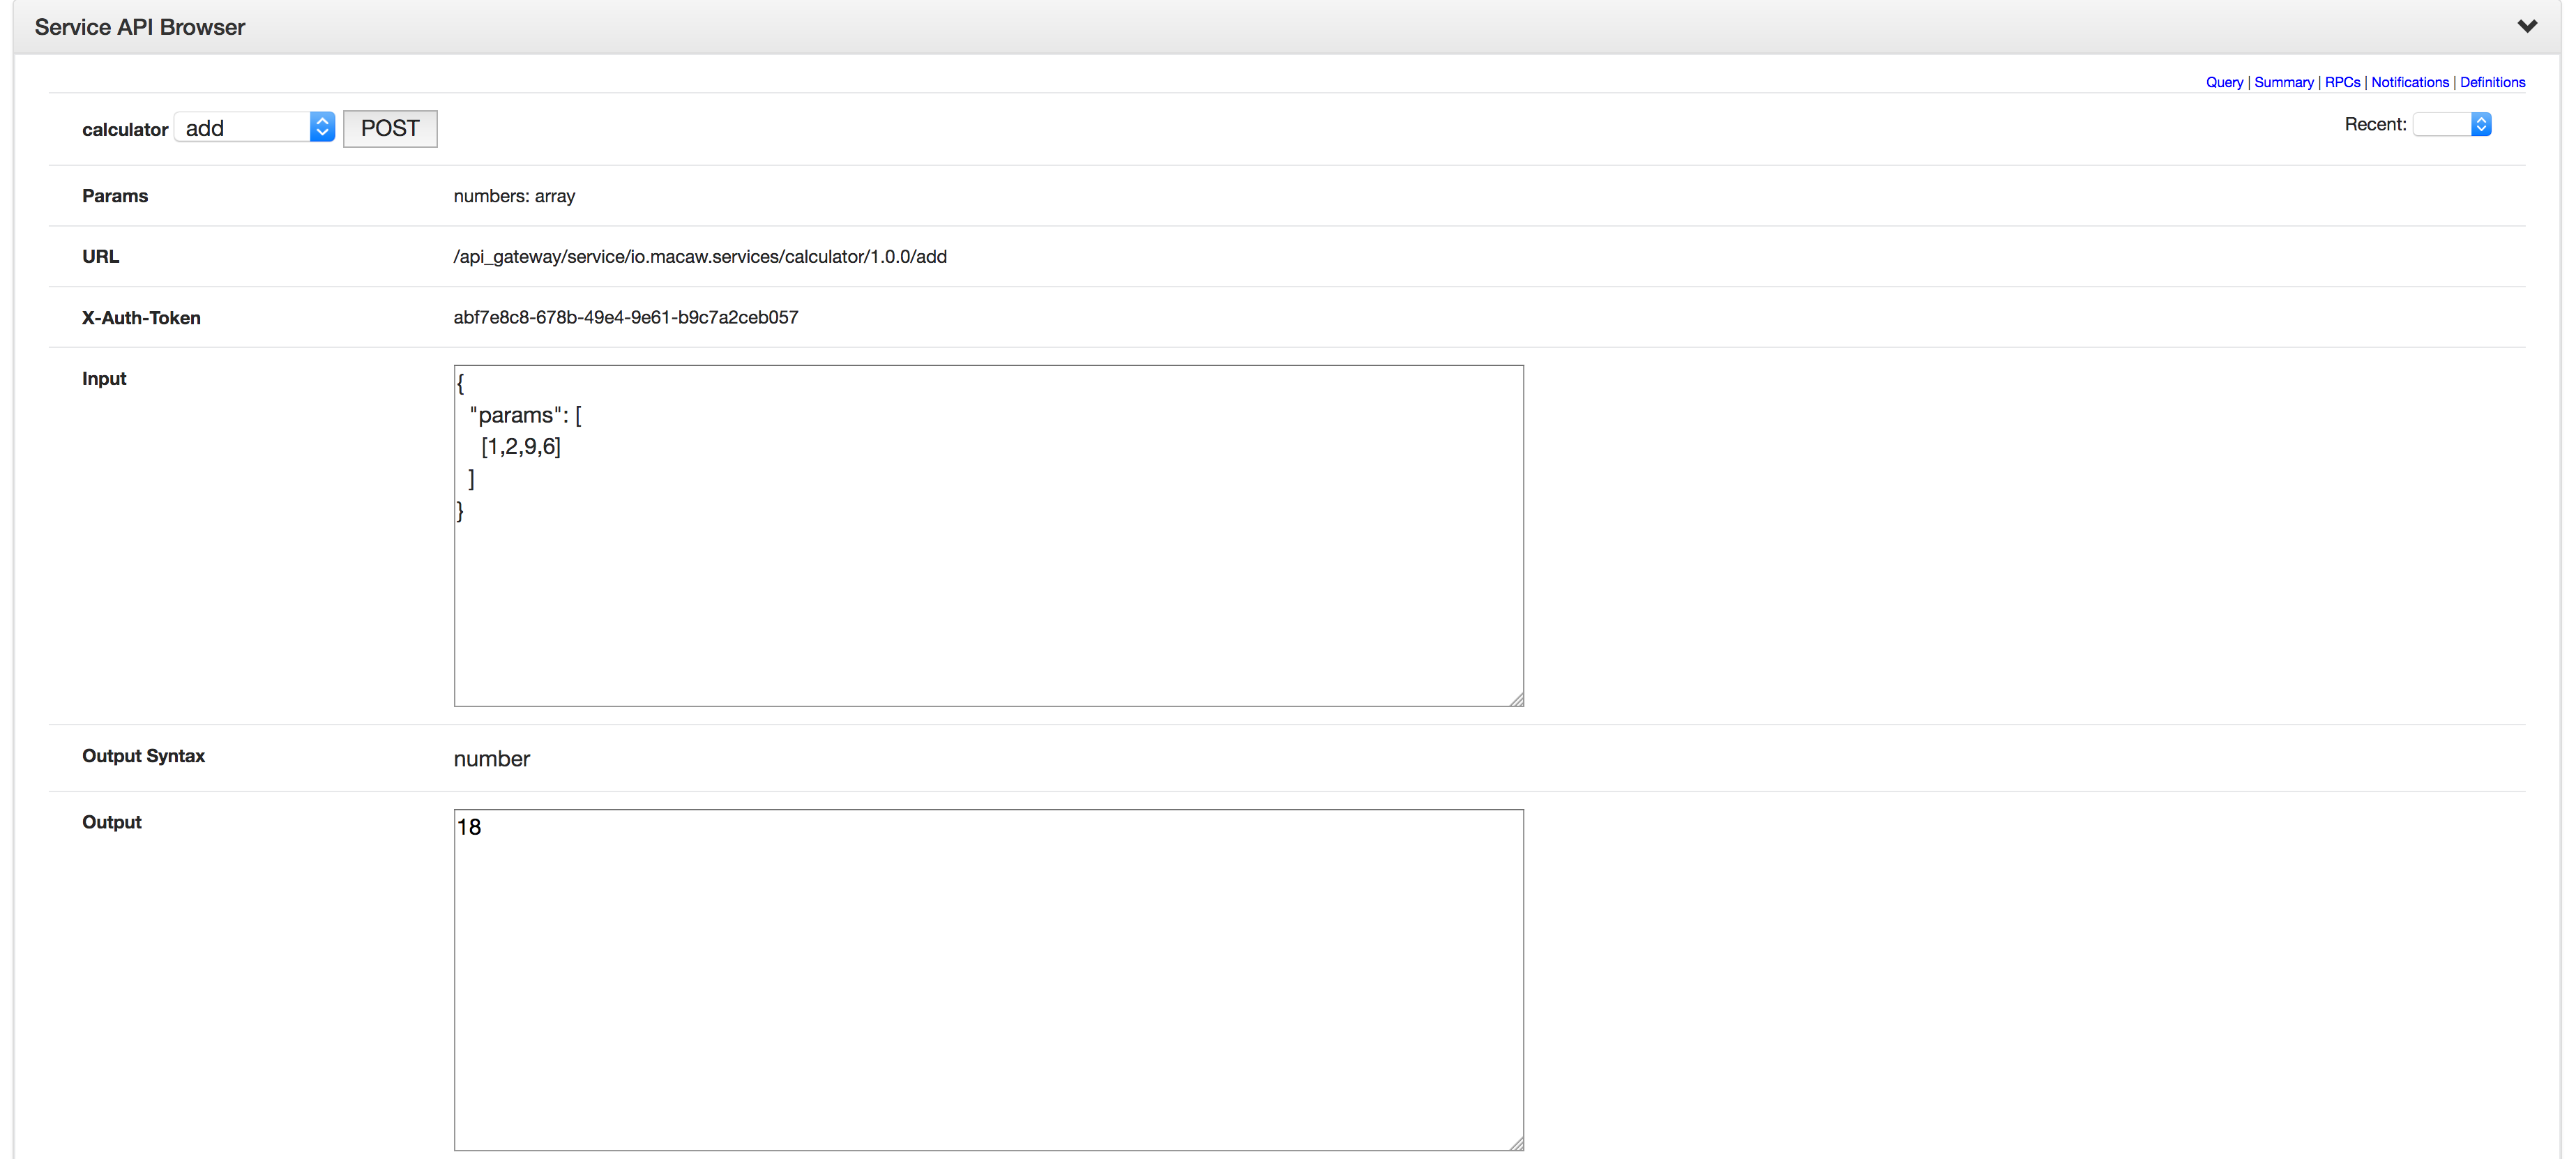
- With this, Microservices powered by Macaw Platform end to end have been successfully compiled, published, deployed and tested.
Eclipse Environment
Macaw Eclipse Toolkit
Download and install Eclipse Minimum System Requirements:
- Macaw SDK 0.9.4 or later
- Eclipse Luna. You may choose to download the latest Eclipse installer from https://www.eclipse.org/downloads/
Download software archive for ‘Macaw Eclipse Toolkit’
Install ‘Macaw Eclipse Toolkit’ software in Eclipse
In your Eclipse workbench, click on Help -> Install New Software… . In the ‘Available Software’ dialog, click on Work with: -> Add… . Provide a name for the software and click on ‘Archive…’ to select the downloaded Macaw Eclipse Toolkit software archive.

Select the ‘Macaw Eclipse Toolkit’ software and press the ‘Next’ button on the dialog. Press the ‘Next’ button on the ‘Install Details’ page. Accept the license on the ‘Review Licenses’ page and press ‘Finish’. 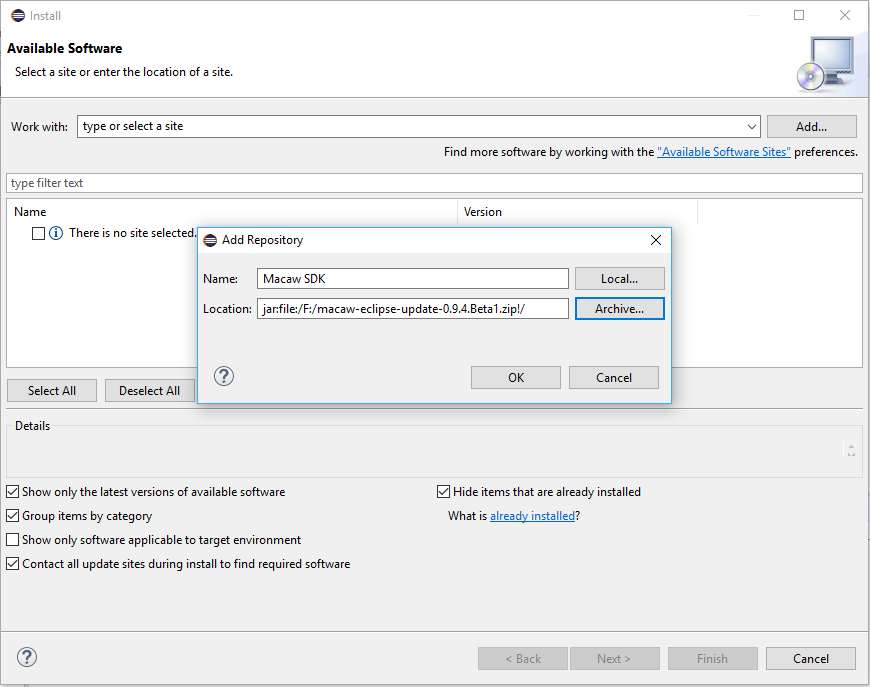
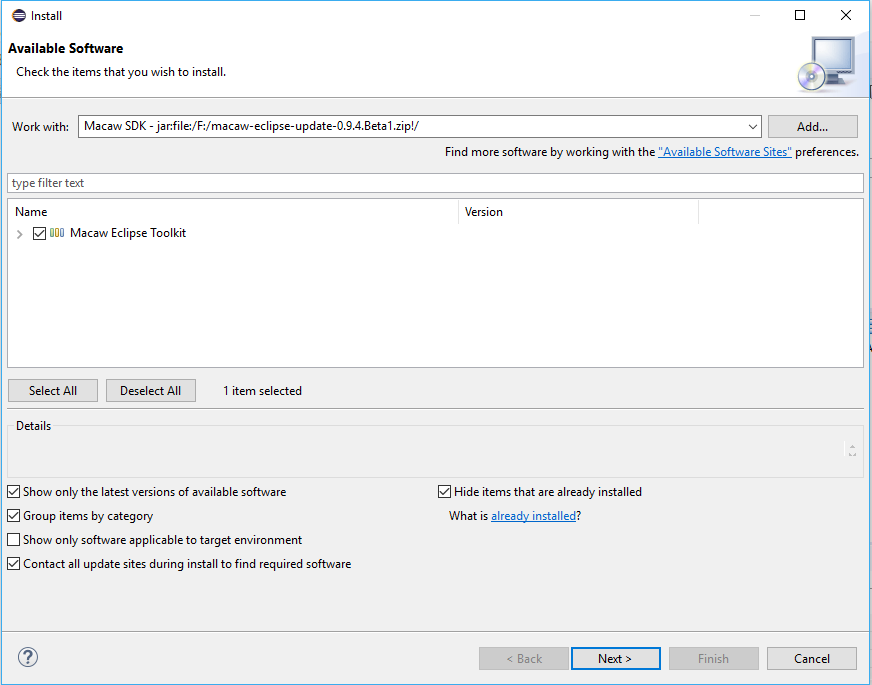
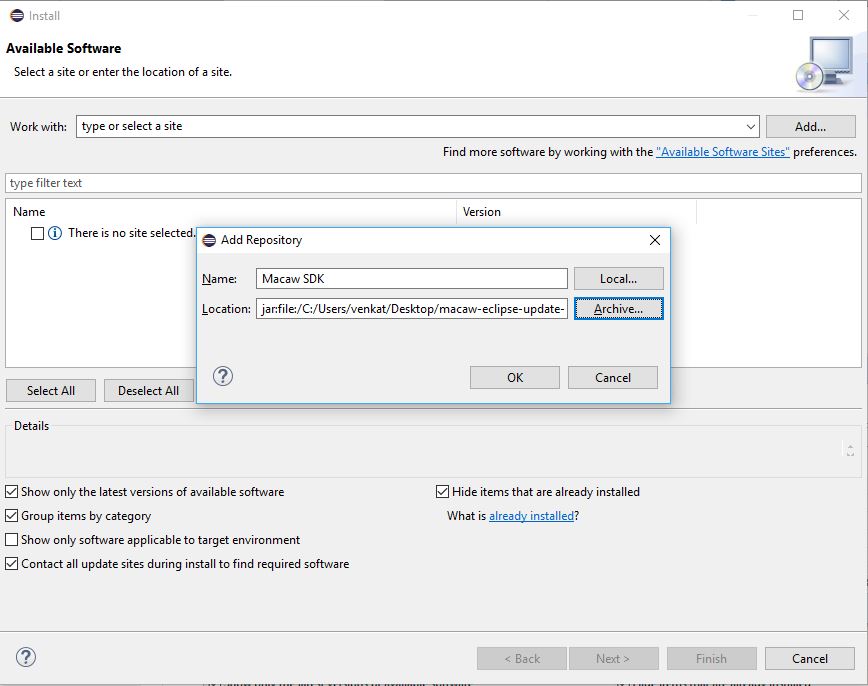
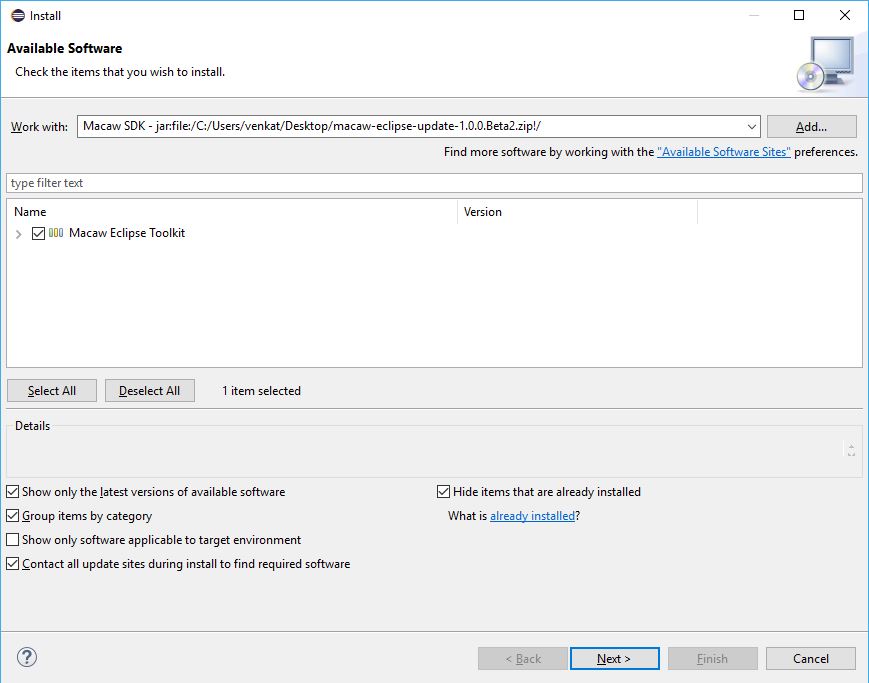
- Accept the license on the ‘Review Licenses’ page and press ‘Finish’.
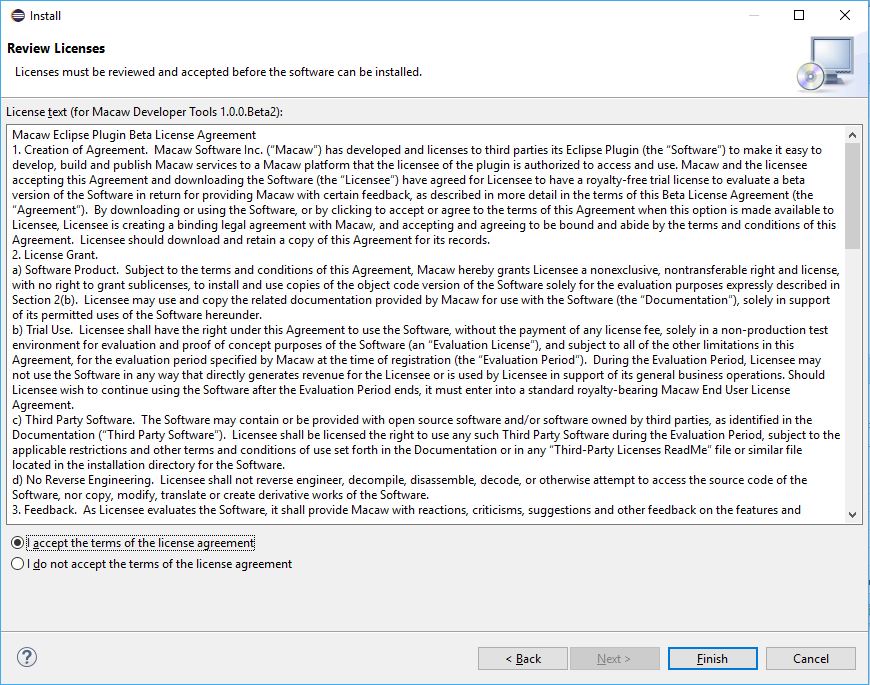
You will be prompted to trust the software being installed.
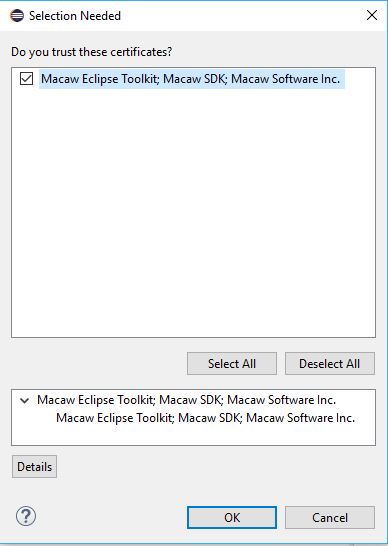
Select the certificate; marking the software as trusted; and press the ‘Ok’ button.
After the software is installed, you will be prompted to restart your Eclipse. Press the ‘Yes’ button.
This completes installation of the software.
Configure Macaw Eclipse Toolkit
Select Window -> Preferences -> Macaw.
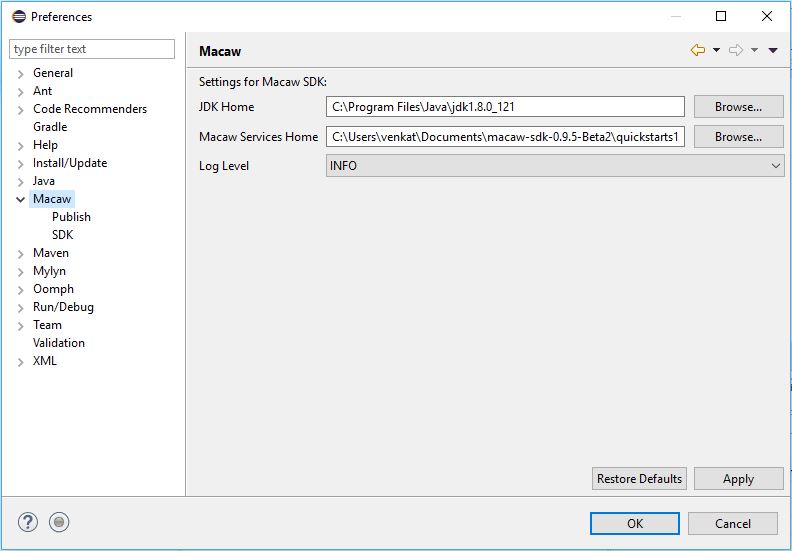
Select the Java installation directory for ‘JDK Home’. For ‘Macaw Services Home’, select a location where you want the Macaw microservice project artifacts to be generated. Press ‘Apply’ and ‘OK’.
The next step is to configure the toolkit to work with an existing Macaw SDK installation. Select ‘SDK’ preference link under ‘Macaw’ and press ‘Add’ to provide a name and location of the Macaw SDK. The SDK setting will be used to generate Macaw microservices.
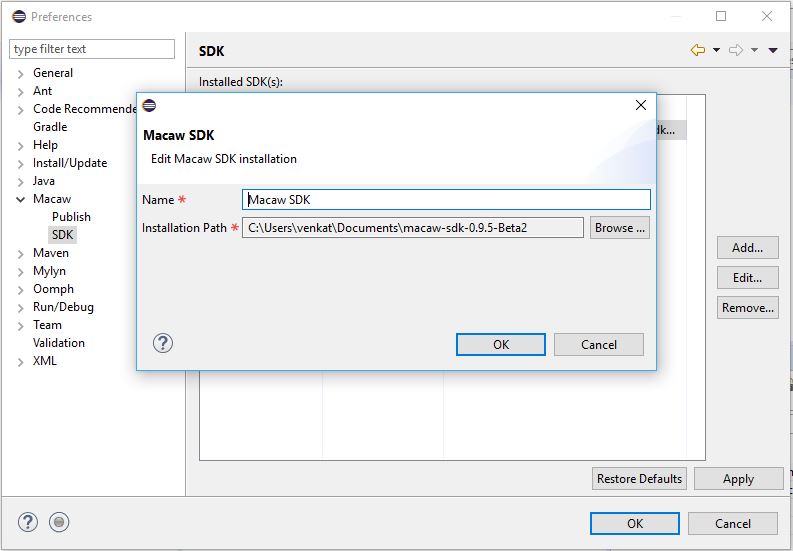
You may add different Macaw SDKs. However you need to select one as the default.
After specifying SDK(s), you need to provide repository details where Macaw microservices can be published. Select ‘Publish’ preference link under ‘Macaw’ and press ‘Add’ to provide repository details.

Provide an alias for the repository.
The repository dialog has three tabs namely – MDR, Docker and Build Server.
The ‘MDR’ tab is used to provide the details of the Macaw MDR (Meta Data Repository).
The ‘Docker’ tab is used to provide the details of the Docker repository.
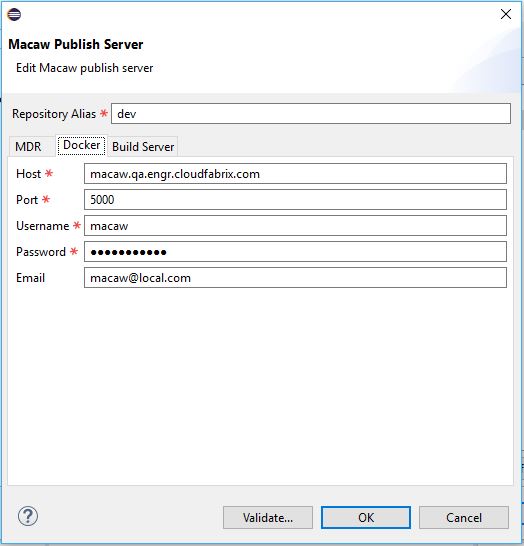
If you do not have docker client installed on your local machine, you can use a Macaw platform instance as remote docker build server. The ‘Build Server’ tab enables you to do that.
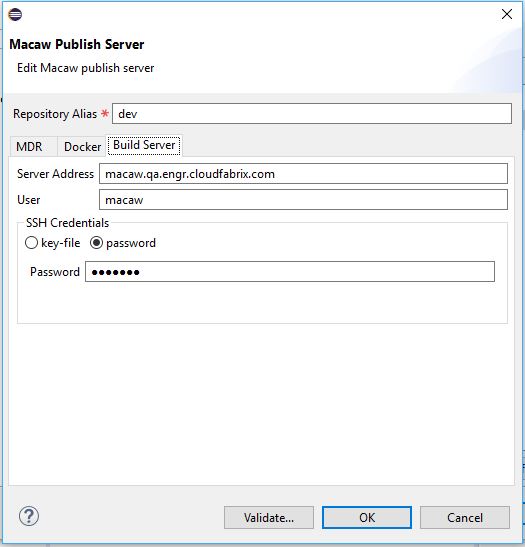
Repository Validation
Click on Validate it should success.

Thats it! You are all set to create and publish Macaw microservices.
Create a Service Descriptor
Before we start creating a service descriptor, lets open the ‘Macaw’ Eclipse perspective that prepares your workbench for Macaw project development. Click on the open perspective icon and select ‘Macaw’.
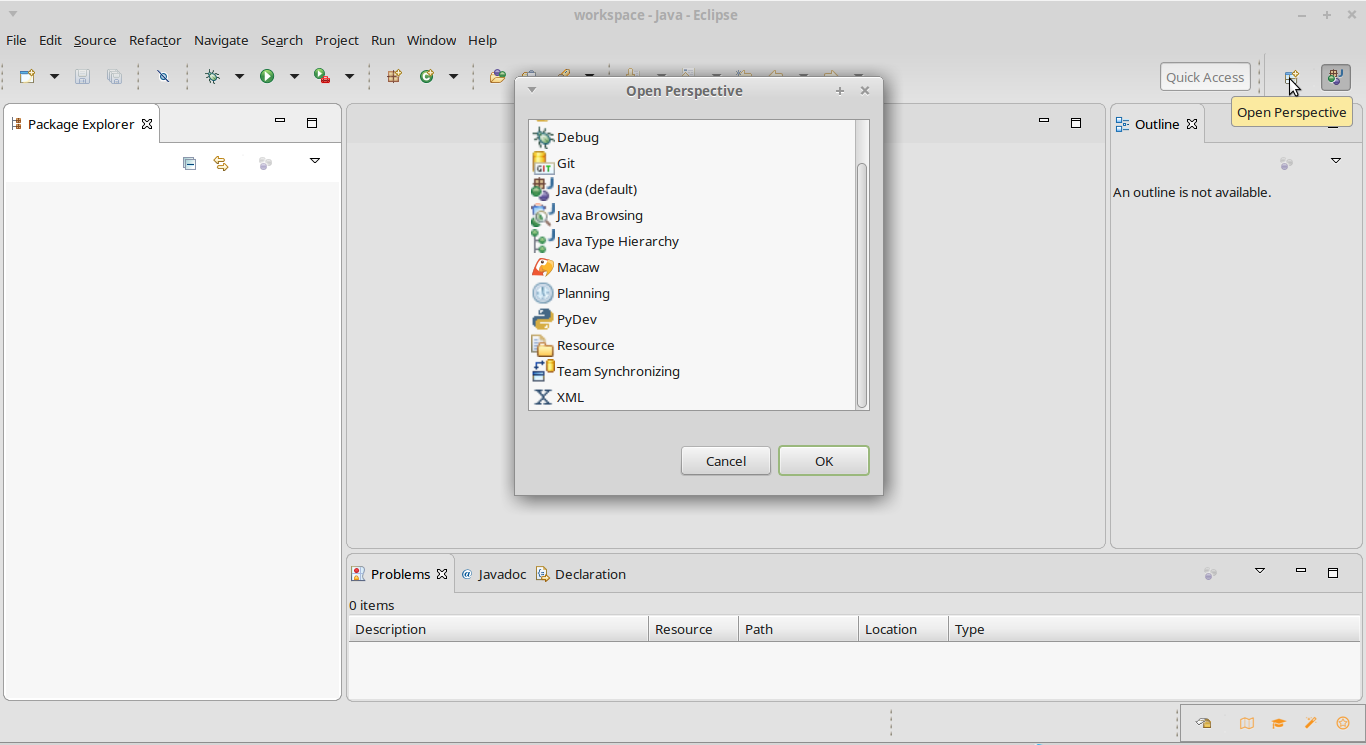
The first step to genarating a microservice project is to create a service definition for the microservice.
The service definition defines the RPCs of the service and the domain entities that the RPCs use.
From the Macaw perspective, navigate to New -> Other… to open the new wizard selection. Select ‘Service Descriptor’ under ‘Macaw’.
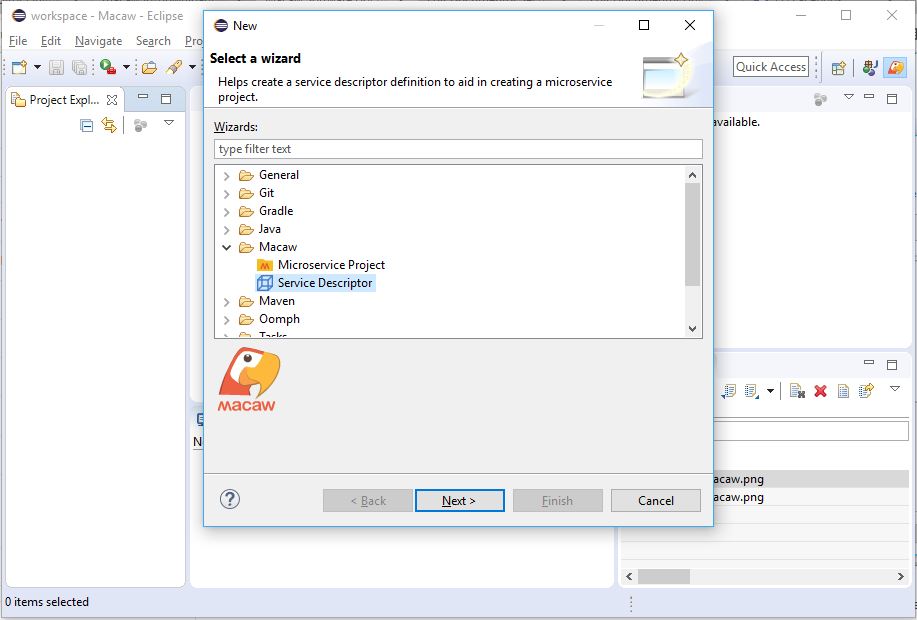
The next page allows you to create an empty service descriptor with placeholder. Alternately, you may choose from one of the available templates.
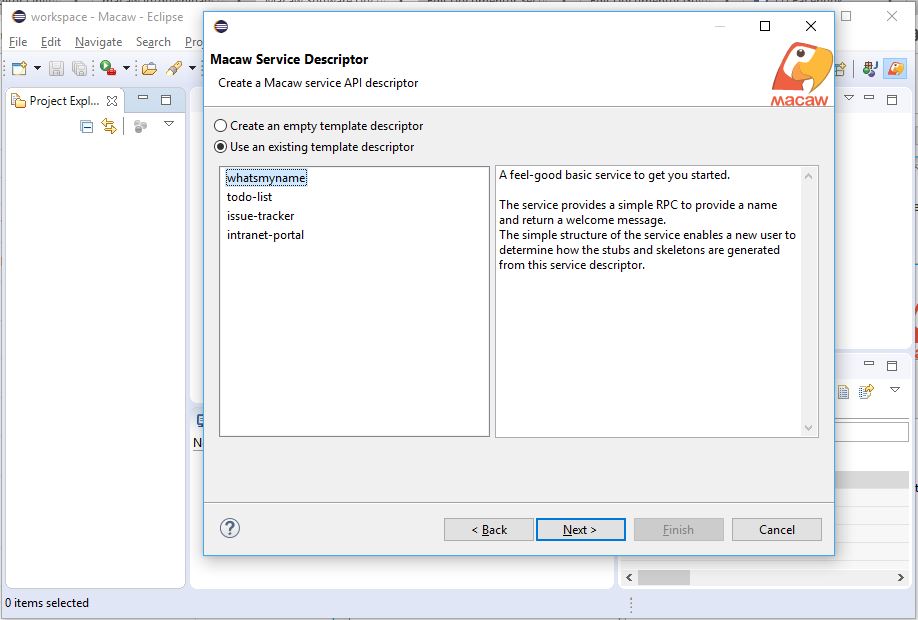
After making your selection, press ‘Next’ button. Provide details of the service module on this page.
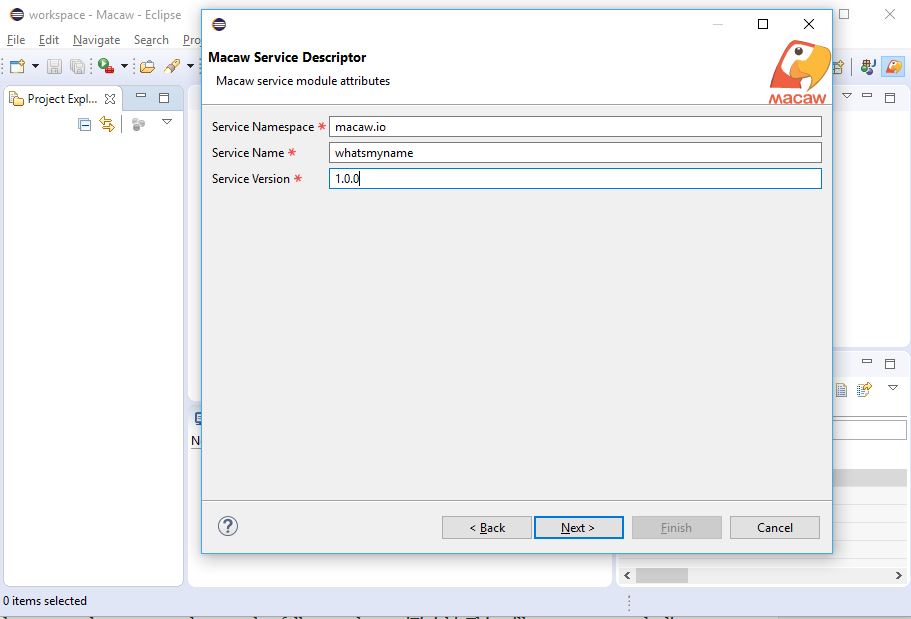
Service Namespace: The namespace within which the service components like RPCs and domain entities reside.
Service Name: A unique name for the service.
Service Version: Version of the service in the form of 1.0.0
Review the generated contents on the page that follows and press ‘Finish’. This will open an unsaved editor.
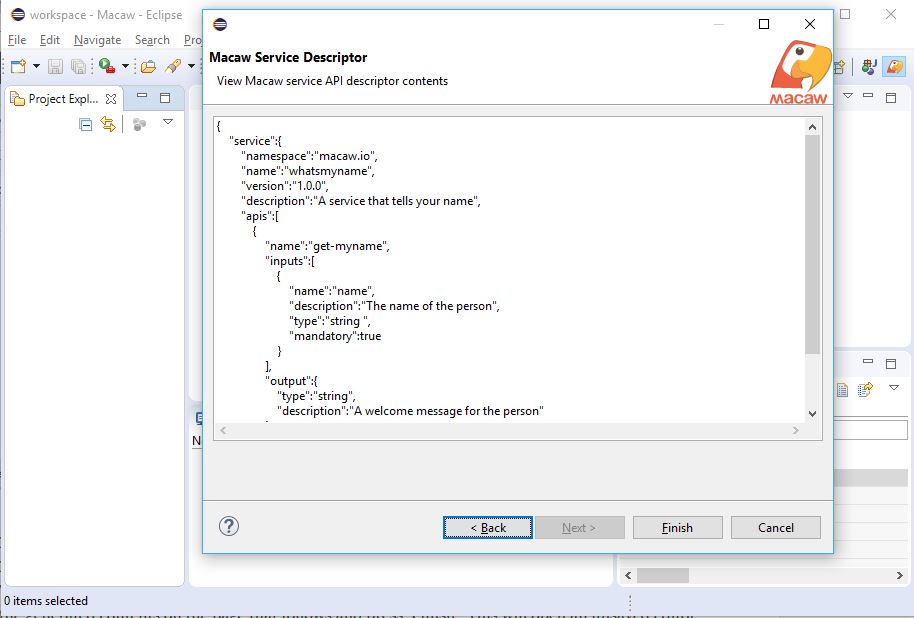
Add or update the contents of the generated service descriptor. Please keep in mind that this file needs to have a valid JSON content.
After editing the file, you need to save the contents of the file. When prompted to save, you may save the file anywhere on your file system.
Generate microservice project
Navigate to New -> Project… to open the project wizard selection. Select ‘Microservice Project’ under ‘Macaw’.
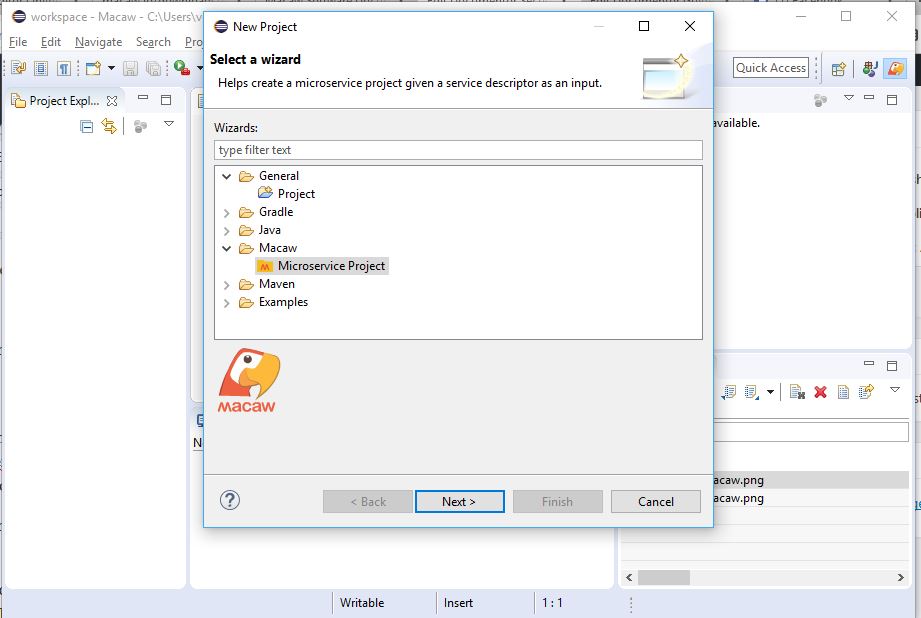
On the next page, select the required configuration for your microservice project.

Select the service desriptor file that you just created in the ‘Input File’. Select ‘Project Language’ to generate the microservice project in Java/Python. Select the build tool of your choice – Ant/Ivy/Maven. Choose the SDK using which you wish to generate the microservice artifacts.
On the next page, provide a name for the package for the generated artifacts and press ->Next–>Next->’Finish’.
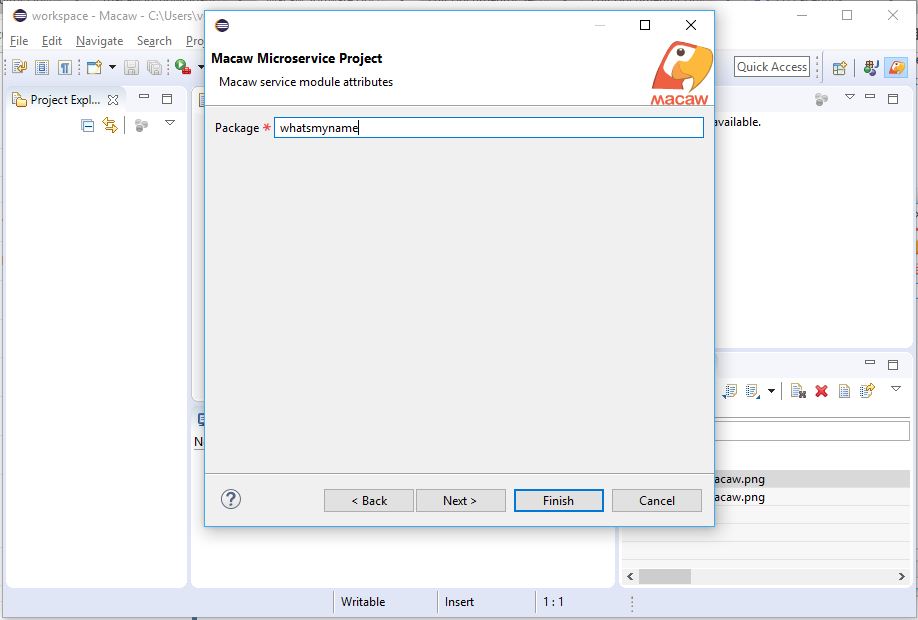
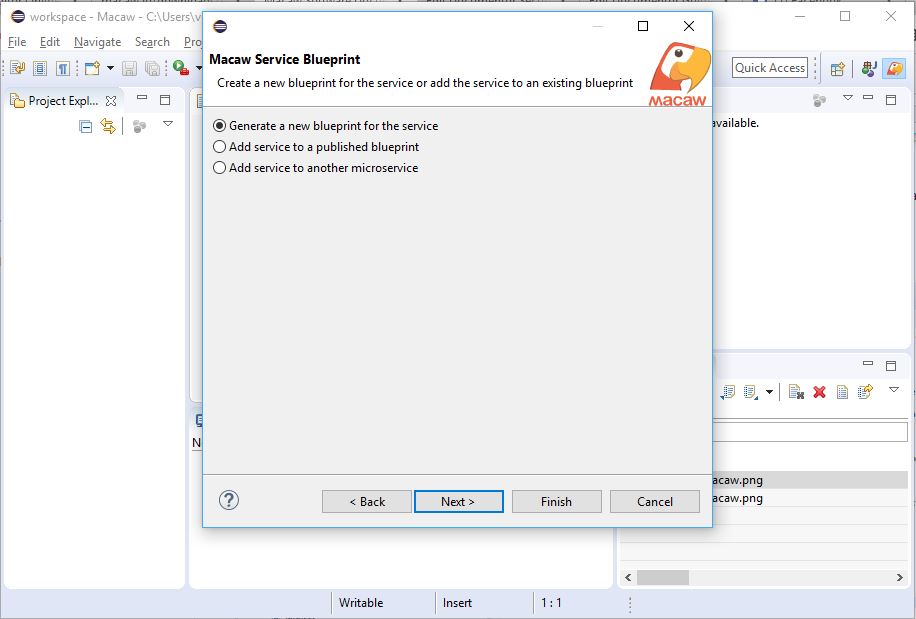
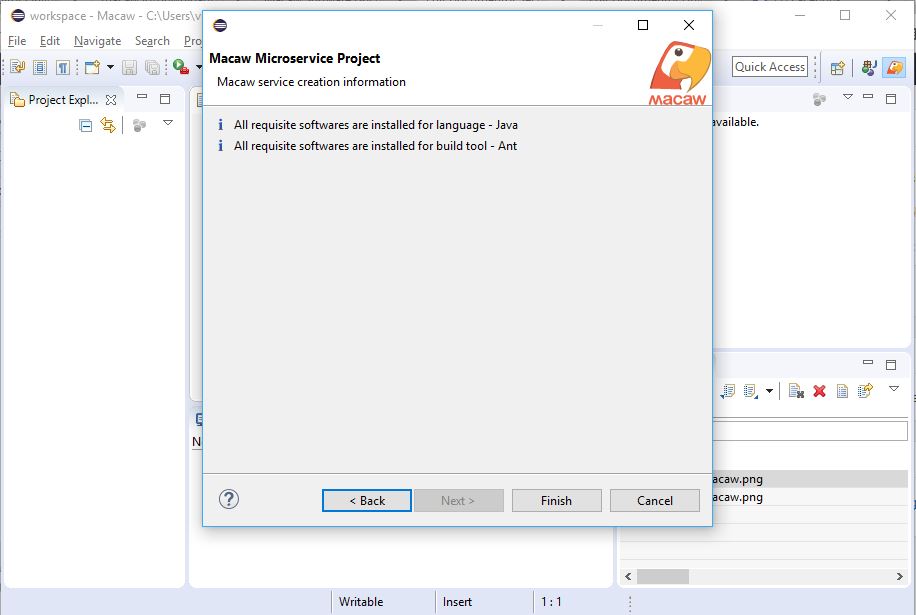
The Macaw microservice project is generated at the location that you specified in the preferences (Refer: Configure Macaw Eclipse Toolkit) and imported into your Eclipse workspace as a project.
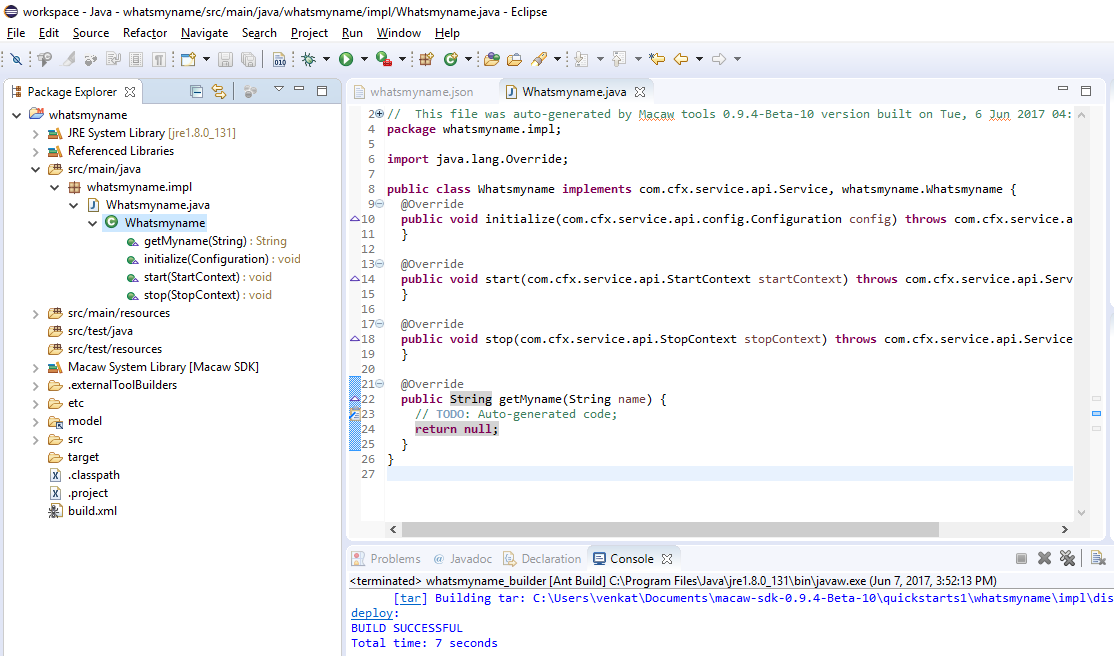
Update the generated service code.
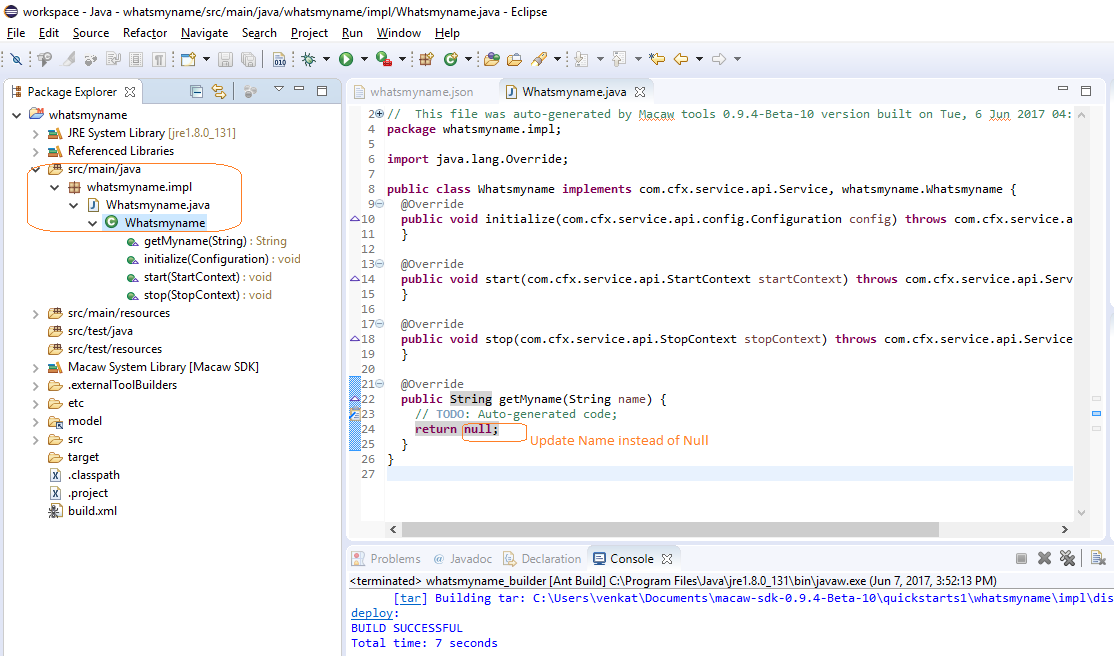
After putting in the necessary code to have the desired functionality, you need to build the project to generate a publishable artifact. To build the project, select ‘Project’ from the main menu and select ‘Build Project’
The status of the build process can be seen in the ‘Console’ view
Publish microservice project
After building the project, the next step is to publish the project to Macaw MDR and upload the built image to Docker repository. Right click on the project or on any child of the project and select Macaw -> Publish.
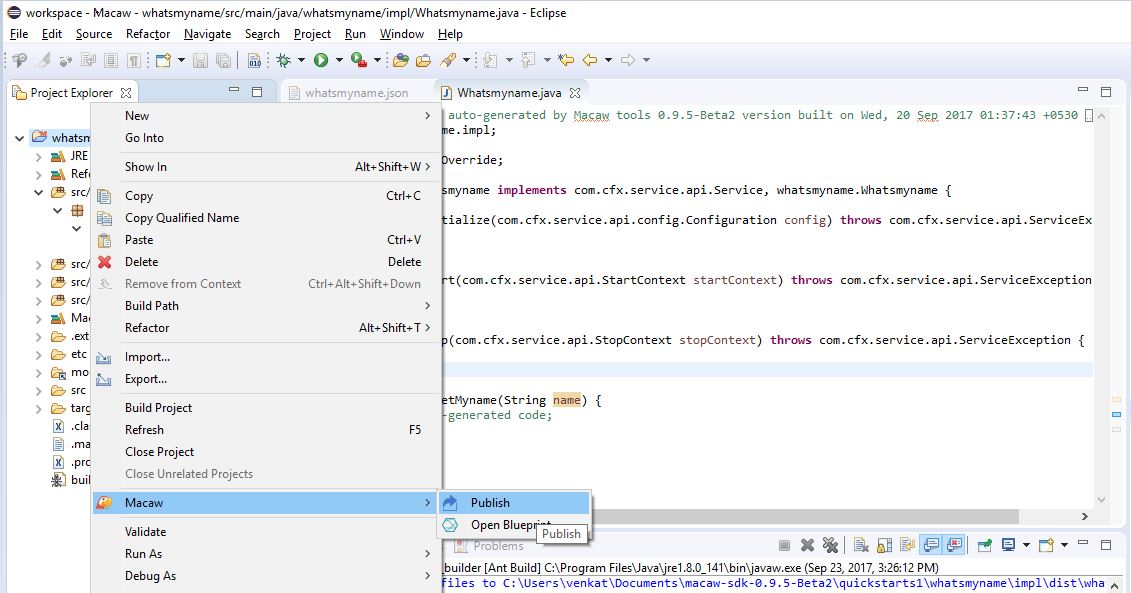
In the following dialog, enter the repository that you wish to publish to and provide a unique tag-name for the docker image.
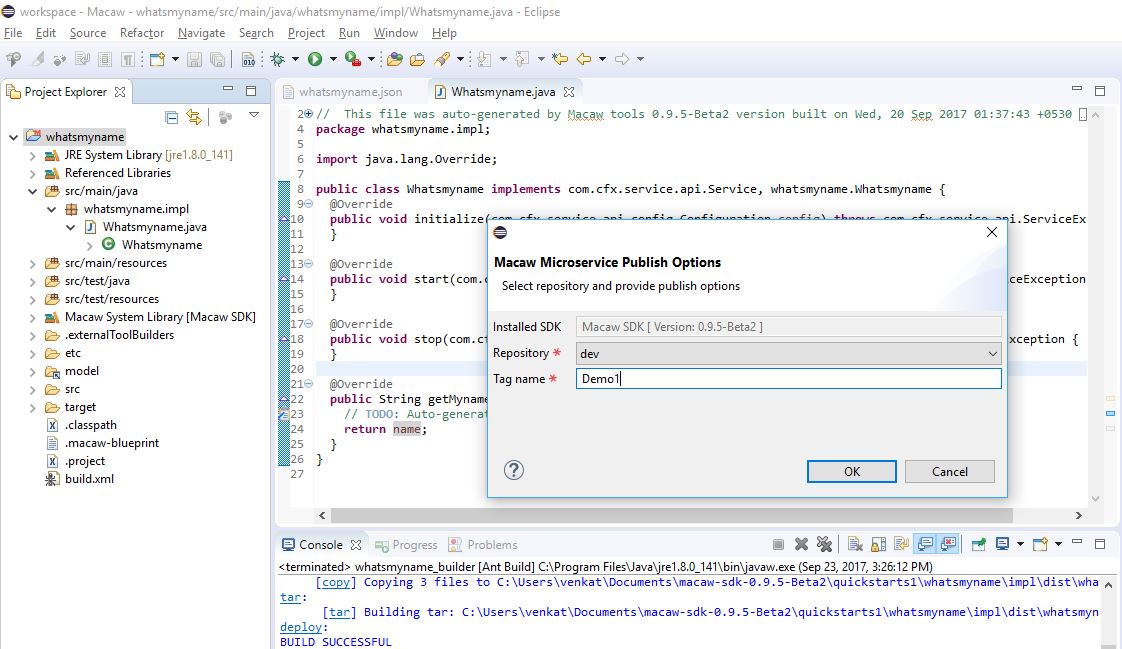
This will trigger the publish activity using the configured default Macaw SDK specified in the preferences (Refer: Configure Macaw Eclipse Toolkit).
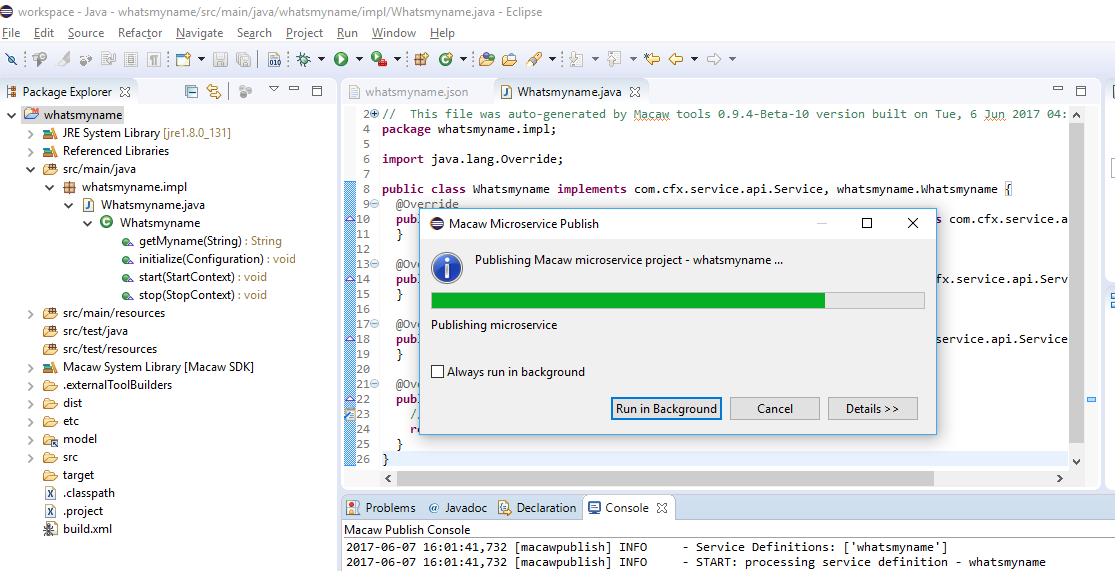
Once the publish activity is complete, you will find a success notification.
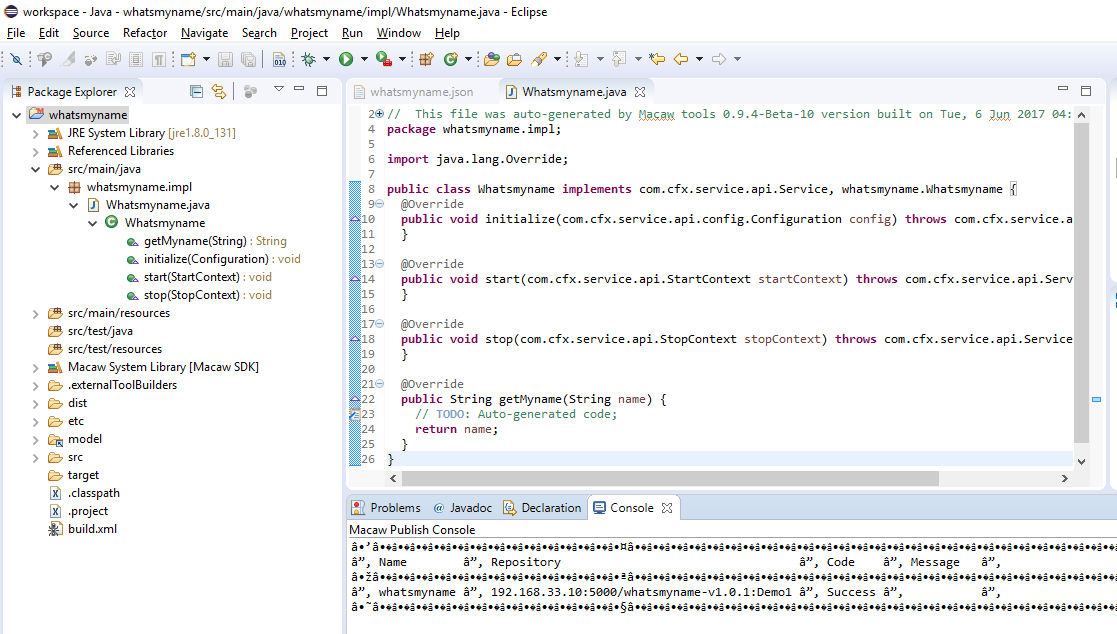
Deploy Published Service from the Macaw Console
-
- Login to the macaw console, Console UI can be accessed at – https://< platform ip >
- Provide the requisite credentials and log in.
- From the dashboard menu, select Service Manager -> Service Catalog
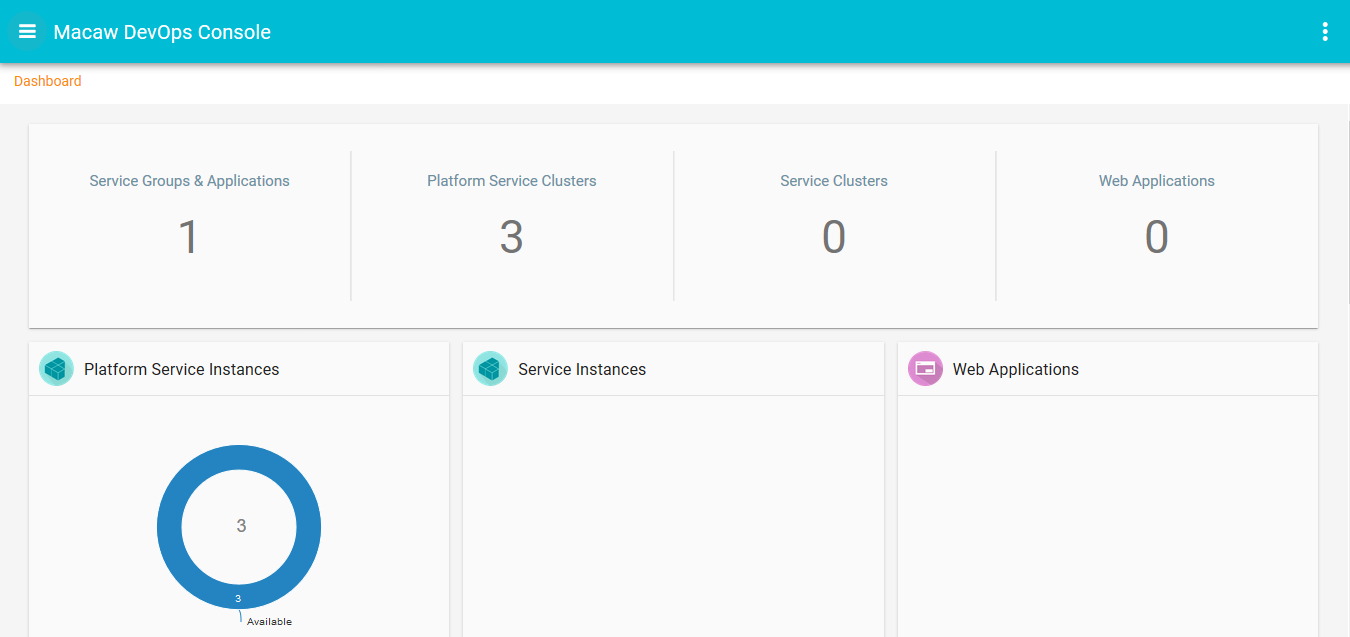
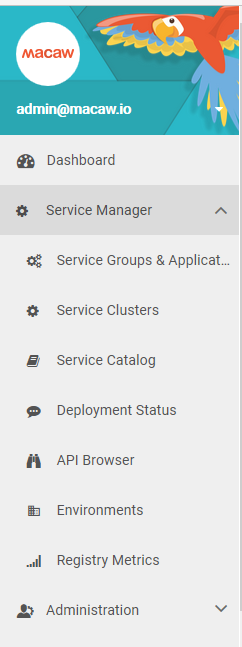
-
- Select the repository that was used to publish and select category “MicroServices
- Find your service and click ‘Deploy’
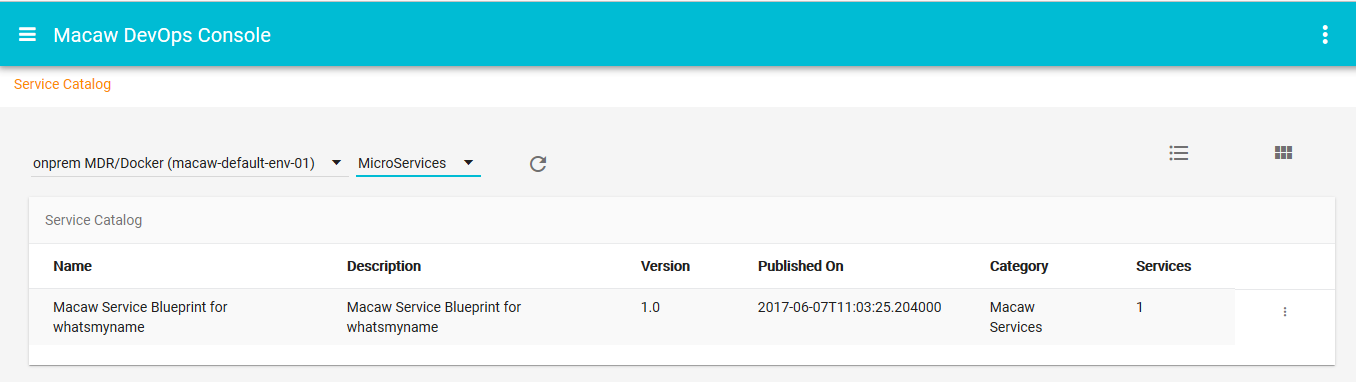
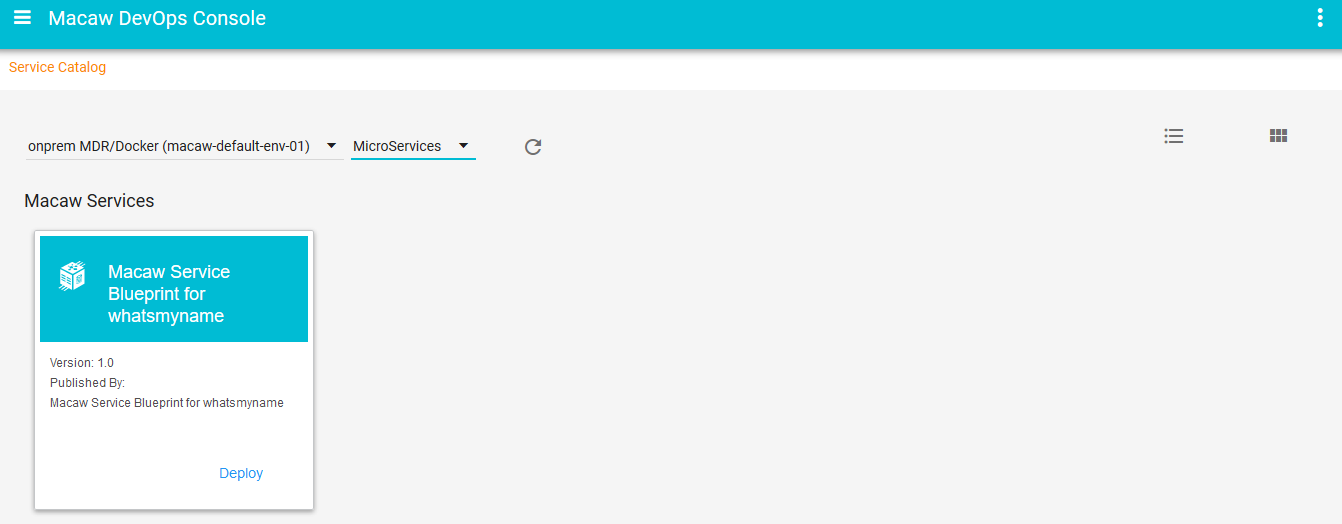
-
- On the ‘Deploy Service’ page, select the number of instances required.
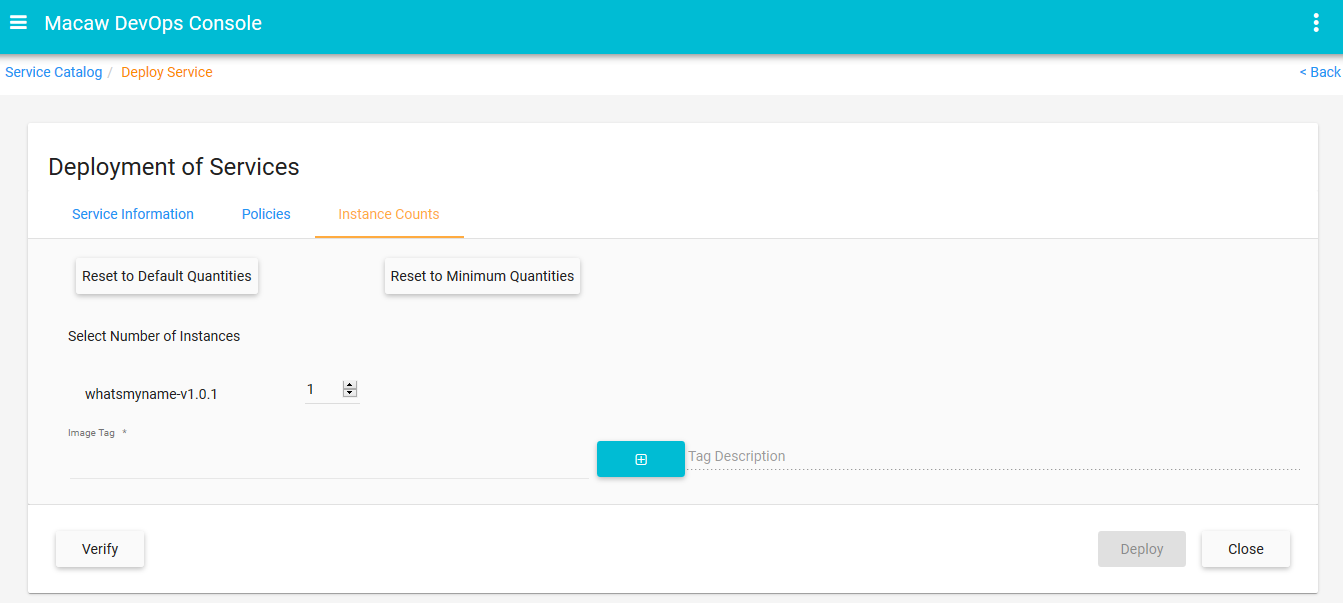
-
- Select Tag and Click on Deploy
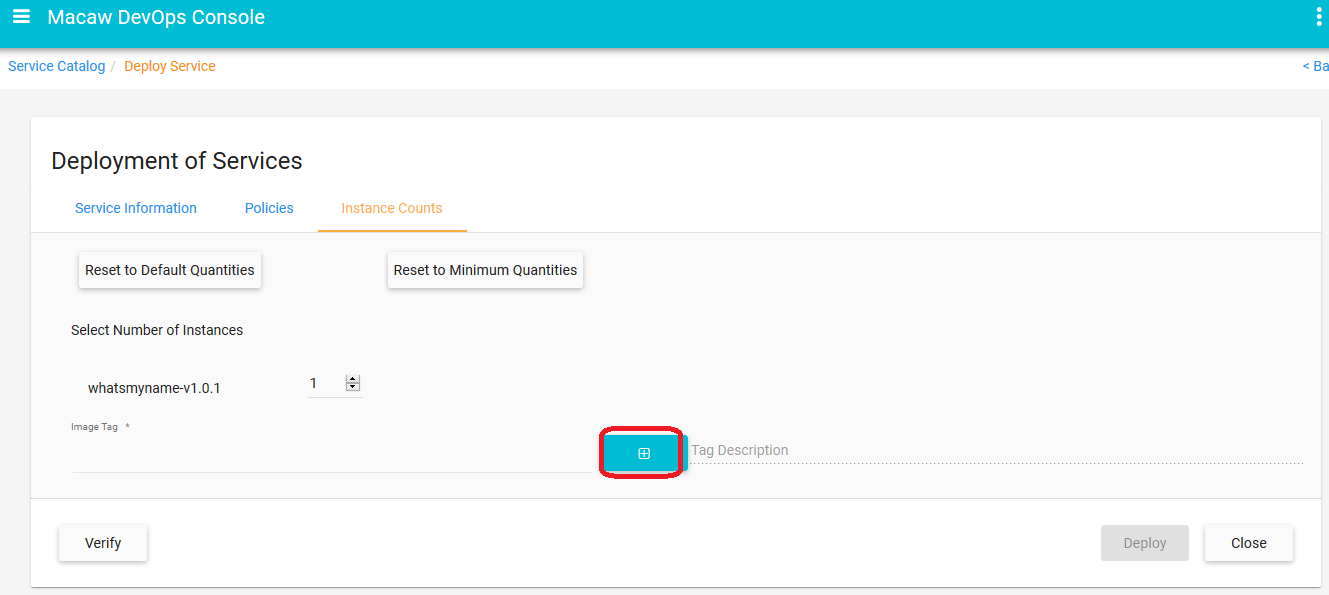
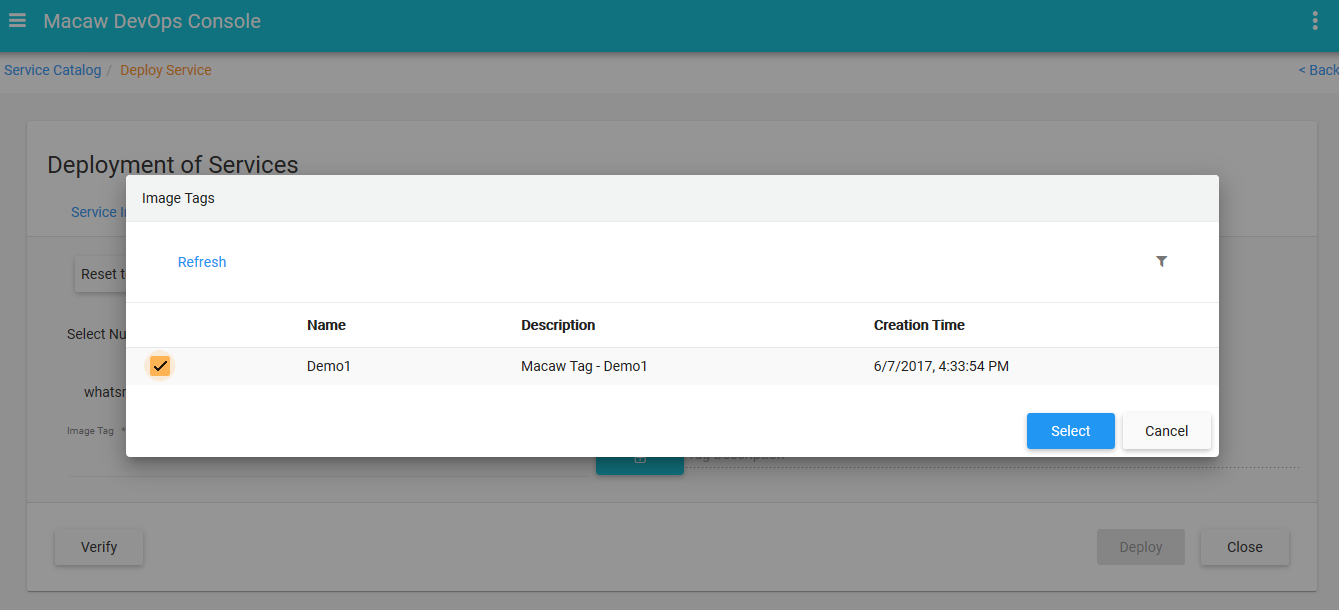
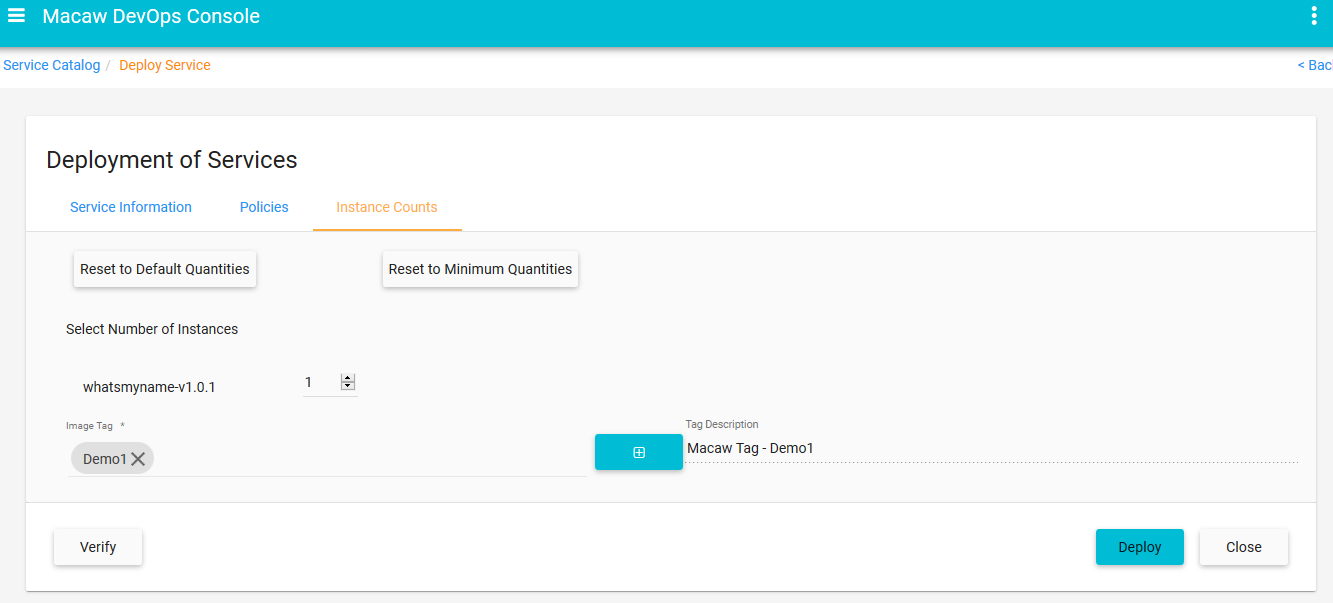
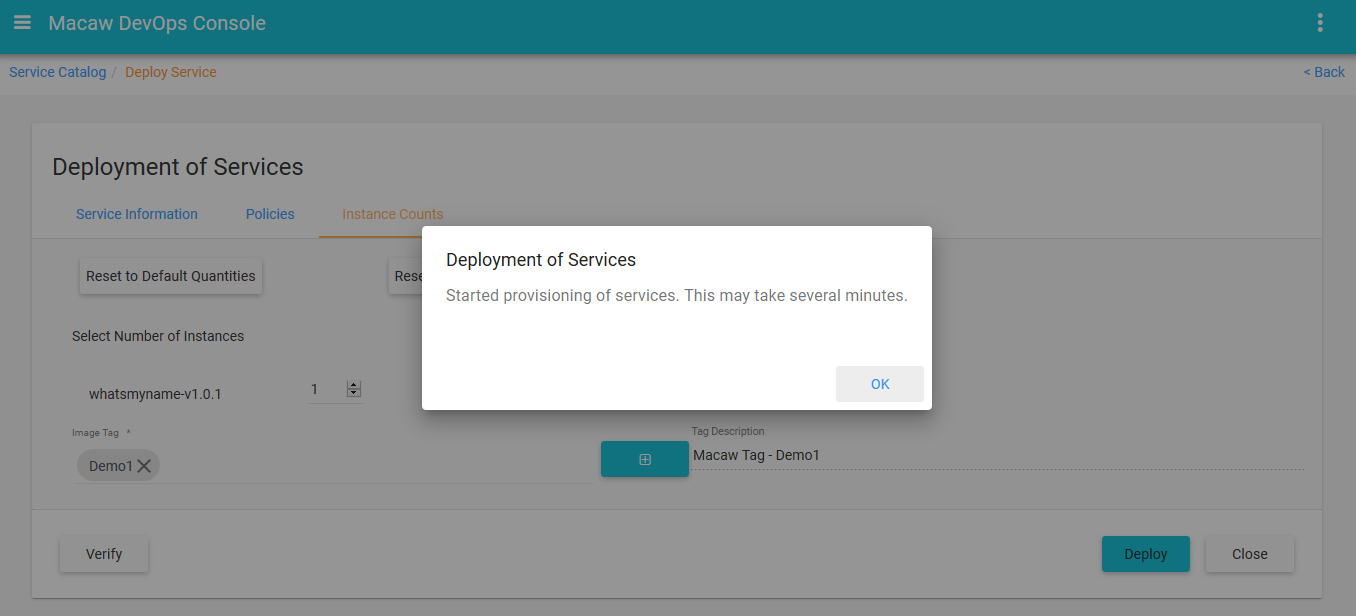
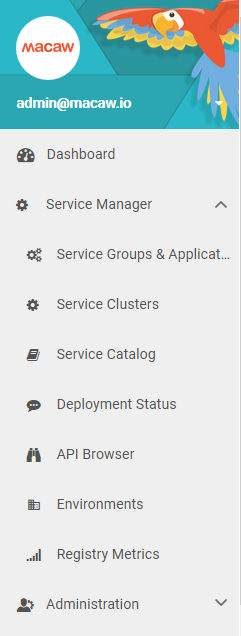
-
- Go to API browser and select service ‘whatsmyname’ in this example and click on ADD

-
- Select RPC and Provide Input Params and click on Post.Check the output of the RPC call in the output pannel.

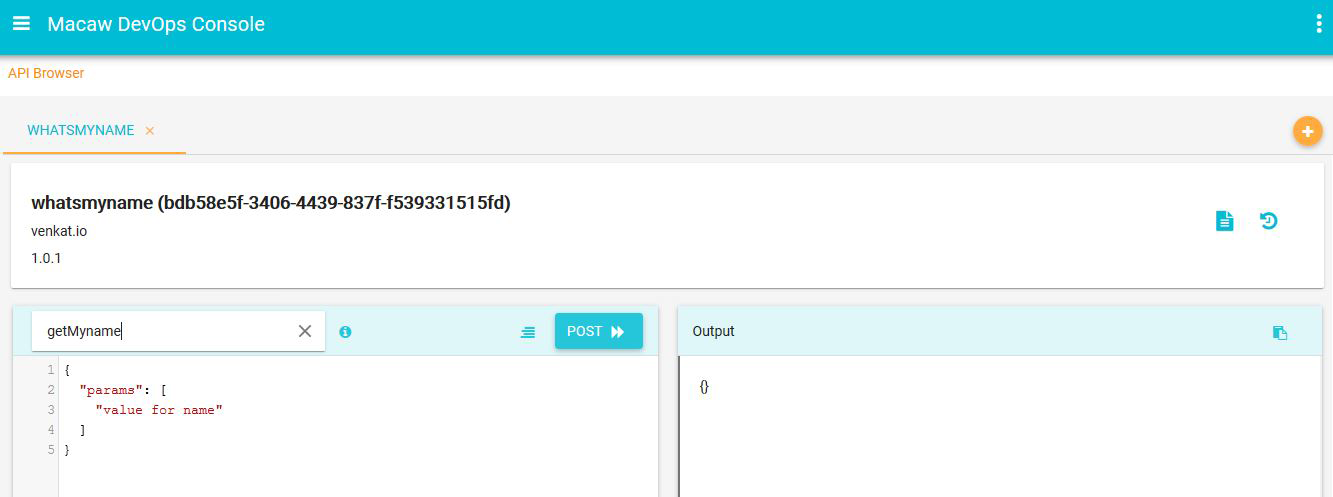

Troubleshooting
This FAQ includes answers to frequently asked questions as well as helpful troubleshooting instructions.
Macaw Installation
PKIX path building failed: sun.security.provider.certpath.SunCertPathBuilderException
This could happen, when enabling explicit certificate trust and the certificate provided by the Service Registry is not trusted (could be a private certificate) or the JDK trust store doest have the CA certificate who signed the service registry certificate. It is suggested to create a trust store with your CA certificate and provide the service the mount point to the CA certificate so that explicit certificate verification can be done successfully. Make sure the environment variables below are to the service during the provisioning. This mount point is automatically provisioned and is a mandatory mount for all services.
cfx.ssl.truststore.location=/In the above, your trust store is located at /opt/cfx-config/certificates/
This can also happen if the trust store you provided does not contain the CA certificate that signed the service registry certificate. Please add your Root/CA certificate to the trust store.
This could also happen when cfx.ssl.truststore.location= is set to empty.
Check the provisioner environment configuration. The default location is /opt/macaw-config/provisioner/
Truststore file /opt/cfx/secrets/truststore/ca_truststore is either missing or is not a regular file
The Truststore file is missing. Make sure it is present on the host and the proper volume is exported to the Service. For the mount point details refer to /opt/macaw-config/provisioner/
Keystore was tampered with, or password was incorrect
If the below exception is seen during the start of the service, mostly the trust store password is wrong. Please check the trust store password.
Invalid keystore format
This would happen if the keystore provided to the services is not in the format that Java understands. Please refer to the below link for more explanation on the keystore format. Also refer to the macaw documentation on how to generate certificates/keystores/
Failed to create trust managers from truststore
This could be due to an empty/zero file given as input to the truststore. Check the trust store file and validate the size and contents.
Macaw Publish
Debug Option
For any issues with macawpublish, the user can enable the debug option which provides additional details on what the tool is expecting/doing. This would help in resolving any issues.
Example:
macawpublish service –tag demo calculator –debug
Error Posting (ConnectionError)
If the macawpublish tool is hitting an error like below, it is mostly that the macawpublish.globals is not right. This file should specify the correct MDR/Docker End point information.
./macawpublish service --tag demo calculator
2017-01-26 09:56:15,150 [macawpublish] INFO - MACAW_SERVICES_HOME is pointing to: /Users/ravjanga/Documents/Refer to the macawpublish tool documentation at: https://www.macaw.io/
MDR Exception : Properties section missing in the MDR definition file
If the system is hitting the error shown, then mostly macawpublish.globals doesn’t have the right repo configuration.
macawpublish service --tag demo calculator
2017-01-26 10:01:06,881 [macawpublish] INFO - MACAW_SERVICES_HOME is pointing to: /Users/ravjanga/Documents/Macaw Publish tool has a concept of repo in the MDR. By default macawpublish sets the repo to dev. If using the tool without any –repo option, then the tool looks for [dev] settings in the macawpublish.globals. If macawpublish.globals has a different repo name like [production], then it can specify the repo name during the launch of the tool like below.
macawpublish –repo production service –tag demo calculator
Token Lacks Read Permissions
If the issue below arises, then the MDR token in the macawpublish globals is wrong.
./macawpublish --repo production verify
2017-01-26 10:09:42,083 [macawpublish] INFO - MACAW_SERVICES_HOME is pointing to: /Users/ravjanga/Documents/Consult the MDR installation/configuration and make sure to have the correct token for read/write. For publishing, read/write permissions are required.
Docker Login Failed
If the macawpublish script says that Docker login failed like below, then mostly the Docker end point is not right. If the endpoint is correct, then mostly the local PC (or build server if configured by remote publishing) is not able to authenticate to the Docker login. This could be due to certificate verification reachability. In this case, debug the issue of not being authenticated to Docker registry separately. Use the regular docker login -u user -p passwd registry command to verify the login. There is a high potential to encounter this issue when using private certificates for registry. Follow the Docker documentation on how to avoid this. It is required to copy the CA.crt which signed the docker registry certificate to the local PC/build machine. On linux machine, this can be done by creating /etc/docker/certs.d/<registry>
./macawpublish --repo production verify
2017-01-26 10:13:50,280 [macawpublish] INFO - MACAW_SERVICES_HOME is pointing to: /Users/ravjanga/Documents/
Missing mandatory directories/files for publishing
If an error like below is encountered while publishing, there could be multiple reasons. Refer to the below explanation.
./macawpublish service --tag demo calculator
2017-01-26 10:57:31,586 [macawpublish] INFO - MACAW_SERVICES_HOME is pointing to: /Users/ravjanga/Documents/The macawpublish relies on certain files like service-info.xml, Dockerfile, and service artifacts which are generated when the service is compiled. The macawpublish does a check on these mandatory files and throws an error like above if any is missing. Make sure to check the below.
- Make sure MACAW_SERVICES_HOME is set properly pointing to the directory where your service folder is existing. The first INFO statment will tell you where the tool is looking for calculator service. If this is not right, set the MACAW_SERVICES_HOME properly. If you cannot set this environment variable, you can provide the full path to the service directory.
- If MACAW_SERVICES_HOME is set correctly, check why the files are missing. Mostly you have not compiled the service yet.
- If compilation is done, may be your service is not generated properly and might be missing some key mandatory files like Dockerfile, service-info.xml
Service distribution artifact missing
If an error similar to what is shown below is encountered, mostly the service is not compiled.
./macawpublish service --tag demo calculator
2017-01-26 11:07:58,207 [macawpublish] INFO - MACAW_SERVICES_HOME is pointing to: /Users/ravjanga/Documents/Tag name already exists with meta data
Every publish to MDR/Docker is uniquely identified by a tag. If a unique tag name is used, the macawpublish script creates the tag definition in MDR and then does the publishing. Let’s say when trying to republish the service with the same tag, macawpublish complains that there is already an existing tag. By design there won’t be an overwrite for the tag definition. However, an option to skip the tag creation and re-use the already existing tag is provided.
./macawpublish service --tag demo calculator
2017-01-26 11:16:03,721 [macawpublish] INFO - MACAW_SERVICES_HOME is pointing to: /Users/ravjanga/Documents/In the above example, you can execute the command like below
macawpublish service –tag demo calculator –skip
X509: Certificate signed by unknown authority
If an issue like below is encountered, mostly the docker environment is not set correctly for the private registry. Follow the standard docker instructions on how to enable docker daemon to talk to the private registry.
./macawpublish service --tag demo calculator --skip
2017-01-26 11:20:36,508 [macawpublish] INFO - MACAW_SERVICES_HOME is pointing to: /Users/ravjanga/Documents/You will need to copy the CA.crt which is used to sign the Docker registry cert to /etc/docker/certs.d/<registry>
Macaw FAQ
Overview
This FAQ section includes answers to frequently asked questions as well as helpful troubleshooting instructions.
Troubleshooting Macaw Installation Errors
PKIX path building failed: sun.security.provider.certpath.SunCertPathBuilderException
This could occur, when you have enabled explicit certificate trust and the certificate provided by the Service Registry is not trusted (could be a private cert) or the JDK trust store doesn’t have the CA cert who signed the service registry certificate. It is suggested to create a trust store with your CA certificate and provide the service the mount point to the CA cert so that explicit cert verification can be done successfully. Make sure the environment variables below are provided to the service during the provisioning. This mount point is automatically provisioned and is a mandatory mount for all services.
cfx.ssl.truststore.location=/opt/cfx/secrets/truststore/ca_truststore
cfx.ssl.truststore.password=macaw1234
Make sure to mount the volume where your trust store is located on the host.

"Mounts": [
    {
        "Source": "/opt/cfx-config/certificates/truststore",
        "Destination": "/opt/cfx/secrets/truststore",
        "Mode": "ro",
        "RW": false,
        "Propagation": "rprivate"
    }
],
In the above, your trust store is located at /opt/cfx-config/certificates/truststore on the host and it mounted to the container as /opt/cfx/secrets/truststore.
This can also happen if the trust store you provided does not contain the CA certificate that signed the service registry certificate. Please add your Root/CA certificate to the trust store.
This could also happen when cfx.ssl.truststore.location= is set to empty.
Check the provisioner environment configuration. The default location is /opt/macaw-config/provisioner/macaw-service-provisioner.properties
Truststore file /opt/cfx/secrets/truststore/ca_truststore is either missing or is not a regular file
The Truststore file is missing. Make sure it is present on the host and the proper volume is exported to the Service. For the mount point details refer to /opt/macaw-config/provisioner/macaw-service-provisioner.properties
Keystore was tampered with, or password was incorrect
If you are seeing the exception below during the start of your service, mostly the trust store password is wrong. Please check the trust store password.
Invalid keystore format
This would happen if the keystore provided to the services is not in the format that Java understands. Please refer to the link below for more explanation on the keystore format. Also refer to the Macaw Documentation on how to generate certificates/keystores/truststores.
Failed to create trust managers from truststore
This could be due to an empty/zero file given as input to the truststore. Check the trust store file and validate the size and contents.
Troubleshooting Macawpublish Tool Errors
Debug Option
For any issues with macawpublish, the user can enable –debug option which provides additional details on what the tool is expecting/doing. This would help in resolving the issues.
Example:
macawpublish service –tag demo calculator –debug
Error Posting (ConnectionError)
If the macawpublish tool is hitting an error like below, it is mostly that the macawpublish.globals is not right. This file should specify the correct MDR/Docker End point information.
./macawpublish service --tag demo calculator
2017-01-26 09:56:15,150 [macawpublish] INFO     - MACAW_SERVICES_HOME is pointing to: /Users/ravjanga/Documents/workspace
2017-01-26 09:56:45,233 [macawpublish] ERROR    - Error Posting (ConnectionError) : HTTPSConnectionPool(host='%3cfqdn', port=443): Max retries exceeded with url: /IP%20of%20MDR%3E:8639/mdr/service/macaw/execModule/mdr?action=getTag&tag=demo (Caused by NewConnectionError('<requests.packages.urllib3.connection.VerifiedHTTPSConnection object at 0x10971d0d0>: Failed to establish a new connection: [Errno 8] nodename nor servname provided, or not known',))
Refer to the macawpublish tool documentation at: https://www.macaw.io/documentation/#macawpublish-tool
MDR Exception : Properties section missing in the MDR definition file
If you are hitting the error below, then mostly your macawpublish.globals doesnt have the right repo configuration.
macawpublish service --tag demo calculator
2017-01-26 10:01:06,881 [macawpublish] INFO     - MACAW_SERVICES_HOME is pointing to: /Users/ravjanga/Documents/workspace

MDR Exception : Properties section (dev) missing in the MDR definition file: /Users/ravjanga/macawpublish.globals
Macaw Publish tool has a concept of repo in the MDR. By default macawpublish sets the repo to dev. If you are using the tool w/o any –repo option, then the tool looks for [dev] settings in the macawpublish.globals. If your macawpublish.globals has a different repo name like [production], then you can specify the repo name during the launch of the tool like below.
macawpublish –repo production service –tag demo calculator
Token doesnt have read permissions
If you hit the issue below, then the MDR token in the macawpublish globals is wrong.
./macawpublish --repo production verify
2017-01-26 10:09:42,083 [macawpublish] INFO     - MACAW_SERVICES_HOME is pointing to: /Users/ravjanga/Documents/workspace
2017-01-26 10:09:42,268 [macawpublish] ERROR    - Error querying tag with name: 1485454182084.
{
  "serviceError": "Token doesnt have read permissions",
  "serviceName": "macaw MDR"
}
Consult your MDR installation/configuration and make sure to have the correct token for read/write. For publishing you need read/write permissions.
Docker Login Failed
If your macawpublish script says that docker login failed like below, then mostly your docker end point is not right. If the endpoint is right, then mostly your local PC (or build server if you configured remote publishing) is not able to authenticate to the docker login. This could be due to certificate verification, reachability. In this case, debug the issue of not being authenticated to docker registry separately. You can use regular docker login -u user -p passwd registry command to verify the login. There is a high potential you might hit this issue when you are using private certs for registry. Follow the docker documentation on how to avoid this. You are reguired to copy the CA.crt which signed the docker registry certificate to the local PC/build machine. On linux machine you can do this by creating /etc/docker/certs.d/<registry>:<port>/ca.crt. The ca.crt is the CA certificate which is used for signing the docker registry certificate.
./macawpublish --repo production verify
2017-01-26 10:13:50,280 [macawpublish] INFO     - MACAW_SERVICES_HOME is pointing to: /Users/ravjanga/Documents/workspace
2017-01-26 10:13:51,077 [macawpublish] INFO     - Launched SSH session to Remote Build Server: 10.95.101.231
Error response from daemon: Get https://cfx-docker-01.engr.cloudfabrix.com:5001/v1/users/: http: server gave HTTP response to HTTPS client
2017-01-26 10:13:51,384 [macawpublish] ERROR    - Docker Login Failed
Verify Operation Failed: Remote Docker Login Failed.Missing mandatory directories/files for publishing
If you encounter an error like below while publishing, there could be multiple reasons. Refer to the following explanation.
./macawpublish service --tag demo calculator
2017-01-26 10:57:31,586 [macawpublish] INFO     - MACAW_SERVICES_HOME is pointing to: /Users/ravjanga/Documents/workspace
2017-01-26 10:57:31,748 [macawpublish] INFO     - Service Definitions: ['calculator']
2017-01-26 10:57:31,749 [macawpublish] INFO     - START: processing service definition - calculator
2017-01-26 10:57:31,749 [macawpublish] ERROR    - Missing path: /Users/ravjanga/Documents/workspace/calculator
2017-01-26 10:57:31,749 [macawpublish] ERROR    - Missing path: /Users/ravjanga/Documents/workspace/calculator/impl
2017-01-26 10:57:31,749 [macawpublish] ERROR    - Missing path: /Users/ravjanga/Documents/workspace/calculator/impl/dist
2017-01-26 10:57:31,749 [macawpublish] ERROR    - Missing path: /Users/ravjanga/Documents/workspace/calculator/impl/src/main/resources/conf/service-info.xml
2017-01-26 10:57:31,749 [macawpublish] ERROR    - Missing path: /Users/ravjanga/Documents/workspace/calculator/impl/etc
2017-01-26 10:57:31,750 [macawpublish] ERROR    - Missing path: /Users/ravjanga/Documents/workspace/calculator/impl/etc/docker
2017-01-26 10:57:31,750 [macawpublish] ERROR    - Missing path: /Users/ravjanga/Documents/workspace/calculator/impl/etc/docker/Dockerfile
The macawpublish relies on certain files like service-info.xml, Dockerfile and service artifacts which are generated when the service is compiled. The macawpublish does a check on these mandatory files and throws an error like above if any is missing. Make sure to check the below.
- Make sure MACAW_SERVICES_HOME is set properly pointing to the directory where your service folder is existing. The first INFO statment will tell you where the tool is looking for calculator service. If this is not right, set the MACAW_SERVICES_HOME properly. If you cannot set this environment variable, you can provide the full path to the service directory.
- If MACAW_SERVICES_HOME is set correctly, check why the files are missing. Mostly you have not compiled the service yet.
- If compilation is done, may be your service is not generated properly and might be missing some key mandatory files like Dockerfile, service-info.xml
Service distribution artifact missing
If you an encounter like below, mostly your service is not compiled.
./macawpublish service --tag demo calculator
2017-01-26 11:07:58,207 [macawpublish] INFO     - MACAW_SERVICES_HOME is pointing to: /Users/ravjanga/Documents/CFXDev/macaw-sdk/quickstarts
2017-01-26 11:07:58,829 [macawpublish] INFO     - Service Definitions: ['calculator']
2017-01-26 11:07:58,829 [macawpublish] INFO     - START: processing service definition - calculator
2017-01-26 11:07:58,839 [macawpublish] ERROR - Missing path: /Users/ravjanga/Documents/CFXDev/macaw-sdk/quickstarts/calculator/impl/dist/calculator-impl.tar.gzTag name already exists with meta data
Every publish to MDR/Docker is unique identified by a tag. If you are using a unique tag name, the macawpublish script creates the tag definition in MDR and then publishes. If you are trying to republish your service with the same tag, macawpublish complains that there is already an existing tag. By design we don’t overwrite the tag definition. Instead, you can provide an option to skip the tag creation and re-use the already existing tag.
./macawpublish service --tag demo calculator
2017-01-26 11:16:03,721 [macawpublish] INFO     - MACAW_SERVICES_HOME is pointing to: /Users/ravjanga/Documents/CFXDev/macaw-sdk/quickstarts
2017-01-26 11:16:03,863 [macawpublish] WARNING  - Tag definition already exists in MDR
2017-01-26 11:16:03,863 [macawpublish] ERROR    - Tag with name: demo already exists with meta data
{
 "time": 1485457999408,
 "labels": [],
 "description": "Macaw Tag - demo",
 "name": "demo"
}.
MDR Exception:

WARNING: Please append --skip at the end to re-use tag definition.
Note: By doing this you might be overwriting the service/webapp meta data for this tag.
In the above example, you can execute the command like below:
macawpublish service –tag demo calculator –skip
x509: certificate signed by unknown authority
If you are encountering an issue like below, mostly your docker environment is not set right for your private registry. Follow the standard docker instructions on how to enable docker daemon to talk to private registry.
./macawpublish service --tag demo calculator --skip
2017-01-26 11:20:36,508 [macawpublish] INFO     - MACAW_SERVICES_HOME is pointing to: /Users/ravjanga/Documents/CFXDev/macaw-sdk/quickstarts
2017-01-26 11:20:36,636 [macawpublish] WARNING  - Tag definition already exists in MDR
2017-01-26 11:20:36,637 [macawpublish] INFO     - Service Definitions: ['calculator']
2017-01-26 11:20:36,637 [macawpublish] INFO     - START: processing service definition - calculator
2017-01-26 11:20:36,643 [macawpublish] INFO     - Service docker build directory: /Users/ravjanga/Documents/CFXDev/macaw-sdk/quickstarts/calculator/impl/dist
Error response from daemon: Get https://cfx-docker-01.engr.cloudfabrix.com:5000/v1/users/: x509: certificate signed by unknown authority
2017-01-26 11:20:37,061 [macawpublish] ERROR    - Error in executing command: Command 'docker login -u='macaw' -p='<redacted>' cfx-docker-01.engr.cloudfabrix.com:5000' returned non-zero exit status 1
2017-01-26 11:20:37,061 [macawpublish] ERROR    - Docker Login Failed
2017-01-26 11:20:37,061 [macawpublish] ERROR    - Docker Login Failed: Aborting further operations for this service..
You will need to copy the CA.crt which is used to sign the docker registry cert to /etc/docker/certs.d/<registry>:<port>/ca.crt
Oracle
Macaw Deployment Guide for Oracle Cloud
Release version: 0.9.4, Release Date: June 26 2017
This document describes the deployment steps for Macaw Platform Software release v.0.9.4 for Oracle Cloud
Introduction
Macaw is a prescriptive Microservices development and governance platform. Macaw provides a comprehensive toolset, many built-in core services, CI/CD integrations, management & operational capabilities and cloud agnostic deployment to accelerate enterprise cloud native journey.
Instructions also available in the link below:
[ https://www.youtube.com/watch?v=NgSb344HY6U&feature=youtu.be ]
Setup Instructions
For Oracle Cloud, Macaw Platform can be deployed from a pre-certified Macaw Oracle Image/binary posted and made available through the Oracle Cloud Market Place.
Prerequisites to deploy Macaw Software Oracle Image
- Pre-Certified Macaw Oracle Image/Binary – CentOS 7.2 is prepackaged on Oracle Cloud
Oracle Cloud – System Requirements
- Memory – Minimum 12GB
- CPU – Minimum 2 Cores
Browser Versions
Macaw Platform supports the following browsers:
- Google Chrome Version 51.0.x or above (Recommended)
- Firefox 47.0.1 or above
- Safari Version 9.1.1
Installation Steps
Macaw Platform Release, Version 0.9.4 is a 64-bit Image that can be hosted on Oracle Cloud and/or other 64 bit Linux OS Platforms.
Step-1.
Please use the appropriate URL for Oracle Cloud.
E.g. https://myaccount.cloud.oracle.com/mycloud/ or as provided by Oracle and as shown in the below screen capture.
After logging into Oracle Cloud, select Oracle Compute Cloud Service as shown in the following screen capture.
Step-2
The above steps will allow you to login to Oracle Cloud Compute location with your registered data-center location; login to Oracle Cloud MyServices using your compute credentials as shown below:
Note: These credentials may or may not be same as your Oracle SSO. Please use the correct credentials to login to your compute cloud MyServices and the domain that was selected by you during your initial setup of Oracle Cloud MyServices.
Step-3
After successful login to Oracle Cloud MyServices, the dashboard is presented to you (or to the end-user) as shown below:
Step-4
Open Service Console of your Compute widget as shown below:
Note: In the MyServices dashboard above, other Oracle Cloud Services are displayed. Elements in the dashboard vary based on your selection of services from the Oracle Cloud Environment. Check your environment and select the Compute platforms MyServices.
Step-5
The selection above will take you to the Oracle Cloud My Services “Compute” dashboard from where you can select and deploy Macaw Oracle Image from the Market Place.
- Select the Marketplace button as show below from the Cloud My Services landing page (shown below).
- Enter “Macaw” text in the market place search field as shown below, to search for Macaw image
The Oracle Market place will search and display Macaw provided binary image. Select the Macaw binary image and create a new instance as shown below:
Select the Macaw binary image and it will prompt to accept (a) Partner terms (b) Oracle terms.
Step-6
Use the instance creation deployment wizard to create a new instance. During the deployment, please select the following configuration:
- 2-OCPU
- 15GB Memory
- Select the instance type and SSH key that you will use to connect to the instance as shown below.
Note: SSH key is the public key that is generated by using ssh-keygen or similar tool from SSH client side.
- Public SSH Key(s) that you would want to use to connect to the new instance
Note: “OPC” user is used as default to deploy and access Macaw Platform Software. An additional user “macaw” is also added for debugging purpose.
- The next step is to select network credentials. You can select static or auto-generated as shown below.
- The next step is to select firewall/security lists. Select ‘default’ firewall rules (which allows all ports for incoming public ip/ports).
Note: Macaw requires specific set of ports (incoming/outgoing) to be enabled; For more details, please refer to Macaw documentation for required list of ports, etc. For proof of concept (PoC), it is suggested to have access to all ports to reduce deployment time.
- The next step is to select the storage
- Once the above steps are completed, deploy the new instance, and wait for Oracle Cloud to create a new instance and assign IP addresses etc.
Select ‘Create’ and let it run for a few minutes and go to the next step.
- Check the dashboard for ‘Ready’ label for the new instance.
Step-7
Once the instance is up and running, the following screen will appear on your compute dashboard:
Note: Please make a note of public and private IP addresses assigned to the user instance.
Step-8
Login to the user instance using any SSH enabled console (e.g. puTTy or any other utility that allows ssh access).
e.g.
ssh macaw@129.144.12.213 <Enter>macaw@129.144.12.213’s password:
In the above example, ssh CLI utility is used to connect to the newly created instance with public IP Address “129.144.12.135”, and using a macaw user (enter the default password macaw)
Step-9.
Once logged to Macaw instance under Oracle Compute Cloud, verify the following from the command prompt using CLI.
[macaw@f249b1 ~] $ sudo python -versionPython 2.7.5
[macaw@f249b1 ~] $ sudo docker -versionDocker version 17.05.0-ce, build 89658be
[macaw@f249b1 ~] $

[macaw@f249b1 ~] $ export JAVA_HOME=/opt/java

[macaw@f249b1 ~] $ export PATH=$PATH:/opt/java/bin

[macaw@f249b1 ~] $ java -version
java version “1.8.0_102” Java(TM) SE Runtime Environment (build 1.8.0_102-b14)
Java HotSpot(TM) 64-Bit Server VM (build 25.102-b14, mixed mode)Note: You can set JAVA_HOME environment variables path in your ~/.bashrc for persistance across reboots.
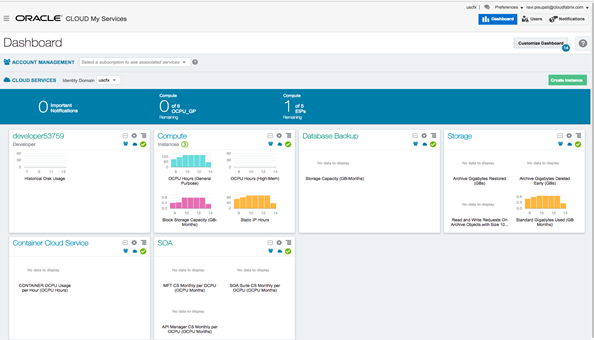
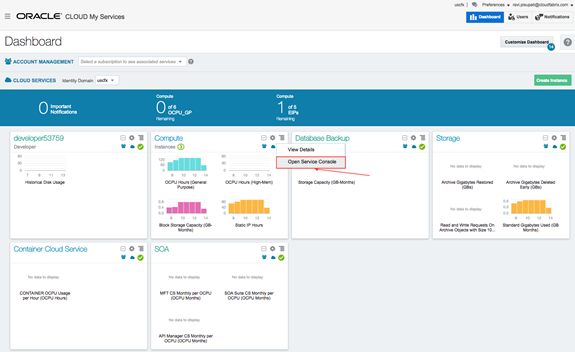
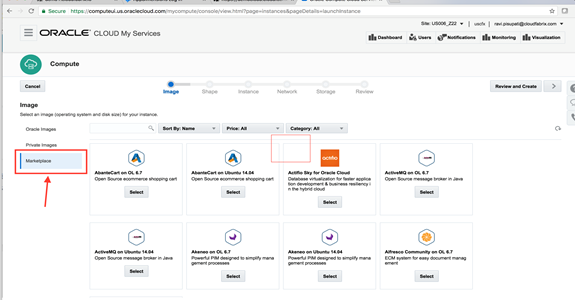
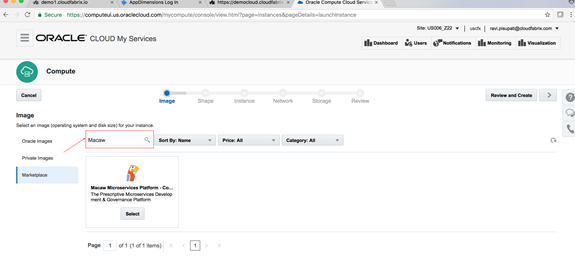
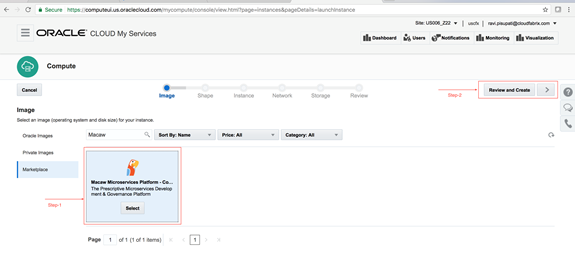
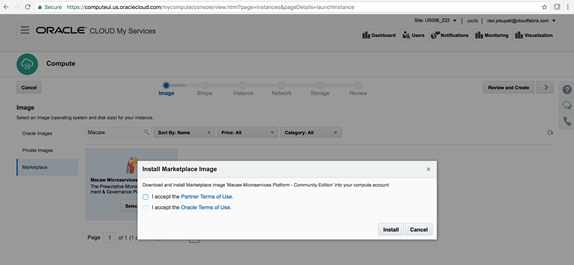


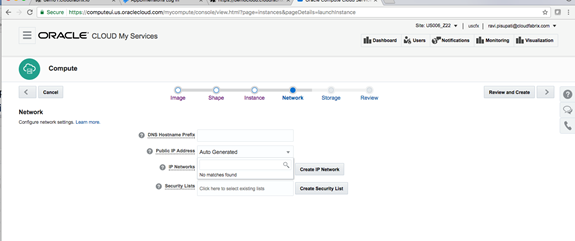
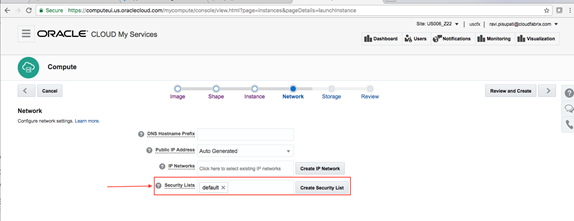
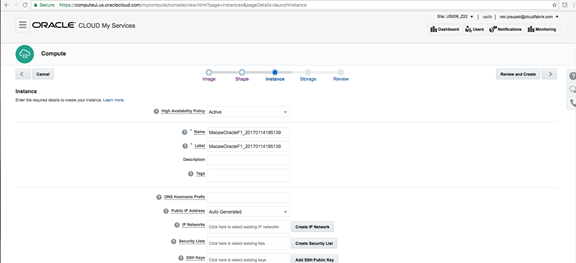
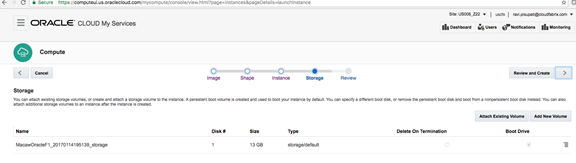
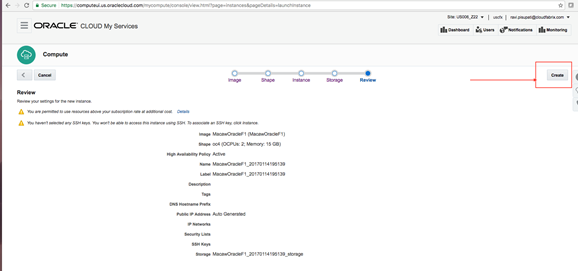
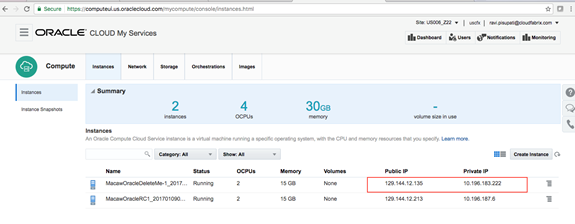
Apache ant is needed for SDK development. Use following steps to install and configure ant:
[macaw@f249b1 ~] $ curl -o /tmp/ant-linux.tar.gz -k http://archive.apache.org/dist/ant/binaries/apache-ant-1.9.7-bin.tar.gz sudo
[macaw@f249b1 ~] $ mkdir -p /opt/ant/
[macaw@f249b1 ~] $ sudo tar xf /tmp/ant-linux.tar.gz -C /opt/ant –strip-components 1 rm -rf /tmp/ant-linux.tar.gz
[macaw@f249b1 ~] $ vi ~/.bashrc and add the below lines.
ANT_HOME=/opt/ant export ANT_HOME export PATH=$ANT_HOME/bin:$PATH
source ~/.bashrc
Platform/Macaw tool Install Instructions
Once logged into Macaw instance under Oracle Cloud, run the following command to deploy Macaw tool/CLI needed for platform deployment.
[macaw@f249b1 ~] $ sudo pip install https://s3.amazonaws.com/macaw-amer/tools/macawcli-0.9.4.tar.gz <Enter>
The above will deploy macaw tool on the instance. Verify the version of the macaw tool version as shown below.
[macaw@f249b1 ~] macaw –version
Version: macawcli-0.9.4
Platform Installation Instructions
Use the certified tag : macaw-v0.9.4
Setup
[macaw@f249b1 ~] macaw setup
FQDN of platform Host [localhost.localdomain]: <private IP>
FQDN or services hosts (separated if more than one): <private IP>
——————————————————————————————–
Do you want NFS setup to be configured? This will require sudo access to the current user.
Please confirm to continue. [yes/no]: yes
——————————————————————————————–
Note: <private IP> is the private IP Address from your instance during macaw instance creation time. You can find your instance private IP address from your compute cloud instance tab (or by selecting your newly deployed instance).
Bootstrap Macaw Infrastructure
[macaw@f249b1 ~] $ macaw infra install --tag macaw-v0.9.4
Bootstrap Macaw Platform
[macaw@f249b1 ~] $ macaw platform dbinit --tag macaw-v0.9.4

[macaw@f249b1 ~] $ macaw platform install --tag macaw-v0.9.4
Bootstrap Macaw on-prem Tools
[macaw@f249b1 ~]$ macaw tools install --tag macaw-v0.9.4 --service macaw-mdr

[macaw@f249b1 ~] $ macaw tools install --tag 2.3.1 --service docker-registry

[macaw@f249b1 ~] $ sudo mkdir -p /etc/docker/certs.d/<private IP>:5000

[macaw@f249b1 ~] $ sudo cp /opt/macaw-config/certificates/ca/ca.crt /etc/docker/certs.d/<private IP>:5000/ca.crt
Note: In the command above, please replace the <private IP> with the correct private IP Address of your instance.
Note: The docker registry tag is pulled from the public docker registry.
Verify the Installation
[macaw@f249b1 ~] $ macaw status
The command above will display the status of the Macaw infrastructure tools. Refer to the documentation or contact support team (support@macaw.io) for help with troubleshooting.
Login to Macaw Console
After the above steps are completed successfully, Macaw Console can be accessed using URL:
https://<public ip>
E.g:
Username : admin@macaw.io
Password: admin
Note: The above credentials are by default and are set during the ‘macaw dbinit’ time. In case if you have used a different user/password during ‘macaw dbibint’ step, use those credentials to login to Macaw Console.
Navigate to Services tab to view running services. Click on any of the service to view its details, or to browse/invoke APIs.
Fig. Macaw Console Login
Following screen is provided to show an example of some of the features that are provided for Macaw Platform
Fig. Microservice Clusters
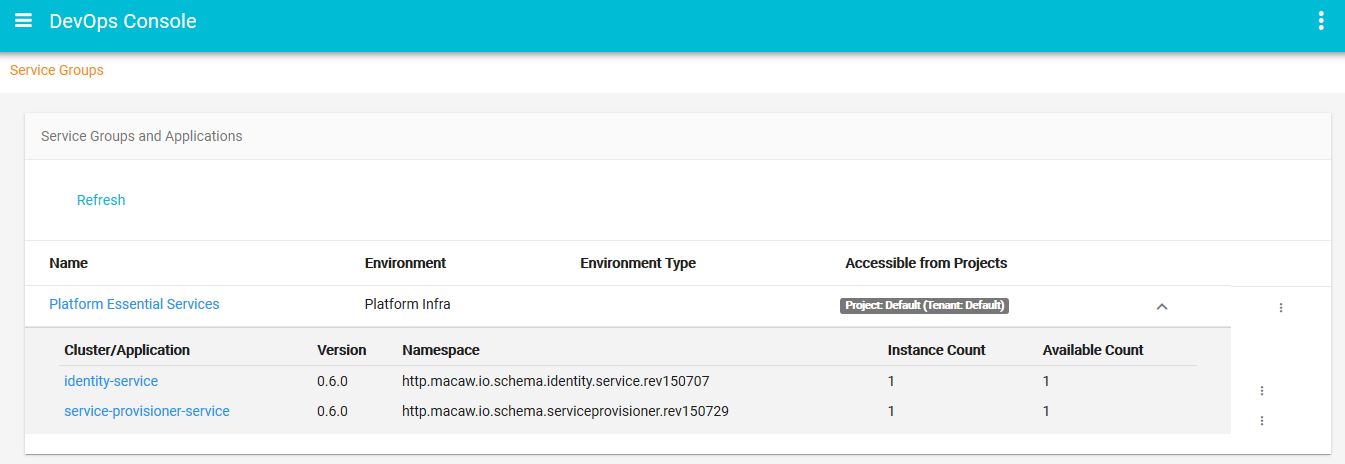
Fig. Microservice Details
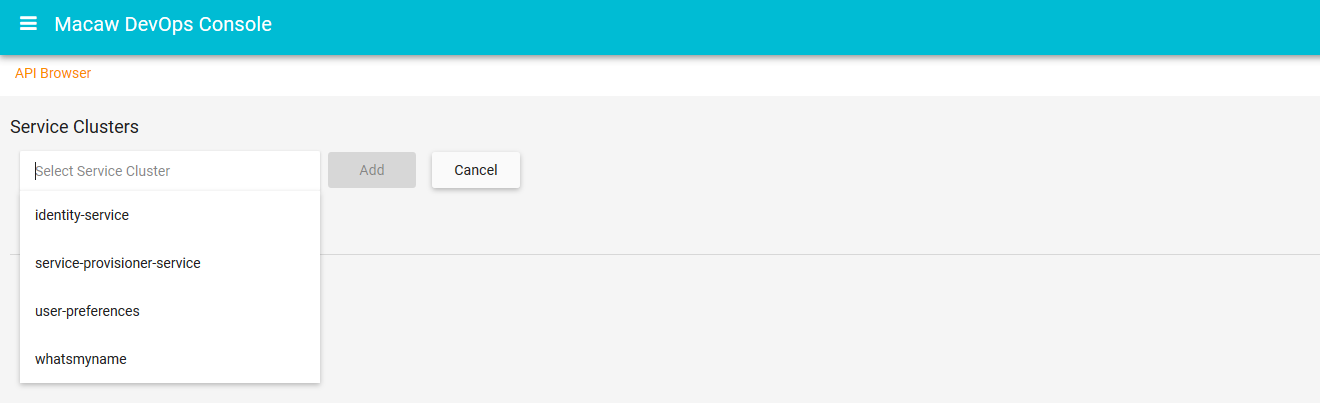
Fig. Microservice API